Mushroom Growing Equipment List: Everything You Need To Get Started
Mushrooms are fascinating. They grow in the dark, need little space, and can be harvested in just a few weeks. For many beginners, mushroom growing feels a bit mysterious. Maybe you’ve seen kits online or heard stories of people growing gourmet varieties at home. What does it really take to start? The truth: you don’t need a laboratory or expensive tools. But you do need the right mushroom growing equipment to be successful, avoid contamination, and get the harvest you want.
If you’re starting out, you might feel confused by the many tools and supplies mentioned in guides and forums. Don’t worry. This article will break down each piece of equipment, explain why it matters, and help you choose what’s best for your setup—whether it’s a small closet grow or a larger hobby project.
You’ll find everything from basic containers to advanced air filters, with tips on what really matters and what can wait until later.
Let’s explore the full list of mushroom growing equipment you need to get started, along with clear explanations, real-world examples, and insider advice that most beginners miss.
1. Growing Containers
Growing containers are the foundation of your mushroom setup. They hold your substrate and spawn, creating a controlled environment for growth.
Types Of Containers
- Plastic Tubs: Clear plastic storage boxes are the most popular choice for home growers. They’re cheap, easy to clean, and let you see what’s happening inside. Choose food-grade tubs with tight-fitting lids, usually between 20 to 60 liters. The size depends on how many mushrooms you want.
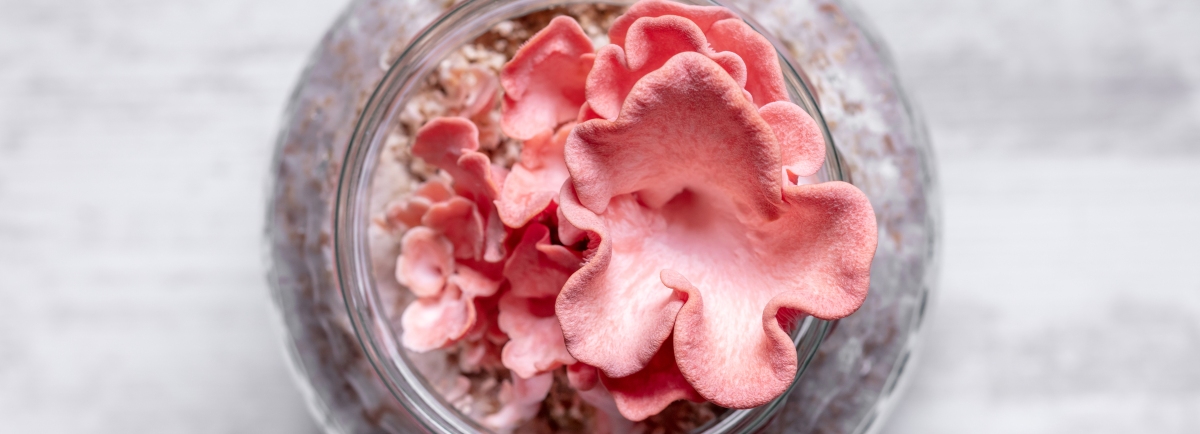
- Glass Jars: Used for growing small batches, especially with the PF Tek method. Mason jars (usually 1/2 pint or 1 pint) are ideal. They’re reusable and withstand high heat, making them perfect for sterilization.
- Grow Bags: Special polypropylene bags with filter patches allow air exchange but block contaminants. They’re used in commercial and home setups and can hold a lot of substrate.
- Buckets: For larger projects, 5-gallon food-grade buckets work well, especially for oyster mushrooms. Drill holes for ventilation and easy harvest.
What To Look For
- Food safety: Never use containers that once held chemicals or non-food items.
- Visibility: Clear containers make it easier to monitor growth.
- Sealability: Lids should fit snugly but not be airtight (mushrooms need some airflow).
- Reusable vs. disposable: Bags are single-use; jars and tubs can be reused.
Pro Tip
Drill small holes (0. 25–0. 5 inches) in your plastic tubs for better airflow. Cover the holes with micropore tape to reduce contamination risk.
2. Substrate Preparation Equipment
The substrate is the material where mushrooms grow and get their nutrients. Preparing it right is key for a good yield.
Main Equipment
- Mixing Bowls or Large Buckets: Needed to mix substrate ingredients like straw, coco coir, vermiculite, or sawdust. Choose sizes that match your batch size.
- Measuring Tools: Accurate digital scales (up to 5kg/10lbs) ensure the right ratios. Also, measuring cups and spoons for smaller ingredients like gypsum or supplements.
- Gloves: Disposable nitrile gloves keep your hands clean and reduce contamination.
- Spray Bottle: For misting water onto the substrate. Use one that can be adjusted from fine mist to stream.
- Heat Source: For pasteurization, you’ll need either a large pot (for boiling water bath) or a pressure cooker (for sterilization).
Substrate Pasteurization Vs. Sterilization
- Pasteurization kills most but not all microbes. Suitable for oyster mushrooms and some simple setups.
- Sterilization kills everything. Needed for gourmet and medicinal mushrooms or when using grains.
Example
If using straw as substrate: chop it into 1–3 inch pieces, soak in hot water (160–170°F or 70–77°C) for 1–2 hours. Use a thermometer to check the temperature.
Non-obvious Insight
Don’t use garden soil or compost for substrate unless you know how to sterilize it fully. These often carry contaminants that ruin mushroom projects.
Credit: grocycle.com
3. Sterilization And Pasteurization Tools
Keeping your substrate and tools clean is the biggest challenge in mushroom growing. Contaminants like mold and bacteria can wipe out your crop.
Essential Tools
- Pressure Cooker or Autoclave: The most important tool for sterilizing grain spawn and some substrates. It should reach 15 PSI (pounds per square inch) and hold at least 6 quarts/liters.
- Large Cooking Pot: For pasteurizing bulk substrates like straw or coir if you’re not using grains.
- Thermometer: A digital or analog thermometer checks water and substrate temperatures.
- Strainer or Colander: Useful for draining water after pasteurization.
- Aluminum Foil: Wrap jar lids or cover containers during sterilization to keep out water and contaminants.
- Tongs: For handling hot jars or bags safely.
Why This Matters
If you skip sterilization, you’ll likely lose your first batch to mold or bacteria. Even small mistakes—like not sealing jars well—can cause problems.
Practical Example
A 23-quart pressure cooker can sterilize 8–12 jars at once, saving time in big projects.
4. Inoculation Tools
Inoculation means adding mushroom spawn or spores to your substrate. This step must be as clean as possible.
Key Equipment
- Syringes with Needles: Used for liquid culture or spore solution. Sterile syringes (10–60ml) are best.
- Scalpel or Flame Sterilized Knife: For transferring mushroom tissue or grain spawn. Stainless steel scalpels are easy to sterilize.
- Alcohol Lamp or Butane Lighter: For flame sterilizing your scalpel or needle between uses.
- Isopropyl Alcohol (70–99%): For cleaning surfaces, tools, and gloves.
- Face Mask: Prevents you from breathing bacteria or mold onto your substrate.
- Disposable Gloves: Reduces the risk of contamination from your hands.
Advanced Option
A laminar flow hood creates a stream of clean air, making inoculation much safer. It’s expensive but useful for serious growers.
Pro Insight
Don’t skip the mask—even healthy people can spread bacteria. Also, always flame your needle or scalpel until it glows red.
5. Incubation Equipment
After inoculation, your substrate needs a warm, dark place to grow mycelium (the “roots” of mushrooms).
Basic Needs
- Incubation Chamber: This can be a closet, a large cardboard box, or a spare room. The key is stable temperature.
- Thermometer and Hygrometer: Digital units are best. Mycelium grows fastest between 70–78°F (21–26°C) and 60–80% humidity.
- Heating Mat or Seedling Heat Pad: Useful in cool climates. Choose one with a thermostat to prevent overheating.
- Racks or Shelves: Keep containers off the floor for better air circulation.
- Blackout Material or Towel: To block light if your space is too bright.
Data Table: Ideal Incubation Conditions
| Parameter | Ideal Range | Notes |
|---|---|---|
| Temperature | 70–78°F (21–26°C) | Too hot can cause contamination |
| Humidity | 60–80% | Mycelium prefers moist air |
| Light | Darkness or dim light | Mycelium doesn’t need bright light |
Common Mistake
Don’t use a heating pad without a thermostat. Mycelium can die if it gets too hot.
6. Fruiting Chamber Setup
When mycelium has colonized the substrate, it needs new conditions to produce mushrooms: more humidity, some fresh air, and indirect light.
Fruiting Chamber Types
- Shotgun Fruiting Chamber (SGFC): Made from a clear plastic tub with holes drilled on all sides, including the lid and bottom. Place the tub on blocks above a tray of water or perlite for humidity.
- Monotub: A larger tub with fewer holes, stuffed with polyfill or covered with micropore tape for air exchange. Suitable for bulk substrate methods.
- Grow Tents: Small tents (like those for hydroponics) with zippers and ports for air and humidity controls. Good for advanced growers.
- Mini Greenhouses: Plastic shelving units covered with clear plastic. Used with humidifiers and fans for large projects.
Accessories
- Perlite: A volcanic mineral that holds water and releases humidity. Line the bottom of your chamber with 2–4 inches.
- Small Fans: For gentle airflow (never aim directly at mushrooms).
- Thermo-Hygrometer: To measure temperature and humidity inside the chamber.
Comparison Table: Fruiting Chambers
| Type | Best For | Pros | Cons |
|---|---|---|---|
| SGFC | Beginners, small batches | Cheap, easy to build | Manual misting needed |
| Monotub | Bulk grows | Low maintenance | Needs careful setup |
| Grow Tent | Advanced, large projects | Automated control | Expensive |
What Beginners Miss
Humidity is key during fruiting. If your chamber is too dry, mushrooms will stay small or stop growing. Misting and fanning (3–4 times a day) helps, unless you have automation.
7. Humidity And Airflow Control
Mushrooms need high humidity (80–95%) and fresh air to form healthy caps and stems.
Tools You Need
- Manual Spray Bottle: For misting water inside the chamber.
- Ultrasonic Humidifier: Automatically adds moisture. Set on a timer for best results.
- Perlite Layer: Passive humidity. Cheap and reliable for small setups.
- Fans: Small computer fans or USB fans to keep air fresh. Always indirect airflow.
- Timers: For automating humidifier and fan operation.
- Hygrometer: Digital models with memory functions help track daily conditions.
Automation Vs. Manual
- Manual control: Cheaper, more hands-on, but requires frequent attention.
- Automated systems: Cost more but save time. Useful for bigger or multiple grows.
Pro Tip
Never let water pool at the bottom of your chamber. Standing water breeds bacteria and mold.
8. Lighting
Mushrooms don’t need sunlight like plants, but they do need some light to trigger fruiting and guide growth.
Lighting Options
- Natural Light: Indirect sunlight from a window is often enough.
- LED Strip Lights: Use cool white (5000–6500K) strips or bulbs. 12 hours on, 12 hours off is perfect.
- Fluorescent Lights: Also work well, but use energy-efficient models.
- Timers: Automate your lighting schedule for consistency.
What To Avoid
- Strong direct sunlight. This dries out your chamber and overheats mushrooms.
- Colored lights. Blue or red grow lights are not necessary for mushrooms.
Example
An 8-watt LED strip placed above your chamber, set on a cheap timer, will trigger healthy fruiting.
9. Monitoring Tools
Tracking conditions helps you catch problems early and improve results.
Recommended Tools
- Digital Thermo-Hygrometer: Measures temperature and humidity. Choose one with a probe for more accurate readings.
- Data Logger: Stores hourly data. Useful if you want to improve yields over time.
- Notebook or Spreadsheet: Record your daily readings and any changes.
- Camera or Smartphone: Take photos to monitor progress and spot issues.
Non-obvious Insight
Small temperature swings (68–75°F) are usually fine. But large drops or spikes can slow growth or cause contamination.
10. Harvesting Tools
When your mushrooms are ready, you’ll need a few simple tools to harvest cleanly and avoid damaging the next flush.
Tools To Have
- Sharp Knife or Scissors: Cut mushrooms at the base. Avoid pulling, which can damage the substrate.
- Disposable Gloves: Keeps hands clean and reduces contamination of future flushes.
- Baskets or Trays: For collecting mushrooms. Avoid plastic bags—they trap moisture and can cause spoilage.
- Brush: A small soft-bristle brush removes substrate or debris from mushroom caps.
Pro Tip
Harvest mushrooms just as the cap opens but before the edges flatten completely. This is when flavor and texture are best.

Credit: www.amazon.com
11. Cleaning And Disinfection Supplies
A clean workspace is the best defense against contamination.
Supplies You’ll Need
- Isopropyl Alcohol (70–99%): For wiping surfaces, tools, and gloves.
- Bleach (5–10%): For deep cleaning shelves, floors, and containers.
- Paper Towels or Disposable Cloths: For wiping down surfaces and spills.
- Hand Soap: Always wash hands before handling any equipment.
- Trash Bags: For safe disposal of contaminated substrate or failed grows.
Example
Before each step (substrate prep, inoculation, harvest), wipe all surfaces with alcohol or bleach solution. Change gloves often.
12. Spawn And Culture Storage
If you plan to grow mushrooms regularly, you’ll need to store spores, liquid culture, or grain spawn safely.
Equipment For Storage
- Refrigerator: Dedicated mini-fridges work well. Keep cultures at 35–45°F (2–7°C).
- Sterile Jars or Bags: For storing spawn or culture long-term.
- Parafilm or Micropore Tape: Seals culture plates and jars to prevent contamination but allows some gas exchange.
- Labeling Supplies: Permanent markers and labels to track species, dates, and strains.
Pro Insight
Always label every culture or jar with date and variety. It’s easy to mix them up after a few weeks.
13. Safety And Personal Protection
While mushroom growing is mostly safe, some steps can carry risks.
Essential Gear
- Disposable Nitrile or Latex Gloves: For all sterile steps.
- Face Mask or Respirator: Especially important when handling dry substrate, spores, or during cleaning.
- Protective Eyewear: Optional, but useful when using chemicals or cleaning.
- Apron or Lab Coat: Keeps your clothes clean and avoids spreading contaminants.
Health Note
Some people are sensitive to mushroom spores, especially oyster mushrooms. Wear a mask during harvest if you notice sneezing or irritation.
14. Optional And Advanced Equipment
As you gain experience, you may want to try bigger projects or harder-to-grow mushrooms. Some advanced equipment can help.
Advanced Tools
- Laminar Flow Hood: Creates a sterile airflow for advanced cloning and culture work. Not needed for beginners, but essential for serious hobbyists.
- Glove Box (Still Air Box): A sealed box with glove holes for sterile transfer. Cheap and useful for spore work.
- Grain Mill or Blender: For preparing custom grain substrates or breaking up spawn.
- PH Meter: If you’re mixing your own substrate, pH should be 5.5–7.0.
- CO2 Meter: Useful for dialling in fruiting conditions in large setups.
- Humidity Controller: Automatically turns humidifier on/off.
Example
A DIY still air box can be made from a clear storage tub with two arm holes—great for spore syringe work at home.
15. Where To Buy Mushroom Growing Equipment
Finding good equipment can be a challenge, especially in smaller towns or countries.
Options
- Local Hardware Stores: Buckets, tubs, jars, and some cleaning supplies.
- Online Retailers: Amazon, eBay, and specialty mushroom supply stores have everything from spawn bags to humidifiers.
- Hydroponics Shops: Good for grow tents, lighting, and environmental controls.
- Farm Supply Stores: Often carry large bags of straw, coir, and other bulk materials.
- Laboratory Suppliers: For flow hoods, petri dishes, and advanced tools.
What Matters Most
- Food-grade materials: Always choose containers and tools safe for food use.
- Sterility: Only buy pre-sterilized spawn or culture from trusted vendors.
- Price vs. Quality: Don’t buy the cheapest pressure cooker or humidifier. Reliability pays off.
External Resource
For more details on mushroom cultivation, see the comprehensive guide at Wikipedia: Mushroom Cultivation.
16. Example Setups For Beginners
It’s easy to get overwhelmed by options. Here are two sample equipment lists for beginners.
Small Space, Low Budget (pf Tek With Jars)
- 12 half-pint glass jars
- Mixing bowl, measuring cups
- Coco coir, vermiculite, brown rice flour
- Pressure cooker (6+ quart)
- Alcohol, gloves, mask, spray bottle
- Plastic tub (for fruiting chamber) + perlite
- Knife, tray, notebook
Bulk Grow (monotub Method)
- 66-liter clear plastic tub (monotub)
- Large mixing bucket, measuring tools
- Coco coir, vermiculite, gypsum, grain spawn
- 23-quart pressure cooker
- Scalpel, alcohol lamp, gloves, mask
- Perlite, digital thermo-hygrometer
- LED strip light, timer, small fan
Both setups can produce several pounds of mushrooms per month, with costs from $50 to $200 depending on equipment.
17. Common Mistakes When Choosing Equipment
Avoid these beginner errors to save money and frustration.
- Buying non-food-grade containers: Chemicals from cheap plastics can leach into your substrate.
- Skipping the pressure cooker: Boiling water alone doesn’t sterilize grain spawn.
- Using garden soil or compost: These are packed with contaminants.
- Over-complicating lighting: Mushrooms need simple light, not full-spectrum grow lights.
- Neglecting humidity control: Most failed grows are too dry or too wet.
- Forgetting to label jars: Mixed-up strains or unknown dates cause confusion later.
18. Real-world Tips From Experienced Growers
These ideas can save you time and improve your harvest.
- Start small and scale up: Master one method before trying others.
- Document your process: Take notes and photos of every step. Patterns emerge over time.
- Don’t reuse old contaminated substrate: Always discard and clean thoroughly.
- Join a local or online mushroom group: Forums and Facebook groups are full of helpful advice.
- Expect a learning curve: It’s normal to lose a batch or two at first. Cleanliness is more important than fancy tools.

Credit: growace.com
19. Estimated Startup Costs
How much does it cost to get started? Here’s a rough breakdown for a home grower.
| Item | Low Cost | High Cost | Notes |
|---|---|---|---|
| Pressure Cooker | $60 | $150 | Essential for sterilization |
| Plastic Tubs/Jars | $10 | $40 | Reusable |
| Substrate Ingredients | $15 | $40 | Bulk is cheaper |
| Spawn or Culture | $10 | $30 | Buy from trusted source |
| Cleaning Supplies | $10 | $25 | Alcohol, bleach, gloves |
| Lighting, Fan, Humidity | $20 | $80 | Optional automation |
| Other Tools | $10 | $40 | Knives, thermometer |
| Total Estimate | $135 | $405 | Depends on choices |
You can start with less if you reuse kitchen tools or do small batches.
20. Equipment Maintenance And Cleaning
Keeping your equipment clean is not just a one-time job. It’s a habit that protects every future grow.
- Pressure cooker: Wash and dry after every use. Check gasket and vent regularly.
- Plastic tubs: Rinse with hot water, wipe with alcohol or bleach.
- Jars and tools: Sterilize between every use, especially after contamination.
- Thermo-hygrometers and fans: Dust regularly, wipe with alcohol if possible.
- Humidifiers: Use distilled water and clean weekly to prevent mold.
If you notice any green, black, or foul-smelling spots, stop and clean everything before starting a new batch.
Frequently Asked Questions
What Is The Minimum Equipment Needed To Grow Mushrooms At Home?
For a simple setup, you need sterile jars or bags, a pressure cooker, clean substrate ingredients, a fruiting chamber (like a plastic tub with perlite), and basic cleaning tools like alcohol and gloves. Lighting can be natural. This lets you grow common types like oyster or button mushrooms.
Can I Reuse Mushroom Growing Containers And Tools?
Yes, most containers (plastic tubs, glass jars) can be cleaned and reused many times. Always wash thoroughly and sterilize before each new batch. Disposable items like grow bags or gloves should not be reused.
Do I Need A Laminar Flow Hood To Grow Mushrooms?
No, most beginners do not need a laminar flow hood. A still air box or clean room is enough for basic work. Flow hoods are for advanced growers making their own cultures or working with hard-to-grow species.
What Is The Best Substrate For Beginners?
Coco coir and vermiculite are very popular because they’re easy to prepare and hard to contaminate. Straw is good for oyster mushrooms, but needs careful pasteurization.
How Can I Prevent Contamination In My Mushroom Grow?
Work as cleanly as possible: sterilize everything, wear gloves and masks, clean your workspace, and avoid drafts when inoculating. If you see green, black, or fuzzy spots, remove and discard contaminated substrate immediately.
Growing mushrooms at home is a rewarding hobby that doesn’t require a science degree or a huge investment. With the right mushroom growing equipment, good hygiene, and patience, you can enjoy fresh, gourmet mushrooms all year round. Start small, learn as you go, and soon you’ll be harvesting your own delicious crops.