
Maitake Growing Guide: Cultivating The Dancing Mushroom At Home
Maitake, also known as the dancing mushroom or Grifola frondosa, holds a special place in both kitchens and traditional medicine. Its feathery, layered appearance and rich, earthy flavor make it a favorite among mushroom lovers. But for many, maitake seems mysterious—something found only in deep forests or at specialty markets. The truth is, growing maitake at home is possible, rewarding, and within reach for beginners and enthusiasts alike.
The journey to cultivate maitake opens new possibilities. You can enjoy fresh, organic mushrooms, understand their fascinating growth process, and even share your harvest with friends and family. This guide will walk you through every step, from understanding maitake’s unique needs to harvesting your first cluster.
Along the way, you’ll discover practical tips, avoid common mistakes, and gain insights even experienced growers sometimes miss. Let’s bring the dancing mushroom into your home garden.
What Makes Maitake Special?
Maitake’s reputation is built on more than its taste. It’s called the dancing mushroom because, according to Japanese legend, people danced with joy upon finding it. But the excitement goes beyond folklore.
- Nutritional powerhouse: Maitake contains vitamins B and D, copper, potassium, and beta-glucans. These nutrients support the immune system and general health. Beta-glucans, in particular, are known for their immune-boosting effects and are the main reason maitake is used in supplements and traditional remedies. The fiber in maitake also helps promote gut health and may help balance cholesterol.
- Unique growth pattern: Unlike button mushrooms or shiitake, maitake grows in large, frond-like clusters resembling a ruffled hen or a bouquet of brown-gray petals. Each cluster can weigh several pounds in nature, and the overlapping caps create a dramatic, almost floral look. This unusual pattern makes maitake a striking addition to any mushroom garden.
- Culinary versatility: Its rich umami flavor fits stir-fries, soups, and grilled dishes. Some chefs say maitake adds more depth to broths than shiitake, and it’s a popular choice in vegetarian and vegan dishes because it brings a meaty quality without animal products.
Maitake also presents unique challenges for growers. Unlike mushrooms that thrive on straw or compost, maitake prefers hardwood substrates and requires patience. Its slow growth often discourages new growers, but patience pays off—maitake clusters are among the most satisfying mushrooms to harvest. There’s also a deeper connection to tradition: in Japan, foraging maitake is a seasonal event, and cultivating it at home lets you experience part of this cultural heritage.
Extra insight: Maitake’s flavor and texture are best just after harvest. Many people who taste home-grown maitake for the first time are surprised by how much better it is than store-bought, which is often older and less aromatic.
Understanding Maitake’s Life Cycle
Before you begin, it’s important to grasp the maitake mushroom life cycle. Each stage influences how you prepare, inoculate, and care for your crop.
- Spore germination: Maitake spores need the right combination of moisture, temperature, and substrate to sprout. Unlike some faster-growing mushrooms, maitake spores take longer to germinate, and the process is often slower in cooler temperatures. It’s not unusual for germination to take several weeks.
- Mycelium growth: After germination, the white, thread-like mycelium spreads through the substrate, feeding and preparing for fruiting. Maitake mycelium grows more slowly than oyster or lion’s mane mushrooms. The mycelium is sensitive to changes in humidity and temperature, so stable conditions are important at this stage.
- Primordia formation: Small knots (primordia) appear—these are the beginnings of mushrooms. The primordia often look like tiny bumps or nodules on the substrate’s surface. Sometimes, they can be hard to spot at first, especially for beginners who expect them to look like miniature mushrooms right away.
- Cluster development: Primordia grow into the large, layered clusters maitake is known for. This stage is exciting, as you’ll see the clusters expand day by day. During this phase, the right balance of humidity, air exchange, and light is crucial for healthy growth.
- Spore release: Mature mushrooms release spores, starting the cycle again. If you let maitake clusters mature fully, you may see a fine, powdery layer of spores. While this is natural, harvesting before heavy spore drop is best for taste and texture.
Understanding these stages helps you anticipate the needs of your mushrooms. For example, maitake’s slow mycelium growth means patience is essential—some steps take weeks or even months.
Extra tip: Many new growers panic if they don’t see quick changes in the bags or logs. Keeping a simple logbook of dates and observations can help you track progress and notice subtle changes others might miss.
Choosing The Right Maitake Strain
Not all maitake strains are equal. Choosing the right one can make the difference between a small, weak cluster and a thriving harvest.
- Commercial spawn: Most home growers begin with commercial maitake spawn from a trusted supplier. Look for strains labeled as “fruiting,” “high yield,” or “home cultivation.” Some suppliers also offer strains bred for different climates, such as cooler or warmer indoor environments.
- Local adaptation: If you live in a region where maitake grows wild, seek strains adapted to your climate. Local strains may offer better disease resistance and faster growth. For example, maitake strains sourced from the U.S. Northeast often fruit more reliably outdoors in temperate climates.
- Culture types: Maitake can be cultivated from grain spawn, sawdust spawn, or plug spawn. Grain and sawdust are best for indoor cultivation; plug spawn is for outdoor logs. Plug spawn is easier for beginners working with logs, as you simply hammer the plugs into pre-drilled holes.
Non-obvious insight: Many new growers overlook the importance of strain vigor. Even within “maitake” there are differences in how strains handle temperature, substrate, and contamination. Ask your supplier about strain performance and read reviews before purchase. It’s also wise to start with a strain that is known to fruit easily indoors, as maitake can be sensitive to small changes.
Practical example: If you live in a humid climate, choose a strain known to resist mold and bacteria, as your growing area may be more prone to these issues.
What You Need: Tools And Materials
Setting up for maitake requires specific tools and materials. Gathering everything before you start saves time and reduces contamination risk.
Basic Materials
- Maitake spawn (grain or sawdust): Quality spawn is essential. Old or contaminated spawn can ruin your batch.
- Hardwood sawdust (oak, maple, beech, or a mix): The fresher, the better. Avoid sawdust with bark, as it can harbor pests or mold.
- Sterile grow bags or buckets (with filter patches for air exchange): Filter patches allow gas exchange without letting in contaminants.
- Pressure cooker (for sterilizing substrate): Large enough to fit your bags or jars.
- Large mixing tub (for preparing substrate): Must be clean and food-safe.
- Disposable gloves and face mask: Prevents contamination from your hands or breath.
- Spray bottle (for misting): Use clean water only.
- Thermometer and hygrometer (for monitoring environment): Digital models are easy to read.
Optional But Helpful
- Laminar flow hood or still air box (for sterile work): Reduces contamination during inoculation.
- Heating mat (if your home is cold): Maintains consistent temperature, especially in winter.
- Grow tent or mini-greenhouse (for humidity control): Increases your control over the fruiting environment.
- PH meter (to test substrate acidity): Maitake grows best at pH 5.5–6.5.
Pro tip: Start with a small batch. Maitake takes time to colonize, and mistakes are easier to correct on a small scale. Once you have success, you can scale up with confidence.
Extra insight: Keep your tools and workspace organized and clean. Even a forgotten dirty spoon or unwashed tub can introduce contaminants that ruin your grow.
Indoor Vs. Outdoor Maitake Cultivation
Choosing where to grow your maitake is a crucial decision. Let’s compare indoor and outdoor cultivation:
| Aspect | Indoor Cultivation | Outdoor Cultivation |
|---|---|---|
| Environment Control | High—easy to manage temp & humidity | Low—depends on weather and season |
| Space Needed | Small—basement, closet, or grow tent | Larger—shaded garden or woodland |
| Time to Harvest | 4–6 months | 6–24 months |
| Yield | Steady, predictable | Large, once established |
| Contamination Risk | Higher, needs sterile work | Lower, but pests and wildlife possible |
| Best For | Control, small batches, year-round | Larger logs, long-term projects |
Non-obvious insight: Maitake’s slow colonization means outdoor logs may not fruit in the first year. If you want mushrooms soon, start indoors; if you have patience and space, outdoor logs can yield for years.
Additional tip: Indoor cultivation lets you experiment with conditions and even try multiple strains side by side. Outdoor logs, once established, need less daily care and can surprise you with big harvests after rain.
Preparing The Perfect Substrate
Maitake thrives on hardwood substrates. Getting the substrate right is one of the most important factors for success.
Best Woods For Maitake
- Oak (ideal): Slow to decompose, supports long-term fruiting.
- Beech: Similar to oak, holds moisture well.
- Maple: Slightly softer, colonizes a bit faster but may fruit for fewer years.
- Sweetgum: Good alternative where oak isn’t available.
Never use softwoods (pine, cedar) or wood treated with chemicals. Maitake cannot digest these and may absorb harmful substances. Even small amounts of resin from softwoods can slow growth or kill the mycelium.
Substrate Recipe (for 10 Lbs Batch)
- 7 lbs hardwood sawdust
- 2 lbs wheat bran (adds extra nutrients)
- 1 lb gypsum (calcium sulfate, helps with pH and structure)
- Water to reach 60–65% moisture (substrate should clump when squeezed but not drip)
Preparation Steps
- Mix dry ingredients thoroughly in a large tub. Mix until the wheat bran and gypsum are evenly distributed.
- Add water slowly, mixing until the right moisture content is reached. Test by squeezing a handful—if just a drop or two of water comes out, it’s perfect.
- Fill grow bags or buckets about 2/3 full. Allow some space for air and mycelium expansion.
- Seal and sterilize in a pressure cooker at 15 psi for 2.5 hours. This step kills competing fungi and bacteria. Let bags cool overnight or until fully room temperature.
Practical tip: Maitake is sensitive to contamination. Always sterilize your substrate; pasteurization is not enough.
Extra insight: If you don’t have a pressure cooker, you can try to find a local commercial kitchen or community food center that rents one. Borrowing for a day is better than risking an entire batch to contamination.

Credit: lykyn.com
Inoculating The Substrate
Once your substrate has cooled (room temperature), it’s time to add your maitake spawn. This is called inoculation.
Steps For Successful Inoculation
- Work in a clean area. Wipe surfaces with alcohol, wear gloves and a mask. Turn off fans, close windows, and keep pets away.
- Break up spawn gently (if using grain or sawdust) to distribute evenly. The more evenly you mix, the faster colonization will be.
- Open the bag (or bucket) and add spawn at a rate of 10–15% by weight of substrate. A higher spawn rate speeds up colonization but costs more.
- Mix spawn and substrate thoroughly but gently. Try not to introduce extra air or create dry pockets.
- Seal the bag with a filter patch or lid for air exchange. If using a bucket, drill small holes and cover with micropore tape.
- Label each bag with date and strain for tracking. This helps if you’re running multiple batches or strains.
Common mistake: Rushing the cooling process after sterilization. Introducing spawn to hot substrate will kill it. Wait until the substrate is completely cool.
Extra insight: If you notice condensation inside your bags after inoculation, your substrate may have been too hot or too wet. Small droplets are normal, but large puddles can drown the mycelium.
Colonization: The Waiting Game
Maitake colonization is slow compared to other mushrooms. Don’t worry if you don’t see rapid progress.
Conditions For Colonization
- Temperature: 21–24°C (70–75°F)
- Humidity: 60–70% (bags are mostly sealed, so ambient isn’t critical yet)
- Light: Darkness or dim light
Place your inoculated bags on shelves or in a closet. After 4–8 weeks, you should see white mycelium spreading through the substrate.
Signs Of Healthy Growth
- Uniform white growth (not green, black, or orange)
- No strong odors (other than fresh, earthy mushroom scent)
- No visible contamination (molds or slime)
If you see contaminated bags, remove them immediately to protect the rest.
Non-obvious insight: Maitake mycelium can look thin and patchy at first, unlike the thick, solid mats of oyster mushrooms. This is normal—patience is key.
Additional example: If you’re uncertain about contamination, compare your bags every few days. Healthy mycelium will slowly expand, while contaminants tend to spread faster and with odd colors.
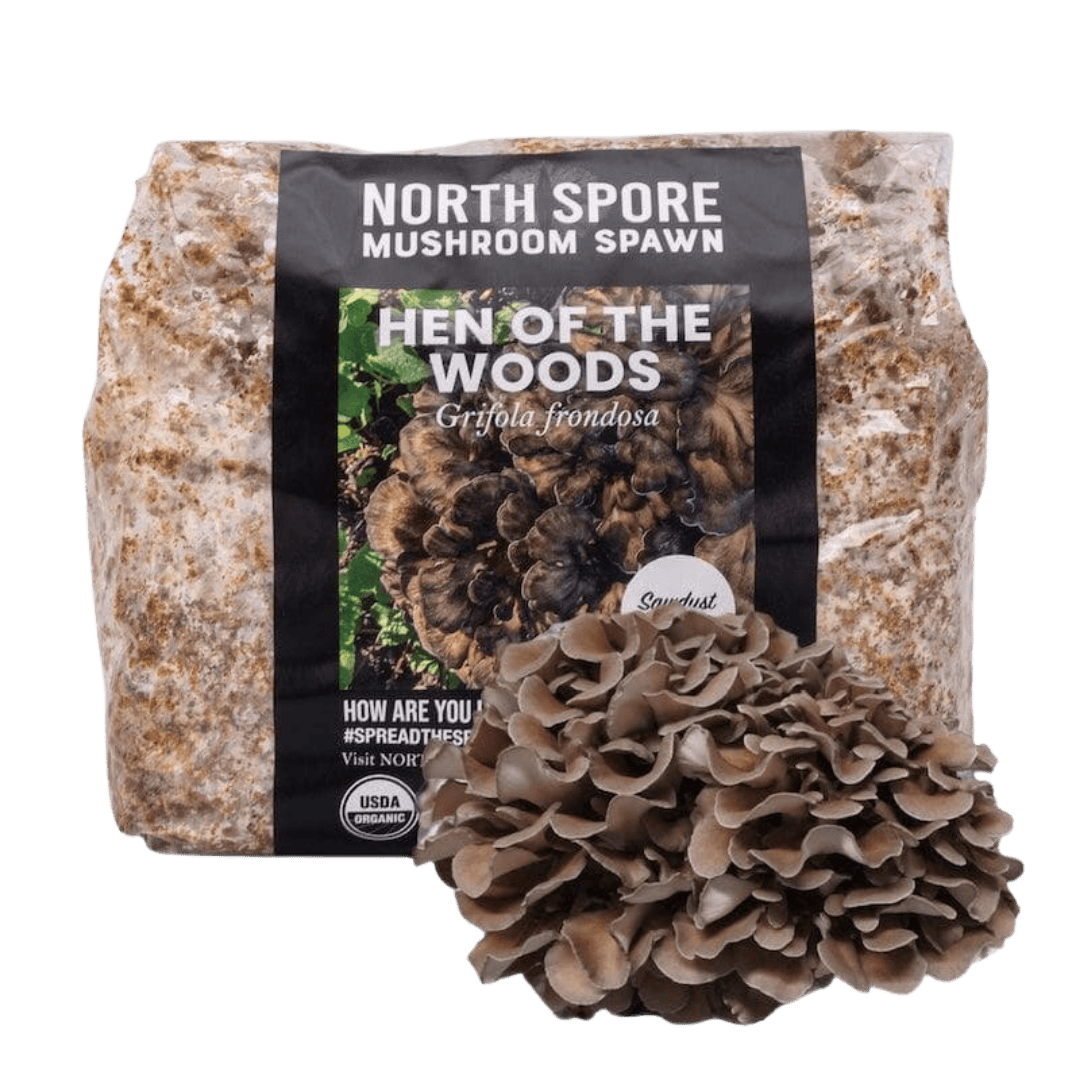
Credit: northspore.com
Initiating Fruiting: Triggering Maitake To Grow
Once the substrate is fully colonized (white throughout), it’s time to encourage fruiting.
Fruiting Conditions
- Temperature: 13–18°C (55–65°F)
- Humidity: 85–95%
- Fresh air: Increase air exchange (open bags, move to fruiting area)
- Light: Indirect light, 8–12 hours per day
Move bags to a fruiting chamber or greenhouse. Cut slits in the sides or open the top to allow mushrooms to emerge.
Practical tip: Maitake needs a drop in temperature to initiate fruiting. Place bags in a cooler room or basement for a few days to “shock” them.
Extra insight: Maitake sometimes forms primordia inside the bag if you wait too long to open it after full colonization. Check bags regularly and open as soon as you see small bumps or knots.
Example: Some growers use a simple plastic tent with a cool mist humidifier to keep humidity high and air fresh. Even a clear plastic storage box with the lid propped open can work for small batches.
Caring For Developing Mushrooms
After primordia appear, your attention shifts to mushroom care.
- Mist regularly to keep humidity high, but avoid soaking mushrooms. Misting 2–3 times a day is usually enough.
- Ventilate to prevent CO₂ buildup, which can deform clusters. Open vents or fan gently for fresh air exchange.
- Monitor temperature—if it gets too warm, fruiting may stop. Use a thermometer near the substrate, not just in the room.
Clusters grow slowly at first, then speed up. Full-sized maitake can weigh several pounds per cluster.
Troubleshooting Common Problems
| Problem | Possible Cause | Solution |
|---|---|---|
| Slow or no fruiting | Temperature too high, low humidity, poor air exchange | Lower temp, increase humidity, open bags |
| Contamination (green, black mold) | Unsterile substrate, bad spawn, poor hygiene | Remove affected bags, improve cleanliness |
| Deformed clusters | High CO₂, low fresh air | Increase ventilation |
| Drying out | Low humidity, direct airflow | Mist more, shield from drafts |
Non-obvious insight: If you see fuzzy white growth around the base of clusters, that’s a sign of high humidity and low air exchange. If you see dry, cracked edges, humidity is too low.
Harvesting Maitake
Harvest time is exciting! Knowing when and how to harvest ensures the best taste and future yields.
When To Harvest
- Clusters are fully expanded but still tender
- Edges are not dried or shriveled
- Weight feels heavy for size (full of water)
Pick before spores release for best flavor and shelf life.
Extra insight: The ideal harvest window may last only 1–2 days. Check your clusters daily as they approach maturity.
How To Harvest
- Use a sharp knife to cut clusters at the base
- Avoid tearing or pulling, as this damages the mycelium
- Clean off substrate debris gently
After harvest, you can sometimes get a second or third flush from the same bag with proper care.
Non-obvious insight: Don’t wait too long. Overripe maitake become tough and lose flavor. Frequent checking is better than missing the ideal window.
Pro tip: After harvesting, mist the exposed area and keep humidity high to encourage another flush.
Storing And Using Maitake
Fresh maitake doesn’t last as long as supermarket mushrooms, so proper storage is important.
- Refrigerate in a paper bag, not plastic (prevents moisture buildup)
- Use within 5–7 days for best flavor
- For longer storage, slice and freeze or dry pieces for later use
Extra example: To dry maitake, slice thinly and spread in a single layer on a dehydrator tray. Dry at 40–45°C (105–115°F) until crisp. Store in an airtight jar away from light.
Culinary Ideas
- Sauté with garlic and olive oil for a simple side dish
- Add to soups or risottos for a rich, earthy flavor
- Grill whole clusters for a smoky, meaty taste
- Use in tempura, stir-fries, or as a pizza topping
- Make maitake tea by simmering dried pieces in water
Non-obvious insight: Maitake’s flavor intensifies when roasted or grilled. Try brushing clusters with a little soy sauce before roasting for an umami boost.
Outdoor Maitake Cultivation: Logs And Beds
If you have a shaded yard or wooded area, try growing maitake outdoors on logs or in beds.
Choosing Logs
- Use freshly cut oak, beech, or maple logs—the fresher the better, ideally within 2–3 weeks of cutting
- Logs should be 4–8 inches in diameter and 3–4 feet long
- Cut logs in winter or early spring for best results, as trees have more stored sugars then
Extra tip: Avoid logs that have started to rot or have visible mold, as contaminants can outcompete your maitake spawn.
Inoculating Logs
- Drill holes every 4–6 inches along the log, about 1–2 inches deep
- Insert plug spawn or sawdust spawn into holes, using a small dowel or plunger
- Seal holes with melted cheese wax to prevent drying and contamination
- Stack logs in a shaded, moist area—leaning them against each other in a “crib” formation is common
Care And Patience
- Water logs during dry spells, especially in the first year
- Cover with leaves or straw in extreme heat or cold to hold moisture
Maitake logs can take 1–2 years to fruit but may produce mushrooms each fall for up to 7 years.
Pro tip: Place logs near your home for easy care and harvest. Wild animals love maitake too!
Extra insight: Outdoor-grown maitake often tastes more intense, as slow growth and natural conditions develop deeper flavors.
Avoiding Common Mistakes
Many beginners make avoidable errors that cost time and yield. Here are the most frequent mistakes and how to avoid them:
- Skipping sterilization: Maitake is sensitive. Never skip sterilizing substrate.
- Using softwoods or old logs: Only use fresh, clean hardwood.
- Impatience: Maitake is slow. Rushing steps leads to contamination or poor yields.
- Overwatering: Mist for humidity, don’t soak the substrate. Pooled water encourages bacteria.
- Poor ventilation: Keep air fresh, especially during fruiting. Stale air leads to deformed clusters.
- Ignoring temperature drops: Maitake needs a “shock” to start fruiting.
Non-obvious insight: Cleanliness matters even with outdoor logs. Use clean tools and spawn, and avoid logs with visible mold or rot.
Extra tip: Always label your bags, logs, or beds with the strain and date. This helps track what works best in your climate and conditions.

Credit: lykyn.com
Maitake Vs. Other Mushrooms: How It Compares
Many home growers start with oyster or shiitake mushrooms. Here’s how maitake stacks up:
| Mushroom | Difficulty | Time to Fruiting | Best Substrate | Flavor Profile |
|---|---|---|---|---|
| Maitake | Intermediate–Advanced | 4–12 months | Hardwood sawdust/logs | Earthy, rich, umami |
| Oyster | Beginner | 2–4 weeks | Straw, sawdust, cardboard | Mild, nutty |
| Shiitake | Intermediate | 2–8 months | Hardwood logs/sawdust | Smoky, meaty |
Maitake requires more patience and care, but the unique yield and flavor make it worthwhile.
Extra insight: Maitake is less likely to “bolt” or overgrow quickly if you miss the harvest window, unlike oyster mushrooms. This makes it slightly more forgiving once you get fruiting started.
Advanced Tips For Bigger And Better Maitake
Ready to take your maitake growing to the next level? Try these advanced tips:
- Supplement substrate with small amounts of soybean hulls for added nutrition (not more than 10%). Too much can invite contaminants.
- Monitor CO₂ levels with a simple aquarium test kit—keep CO₂ below 1000 ppm during fruiting. High CO₂ leads to smaller, misshapen clusters.
- Rotate bags or logs to expose all sides to light and air. Even exposure helps clusters grow symmetrically.
- Clone wild maitake by placing a piece of tissue in sterile agar, then using the resulting mycelium as your starter. This can give you a unique strain adapted to your area.
Caution: Advanced techniques require more sterile technique and monitoring. Start simple, then experiment as you gain experience.
Extra insight: Some growers create a “cold shock” by placing colonized bags in the refrigerator (above freezing) for 24–48 hours before fruiting. This can trigger faster and more robust primordia formation.
Maitake’s Health And Medicinal Value
Beyond the kitchen, maitake is famous for its medicinal properties. Studies show maitake’s beta-glucans may support the immune system and help regulate blood sugar. In Japan and China, maitake extracts are used as supplements for immune health and wellness.
Still, home-grown maitake is best enjoyed as food. If you plan to use it medicinally, consult a healthcare provider and check resources like the [Wikipedia Maitake Page](https://en.wikipedia.org/wiki/Grifola_frondosa) for research updates.
Extra tip: Dried maitake can be ground into powder and used in teas or as a soup thickener, making it easy to add to your diet year-round.
Frequently Asked Questions
How Long Does Maitake Take To Grow At Home?
Maitake usually takes 4–6 months from inoculation to harvest indoors. Outdoor logs may take 1–2 years but will produce for several seasons once established.
Can I Grow Maitake From Store-bought Mushrooms?
It’s difficult but possible. Maitake from stores is often cooked or dried, which kills the mycelium. For best results, buy commercial maitake spawn from a trusted supplier.
Why Are My Maitake Clusters Small Or Deformed?
Small or deformed clusters usually mean low humidity, poor air exchange, or insufficient substrate nutrition. Double-check your humidity and ventilation, and use fresh hardwood substrate.
Is Maitake Safe To Eat Raw?
Maitake is best cooked. Raw maitake can be tough and may cause stomach upset. Cooking improves both taste and digestibility.
What Is The Best Time Of Year To Start Outdoor Maitake Logs?
Late winter to early spring is ideal. Freshly cut logs inoculated at this time have the best chance to colonize before summer heat or winter cold.
Extra insight: For first-time growers, joining an online mushroom growing forum can offer community support, troubleshooting, and new ideas. Many successful maitake growers share photos and tips that can help you spot issues early and celebrate successes.
Bringing maitake into your home garden is more than a project—it’s an adventure in patience, observation, and reward. With the right knowledge, even beginners can enjoy the dance of Grifola frondosa each season.