Making your own mushroom spawn from scratch is a rewarding way to control your mushroom growing process, save money, and gain a deeper understanding of fungal cultivation. Many people enjoy growing mushrooms at home, but buying spawn can get expensive.
Learning how to make your own spawn gives you independence and lets you experiment with different mushroom varieties. This process might sound complex, but with the right guidance, anyone can do it—even with basic kitchen tools. As an experience-based guide, I’ll walk you through each step, including materials, sterilization, mycelium culture, and common mistakes to avoid.
By the end, you’ll have the confidence to create mushroom spawn safely and successfully.
Understanding Mushroom Spawn
Before you start, it’s important to know what mushroom spawn is. Spawn is a material that contains mycelium—the living, thread-like part of the mushroom. Mycelium acts like the roots of a plant. It grows through a substrate (like grains or sawdust), spreading and preparing to form mushrooms.
Mushroom growers use spawn to “seed” a larger bulk substrate (such as straw, logs, or compost). This step is key in the mushroom growing cycle because strong spawn leads to healthier and faster mushroom growth.
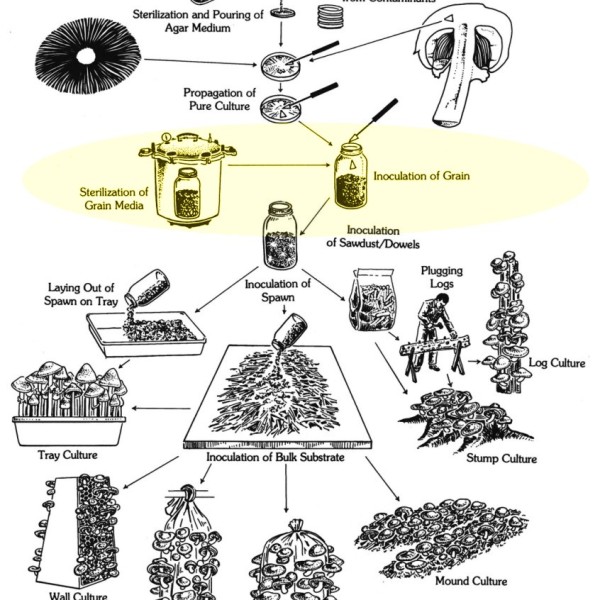
There are different types of spawn, including:
- Grain spawn: Mycelium grown on sterilized grains (like rye, wheat, or millet). This is the most common and versatile type.
- Sawdust spawn: Mycelium grown on sawdust, often used for wood-loving mushrooms.
- Plug spawn: Small wooden dowels colonized with mycelium, used for inoculating logs.
This article focuses on making grain spawn because it’s easy for beginners, works for many mushroom species, and gives fast results.
Why Make Your Own Mushroom Spawn?
Buying spawn is convenient, but making your own has several strong advantages:
- Cost savings: Commercial spawn can be expensive, especially if you plan to grow many mushrooms.
- Freshness: Homemade spawn is fresher, often resulting in faster colonization and higher yields.
- Variety: You can choose any mushroom species you like, including rare or local types.
- Learning experience: The process helps you understand how mushrooms grow and behave.
- Self-sufficiency: No need to rely on outside suppliers.
Many beginners miss the fact that commercial spawn can be weeks old and losing vigor. Making it yourself means you always have the healthiest possible start for your mushrooms.
Tools And Materials Needed
Starting with the right tools and ingredients is crucial for success. Here’s what you’ll need:
- Pressure cooker (minimum 15 psi, 6-8 quart/liter size): For sterilizing grain and equipment.
- Mason jars or autoclavable spawn bags: For holding the sterilized grain.
- Grain (rye, millet, wheat, or wild bird seed): The food for your mycelium.
- Mushroom culture: This can be a liquid culture, spore syringe, or a piece of mushroom tissue.
- Alcohol lamp or flame: For sterilizing tools.
- Gloves and face mask: To reduce contamination risk.
- Alcohol spray (70% isopropyl or ethanol): For cleaning surfaces and hands.
- Scalpel or sterile knife: For transferring cultures.
- Micropore tape or synthetic filter discs: To cover jar lids and allow airflow.
- Clean workspace: Ideally, a still air box or a small room with little airflow.
Optional but helpful:
- Petri dishes and agar (for advanced culture work)
- Flow hood (for professionals or frequent use)
Many people underestimate the importance of cleanliness. Even small mistakes here can ruin your batch. Take time to disinfect everything.
Step 1: Preparing The Grain
The first step is to prepare your grain so it’s perfect for mycelium growth. Poorly prepared grain can cause slow colonization or contamination.
Choosing The Right Grain
- Rye berries: Popular because they hold moisture well.
- Wheat berries: Widely available and affordable.
- Millet: Small grains with a lot of surface area.
- Wild bird seed: Cheap and easy to find, but avoid mixes with sunflower seeds.
Cleaning And Hydrating The Grain
- Rinse the grain: Put your grains in a strainer or bowl. Rinse under cold water until the water is clear. This removes dust and extra starch.
- Soak overnight: Place the cleaned grain in a large pot. Add enough water to cover by several inches. Soak for 12–24 hours. This hydrates the grain and helps endospores swell, making sterilization more effective.
- Boil the grain: After soaking, drain and refill with fresh water. Bring to a boil and simmer for 10–15 minutes. Check the grains—they should be fully hydrated but not bursting. Test a few grains: they should be soft but not mushy.
- Drain and dry: Pour the hot grains into a colander. Let them steam off for 20–30 minutes. The surface should be dry to the touch but the inside moist. Too much water will make the grains stick and encourage contamination.
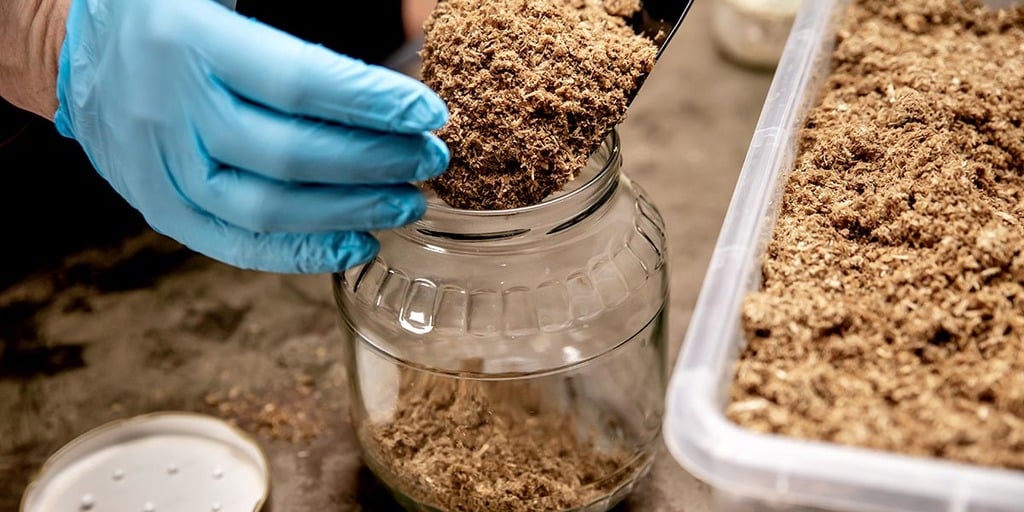
Filling Your Jars Or Bags
- Fill each Mason jar or spawn bag about 2/3 full. Leave room for shaking later. Overfilled jars slow colonization and make mixing difficult.
- Add a lid with a filter: If using jars, drill a small hole in the lid and cover with micropore tape or a filter disc. This lets air in but keeps contaminants out.
- Wipe the rims and outside with alcohol.
Step 2: Sterilizing The Grain
Sterilization is the most critical part of making mushroom spawn. Boiling water is not enough. Pressure cooking at 15 psi is necessary to kill all bacteria and fungal spores.
- Place the filled jars or bags in your pressure cooker. Don’t overpack—steam must circulate.
- Add water to the pressure cooker as instructed by the manufacturer (usually about 2–3 inches).
- Seal and heat. Once pressure reaches 15 psi, start timing: Sterilize for 90–120 minutes.
- Allow the cooker to cool completely before opening (several hours). Hot jars can crack if cooled too quickly.
Never skip or shorten this step. Many beginners fail because their grain was not fully sterilized.
Step 3: Preparing Your Mushroom Culture
Now you need to add mycelium to your sterile grain. You have several options:
Liquid Culture
A liquid culture is a nutrient-rich solution with live mycelium. It’s fast and easy to use.
- Shake well before use.
- Sterilize the needle by flaming.
- Inject 1–2 ml into each jar or bag through the filter hole.
- Reseal with micropore tape.
Spore Syringe
Spores are like mushroom seeds. They take longer to colonize and have a higher risk of contamination.
- Use as you would a liquid culture.
- Colonization may take 2–4 weeks.
Agar Culture
Agar is a jelly made from seaweed, often poured into petri dishes. Mycelium grows on it, and you can transfer small pieces to your grain.
- Open the jar in a still air box or very clean room.
- Flame-sterilize your scalpel.
- Cut a small wedge of mycelium and drop into the jar.
- Reseal quickly.
Pro tip: If you’re using store-bought mushrooms, you can clone a piece of fresh tissue onto agar first, then transfer to grain. This lets you reproduce almost any mushroom you can buy.
Step 4: Inoculating The Sterilized Grain
Inoculation is the process of adding your mushroom culture to the sterilized grain.
- Work in the cleanest environment you can. Wipe down all surfaces with alcohol.
- Wear gloves and a mask.
- Open each jar or bag briefly. Add the liquid culture, spore syringe, or agar wedge.
- Close the lid tightly and reseal the filter hole.
- Shake the jar gently to distribute the culture.
Insight: Many people forget to shake their jars after inoculation. This step spreads the culture and speeds up colonization.
Step 5: Incubating The Spawn
Now your jars or bags need time to grow mycelium.
- Store them in a dark, warm place (20–24°C or 68–75°F is ideal).
- Check them every few days. You’ll see white threads forming in 5–10 days (liquid culture) or 10–21 days (spores).
- Once the mycelium covers about 30% of the grain, shake the jar to break it up and spread it further. This encourages even colonization.
- Wait until the grain is fully white and there are no bare spots. This usually takes 2–4 weeks.
Do not use spawn with green, black, or pink spots—these are signs of contamination. Healthy spawn is pure white and smells earthy, not sour or sweet.
Step 6: Testing And Using Your Spawn
Before using your spawn to inoculate a larger substrate, check that it’s strong and healthy.
- Open one jar and smell it. It should have a clean, mushroomy smell.
- Break up the spawn by shaking. It should fall apart easily, not be stuck in a solid mass.
- If all looks good, you can use it to inoculate straw, sawdust, logs, or compost.
You can also use your own spawn to make more spawn—a process called grain-to-grain transfer. This multiplies your results quickly.
Common Problems And How To Solve Them
Contamination
Contamination is the most common problem. Mold, bacteria, or yeast can ruin your batch. Signs include colored spots, strange smells, or sliminess.
- Solution: Always sterilize thoroughly, keep your workspace clean, and handle everything with gloves and a mask.
Wet Or Sticky Grain
If your grain is too wet, it sticks together and makes a perfect environment for bacteria.
- Solution: Drain and dry your grain until the outside is dry to the touch before sterilizing.
Slow Colonization
This often means the culture is weak or something is wrong with the temperature.
- Solution: Use a fresh, vigorous culture and keep your jars at the right temperature.
Clumping After Sterilization
Grain that is packed too tightly or not shaken soon after inoculation can clump together.
- Solution: Shake jars after inoculation and at 30% colonization.
Comparing Different Types Of Grain For Spawn
Choosing the right grain affects your results. Here’s a side-by-side look at popular options:
| Grain Type | Colonization Speed | Cost | Availability | Contamination Risk |
|---|---|---|---|---|
| Rye Berries | Fast | Medium | Good (specialty stores) | Low |
| Wheat Berries | Fast | Low | Excellent (grocery stores) | Low |
| Millet | Very Fast | Medium | Fair (bird supply stores) | Medium |
| Wild Bird Seed | Medium | Very Low | Excellent | Medium-High |
Pro insight: Rye berries are often chosen for their low contamination risk and good water retention, making them a favorite for both beginners and experts.
Step-by-step Timeline: Making Mushroom Spawn
Here’s a summary timeline to keep you organized.
| Day | Task | Notes |
|---|---|---|
| 1 | Clean and soak grain | Soak overnight for best results |
| 2 | Boil, drain, and fill jars | Let grains dry on surface |
| 2 | Sterilize jars in pressure cooker | 90–120 minutes at 15 psi |
| 3 | Cool and inoculate with mushroom culture | Work quickly and cleanly |
| 4–14 | Incubate jars at 20–24°C | Shake at 30% colonization |
| 15–28 | Spawn fully colonized and ready to use | Check for contaminants |
Credit: www.milkwood.net
Tips For Success
- Work slowly and carefully. Rushing often leads to mistakes.
- Label your jars with date and strain. It’s easy to forget which is which.
- Don’t open jars until you’re sure they’re fully colonized.
- Keep records of what you do each time. This helps you improve.
Many beginners think they must buy expensive lab equipment. In reality, you can make excellent spawn with kitchen items and a good pressure cooker.
Advanced Techniques
If you’re comfortable with the basics, you can try these advanced methods to improve your spawn production.
Agar Plates
Using agar plates lets you clean and expand cultures before adding them to grain. This helps isolate strong, pure mycelium and avoid contamination.
- Prepare agar in petri dishes.
- Transfer a piece of mushroom or spores onto the agar.
- When the mycelium grows, transfer clean sections to new plates.
- Eventually, move a clean wedge to sterilized grain.
Grain-to-grain Transfer
Once you have a colonized jar, you can use it to start many more.
- In a clean environment, open a colonized jar and divide the grains among several new sterilized jars.
- Shake to mix.
- Each jar will grow new spawn quickly.
Master’s Mix And Other Substrates
Some growers use blends of hardwood sawdust and other ingredients for special mushroom types. The process is similar, but the choice of substrate can improve results for species like shiitake or lion’s mane.
Safety And Cleanliness
Working with fungi means preventing contamination is always your top priority. A few extra precautions:
- Always pressure cook for the full recommended time.
- Use a still air box or glove box if you don’t have a flow hood.
- Wash hands, wear gloves, and wipe everything with alcohol.
- Never work in a drafty room or near open windows.
- If you see contamination, dispose of the jar carefully—don’t open it inside your house.
Non-obvious tip: Even air fresheners, pets, or houseplants nearby can introduce spores. Try to work in a simple, closed space.
Scaling Up: Producing Large Amounts Of Spawn
If you want to grow mushrooms at scale, making larger batches of spawn is possible.
- Use spawn bags instead of jars. They hold more grain and are easier to shake.
- Invest in a larger pressure cooker or autoclave.
- Plan your workflow so you always have a fresh batch in progress.
For small farms or community projects, homemade spawn can save thousands of dollars per year.
When To Use Homemade Spawn
Homemade mushroom spawn is great for:
- Oyster mushrooms
- Shiitake
- Lion’s mane
- Wine cap
- Reishi
Some mushrooms (like morels or truffles) have complicated growth cycles and are not suitable for beginners. Start with easy species and work up as you gain skill.
Storing And Using Extra Spawn
If you make more spawn than you need, you can store it for later.
- Refrigerate: Grain spawn keeps for up to 2–3 months in a clean fridge.
- Freeze: Not recommended, as freezing can kill mycelium.
- Use quickly: Spawn is most vigorous within 1–4 weeks.
Pro tip: If you see the mycelium starting to form mushrooms inside the jar, use it immediately.

Credit: www.youtube.com
What To Do With Contaminated Spawn
Contaminated jars should not be opened indoors. Here’s a safe way to dispose of them:
- Move the jar outside, away from people, pets, and plants.
- Open and empty the contents into a compost pile or landfill.
- Clean the jar with hot, soapy water and then soak in bleach.
Never try to salvage contaminated spawn for eating or further use.
Real-world Example: Oyster Mushroom Spawn
Let’s walk through an example with oyster mushrooms.
- Buy or make a liquid culture of oyster mushrooms.
- Prepare and sterilize rye grain as described above.
- Inoculate with 2 ml of liquid culture per jar.
- Incubate at 22°C (72°F).
- Colonization should be visible in 4–6 days.
- Shake jars at 30% and 70% colonization.
- In 2–3 weeks, you’ll have fully colonized, healthy oyster spawn.
Oyster mushrooms are very forgiving and grow quickly, making them perfect for beginners.
Troubleshooting: Frequently Missed Insights
- Keep records of every batch. Write down grain type, sterilization time, inoculation date, and any problems. This helps you improve and troubleshoot.
- Test small batches before scaling up. Don’t risk all your grain on an unproven culture or method.
Comparing Sterilization Methods
Many people wonder if they can use boiling water or ovens instead of a pressure cooker. Here’s a quick comparison:
| Method | Effectiveness | Time Required | Contamination Risk |
|---|---|---|---|
| Pressure Cooker (15 psi) | Very High | 90–120 min | Very Low |
| Boiling Water | Low | 2–4 hours | High |
| Oven | Low | 2–3 hours | High |
Pressure cooking is the only reliable method for making mushroom spawn at home.
Credit: grocycle.com
Where To Learn More
If you want to dive deeper, resources like the Mushroom Cultivation Wikipedia page offer a wealth of scientific background and advanced techniques.
Frequently Asked Questions
What Is The Easiest Mushroom To Make Spawn For?
Oyster mushrooms are the easiest for beginners. They grow quickly, tolerate a wide range of conditions, and are less likely to be overtaken by contaminants.
How Long Does Homemade Mushroom Spawn Last?
Fresh spawn is best used within 1–2 months if kept in the refrigerator. After this, the mycelium may lose vigor and colonization may slow.
Can I Make Spawn Without A Pressure Cooker?
It’s technically possible but not recommended. Boiling or oven sterilization leaves many contaminants alive, greatly increasing the chance of failure. A pressure cooker is a must for reliable results.
Why Does My Spawn Smell Bad?
A foul, sour, or sweet smell is a sign of contamination—usually bacteria or mold. Healthy spawn smells earthy and mushroomy. Discard any jars with bad smells.
What Is The Difference Between Spawn And Spores?
Spawn contains living mycelium, ready to grow mushrooms. Spores are like seeds and must first germinate and grow mycelium before producing mushrooms. Spawn is faster and more reliable for mushroom cultivation.
Making your own mushroom spawn from scratch is a skill that will reward you for years. It gives you control, saves money, and opens the door to a fascinating world of mushroom growing. With patience, attention to cleanliness, and a little practice, you’ll soon be harvesting your own mushrooms from spawn you created yourself.