Mushroom Bag Cultivation: Techniques For High-yield Indoor Growing
Mushroom cultivation is moving indoors. More growers are turning to mushroom bag cultivation because it’s reliable, space-saving, and can produce impressive yields. Whether you’re growing for home use or small business, learning how to use bags for mushrooms can make your efforts efficient and profitable. This article will guide you through every step, from choosing materials to harvesting, so you can maximize your results and avoid common mistakes.
Bag cultivation is also a great way to take control over your food supply, experiment with different mushroom varieties, and even start a small-scale business right from your home. With the right approach and a bit of patience, you can consistently produce fresh, high-quality mushrooms, even if you have no previous gardening experience.
Understanding the details of this method will help you avoid frustration and wasted effort. Let’s look at what makes mushroom bag cultivation such a powerful technique—and how you can make it work for you.
Why Choose Mushroom Bag Cultivation?
Growing mushrooms indoors using bags offers several unique benefits. You can control the environment, which means fewer problems with weather, pests, or contamination. Bags are compact, letting you fit many in a small space, like a basement or spare room.
For beginners, it’s an accessible way to start, but with the right techniques, even experienced growers get high yields.
Bag cultivation reduces some of the biggest headaches in traditional mushroom farming. Outdoor beds or logs are exposed to unpredictable weather—too hot, too cold, too wet, or too dry—which can ruin crops. Indoors, you set the temperature, humidity, and light exactly as your mushrooms need.
Another advantage is flexibility. You can use different substrates, select the best mushroom species, and adjust conditions for each bag. This method also helps you scale: start with a few bags, and as you learn, expand your production.
Compared to tray or shelf growing, bags make it easier to avoid cross-contamination. Each bag is like a mini-environment, so if one bag gets contaminated, others are often safe. This isolation is especially valuable when growing multiple species or experimenting with new techniques.
Finally, bag cultivation is less physically demanding. There’s no need for heavy lifting or large outdoor plots. Even people with limited mobility can manage a productive mushroom setup using only a table and some shelves. This makes the technique popular among home growers, urban farmers, and small commercial operations.
Understanding The Mushroom Growth Cycle
It’s important to know how mushrooms grow. Their life cycle has several stages:
- Spore germination – Spores land on a suitable substrate and begin to grow into mycelium.
- Mycelium colonization – White, thread-like mycelium spreads through the substrate, digesting nutrients.
- Primordia formation – Tiny knots (primordia) appear as the mycelium gets ready to fruit.
- Fruiting – Primordia grow into full mushrooms, which can be harvested.
Each stage requires different conditions. For example, colonization needs warmth and darkness, while fruiting calls for light and fresh air. Bag cultivation makes it easier to manage these needs.
If you’ve never seen mycelium before, it looks a bit like white cotton. As it spreads, it breaks down complex nutrients in the substrate, turning them into energy for mushroom growth. When the bag is fully colonized, the mycelium is ready to “switch gears” and start making mushrooms.
A less obvious point: The transition from colonization to fruiting is sensitive. Mushrooms notice small changes in temperature, humidity, and even the amount of air in the bag. This is why timing and environment control matter so much for high yields. If you move too soon, the mycelium might stall; too late, and it can dry out or get infected.
In nature, mushrooms fruit after rain or a drop in temperature, which signals “now is the time. ” Indoors, you can trigger this change by adjusting the environment—giving you better control over when and how your mushrooms grow.
Essential Materials And Equipment
Before you start, gather the following:
- Substrate (the material mushrooms grow on)
- Mushroom spawn (live mycelium ready to colonize)
- Grow bags (usually made from polypropylene)
- Pressure cooker or autoclave for sterilization
- Thermometer and hygrometer to measure temperature and humidity
- Alcohol spray for sterilization
- Gloves and mask for hygiene
Choosing quality materials is critical. Poor substrate or contaminated spawn often cause failure. For bags, look for thick polypropylene with filter patches—they let air in but keep contaminants out.
Some extra tools can make your process smoother. For example, a small scale helps you measure substrate and spawn accurately. Sharp scissors or a blade are useful for opening bags or cutting slits for fruiting. If you plan to grow many bags, consider a shelving unit to hold them off the ground and improve airflow.
Spawn is a key ingredient. It comes in different forms: grain spawn (rye or millet), sawdust spawn, or even plug spawn. Grain spawn is fast and vigorous, ideal for most bag grows. Always buy spawn from a trusted supplier and store it in a cool place until use.
A less obvious tip: Use a fine-mist spray bottle for humidity—one that produces a gentle, even mist rather than large droplets. This prevents damaging delicate primordia or over-wetting the substrate surface.
Selecting The Right Substrate
The substrate feeds your mushrooms. The best choice depends on the species, but popular substrates include:
- Straw – Cheap and effective for oyster mushrooms.
- Hardwood sawdust – Great for shiitake and lion’s mane.
- Coco coir and vermiculite – Used for species like Psilocybe cubensis.
Some growers mix in bran or gypsum to boost nutrition. Each substrate should be pasteurized or sterilized to kill unwanted organisms. For example, straw is usually pasteurized with hot water, while sawdust is often sterilized under pressure.
Experienced growers sometimes add extra supplements, like soybean hulls, to increase yields. These additions give the mycelium more protein and minerals, leading to larger mushrooms or more flushes. However, richer substrates also raise contamination risk, so sterilization must be perfect.
Substrate Comparison Table
Here’s a quick look at common substrates and their ideal mushroom types:
| Substrate | Best for | Pros | Cons |
|---|---|---|---|
| Straw | Oyster, Enoki | Cheap, easy to find | Lower yields than sawdust |
| Hardwood sawdust | Shiitake, Lion’s mane | High yield, dense fruits | Needs sterilization |
| Coco coir & vermiculite | Psilocybe, Oyster | Clean, easy to handle | More expensive |
| Coffee grounds | Oyster | Recycling waste, good nutrients | Risk of contamination |
Two often-missed points: Always check the pH of your substrate (most mushrooms prefer slightly acidic conditions), and avoid using substrate that’s too wet, as excess moisture encourages mold.
Another beginner mistake is not mixing the substrate well. Uneven moisture or clumps of supplements can create pockets where bacteria or mold flourish. Always break up clumps and mix thoroughly before bagging.
If you want to experiment, try blending two substrates. For example, a 50/50 straw and sawdust mix can combine the low cost of straw with the higher nutrition of sawdust, producing better results than either alone.

Credit: www.out-grow.com
Preparing And Sterilizing The Substrate
Proper preparation is vital. Contaminated substrate is the number one cause of crop loss in bag cultivation. Here’s how to prepare the most common substrates:
Straw
- Chop into 2–5 cm pieces.
- Soak in hot water (60–80°C) for 1–2 hours to pasteurize.
- Drain and cool until damp but not dripping.
Pasteurization kills most competing organisms but keeps some good bacteria that help mushrooms grow. Stir the straw every 30 minutes to make sure all pieces are evenly heated.
Sawdust
- Mix with bran, gypsum, and water until it feels like a wrung-out sponge.
- Pack into heat-resistant bags.
- Sterilize in a pressure cooker at 121°C for 90–120 minutes.
Sterilization is stricter than pasteurization. All living organisms are destroyed, making it safe for slower-growing species or richer substrates. If you don’t have a pressure cooker, try smaller bags and extend the cooking time, but results may vary.
Coco Coir And Vermiculite
- Hydrate with boiling water.
- Mix until moisture is even.
- Cool before use.
Coco coir is naturally resistant to many contaminants but still needs clean handling. After mixing, squeeze a handful—if only a few drops come out, the moisture is right.
After preparation, work as cleanly as possible. Wipe surfaces, use gloves, and keep windows closed to limit airborne contamination.
A beginner often forgets to cool the substrate before adding spawn. Hot substrate kills mycelium, so always wait until it’s below 30°C before inoculating.
Inoculation: Adding The Spawn
This is the step where mushroom mycelium is added to the substrate. The process is called inoculation.
- Clean your workspace with alcohol spray.
- Break up the spawn (which looks like white grains or sawdust).
- Mix spawn into the substrate inside the bag, or layer it between substrate sections.
- Seal the bag with a twist tie or impulse sealer.
A common mistake is using too little spawn. More spawn means faster colonization and less chance for contamination. For best results, use a 5–10% spawn rate (by weight).
Some growers gently shake the sealed bag to mix spawn and substrate more evenly. This helps avoid dead spots where mycelium is slow to reach. If you’re working with sawdust spawn, a gentle massage is enough.
Another tip: Label each bag with the date and mushroom species using a waterproof marker. This makes tracking progress and troubleshooting much easier, especially if you’re running multiple batches.
If you’re inoculating more than a few bags, consider setting up a “clean area” using a clear plastic box (still air box) with armholes cut into the sides. This blocks drafts and dust, reducing contamination risk.
Credit: smallfarms.cornell.edu
Incubation: Mycelium Colonization
Now, place the inoculated bags in a warm, dark place. The ideal temperature is 20–25°C for most mushrooms. Higher temperatures speed growth but also raise contamination risk.
During incubation:
- Keep humidity around 70–80%.
- Avoid direct sunlight.
- Do not open bags until fully colonized.
After 2–4 weeks, the substrate should turn white as mycelium spreads. If you see green, black, or pink patches, that’s contamination—remove these bags immediately.
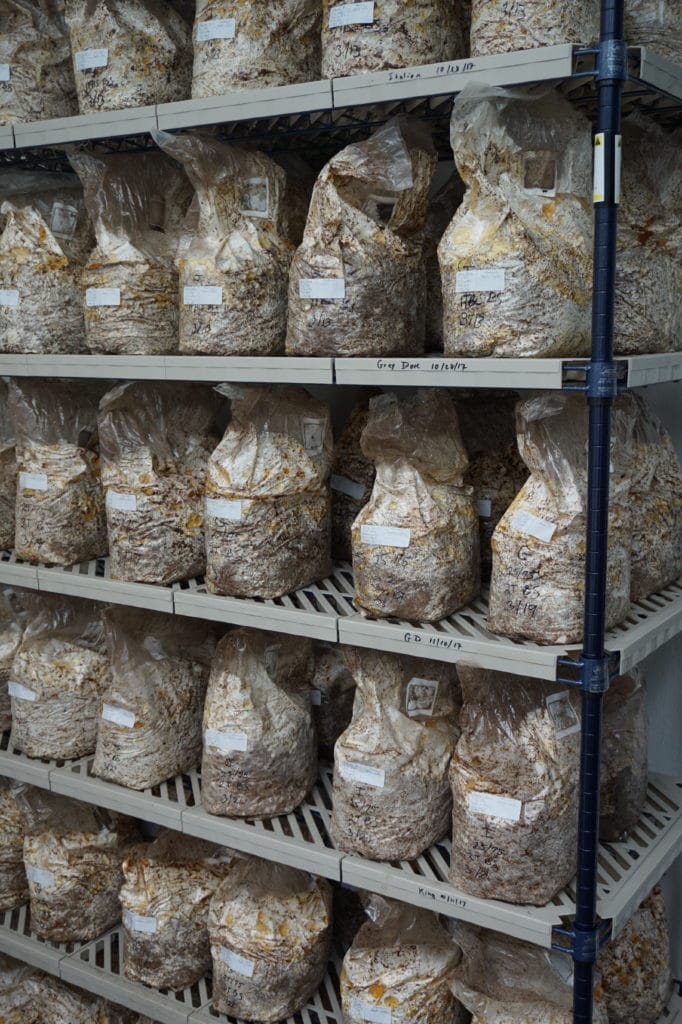
Place bags on racks or shelves so air can flow around them. Stacking bags tightly can slow colonization and increase contamination risk. If you’re short on space, try rotating bags every few days.
A non-obvious insight: Sometimes, condensation forms inside the bag during incubation. Small droplets are normal, but large pools mean the substrate was too wet. Excess water can suffocate mycelium, so be careful with initial moisture content.
If colonization is slow, check room temperature and spawn quality. Old or weak spawn can take much longer, increasing the risk of failure.
Bag Types: Choosing The Best For Your Needs
Not all bags are the same. Here are the main types used for mushroom cultivation:
- Autoclavable polypropylene bags – Most popular, with a filter patch for gas exchange.
- Unfiltered bags – Cheaper but riskier, best for short-term use or outdoor spawning.
- Pre-sealed bags – Ready to use, but less flexible for custom mixes.
The filter patch is important. It lets CO₂ escape and O₂ enter without letting mold spores in. For high yield, use bags with 0. 2–0. 5 micron filters.
If you want to reduce plastic waste, some suppliers now offer biodegradable bags. These can break down in compost after use, but may not be as strong as traditional polypropylene.
Comparison Of Bag Types
| Bag Type | Best For | Advantages | Disadvantages |
|---|---|---|---|
| Polypropylene with filter | Indoor, high-yield | Reusable, less contamination | More expensive |
| Unfiltered bag | Outdoor, spawn run | Cheap, easy to find | High contamination risk |
| Pre-sealed bag | Beginner, small batches | Convenient, ready to use | Limited customization |
Bags come in different sizes, from 1 liter to 5 liters or more. Larger bags hold more substrate, producing more mushrooms per bag, but are harder to handle and sterilize. Beginners often find medium-sized bags (about 2–3 kg wet substrate) easiest to manage.
Creating The Ideal Environment
After colonization, mushrooms need new conditions to fruit. This stage is called the fruiting phase.
- Temperature: 15–20°C for most species (check your strain’s needs).
- Humidity: 85–95% is critical for pinning and healthy growth.
- Fresh air: Open bags or cut slits so mushrooms can breathe.
- Light: A few hours of indirect light daily is enough. Avoid strong sunlight.
A small grow room, tent, or even a closet can work if you monitor conditions. Use a humidifier to boost moisture, and a small fan (on low) for air exchange. Too much airflow dries bags out, so balance is key.
Two beginner tips: Place bags on racks for air flow all around, and group bags by species—different mushrooms can need slightly different conditions.
If your air is very dry, place trays of water or wet towels near the bags. For large setups, consider an ultrasonic humidifier set on a timer. A digital hygrometer is your friend—small changes in humidity can affect yields.
A common mistake is using too much light. Most mushrooms need only diffuse or indirect light, about as much as a bright room. Direct sun can overheat bags and dry mushrooms out, so position them away from windows or use curtains.
Techniques For Bag Opening And Fruiting
When mycelium has fully colonized the bag, it’s time to trigger fruiting. Here are the main methods:
Top Fruiting
Cut off the top of the bag. Mushrooms will grow from the open surface. This is common for oyster mushrooms.
Side Fruiting (slit Method)
Cut slits (2–4 cm) on the sides of the bag. Mushrooms push out through these holes, forming neat clusters. This works well for lion’s mane and shiitake.
Partial Opening
Open the top a little for air, but leave most of the bag closed to keep humidity high.
Each method has pros and cons. Top fruiting gives big flushes but can dry out quickly. Side fruiting allows more mushrooms per bag and uses space better.
If you’re growing in a very dry climate, try the partial opening method first. It keeps more humidity in the bag, reducing the risk of dry or cracked mushrooms. For maximum yield, some growers combine methods—starting with side slits, then opening the top for a final flush.
When making cuts, use a clean, sharp knife or scissors disinfected with alcohol. Dirty tools are a common cause of late-stage contamination.
Managing Humidity And Airflow
Humidity and airflow are the most critical factors after colonization. Low humidity causes small, cracked mushrooms. Poor airflow leads to long, thin stems (called “legging”).
Tips for maintaining perfect conditions:
- Mist bags or room walls daily, but never soak.
- Use a hygrometer to monitor humidity.
- If using a fan, point it away from bags.
- For small setups, a simple plastic tent with trays of water can keep humidity up.
One thing many miss: If the substrate shrinks away from the bag sides, it’s too dry. Add moisture with a sprayer or seal leaks in your grow space.
Another tip: Mushrooms “breathe” as they grow. If the air is stale, you’ll see thin, pale stems or slow growth. Open a window for a few minutes each day, or run a fan on low setting. But avoid strong drafts—they dry the surface too quickly.
For high-value mushrooms like lion’s mane, keep humidity near 95% during pinning. Some growers cover bags loosely with plastic during the first few days of fruiting to keep conditions just right.
Maximizing Yield: Advanced Tips
Getting high yields is about more than just following steps. Try these advanced techniques:
- Use supplements – Adding bran or soy hulls to sawdust can boost yield by 30–40%.
- Layer spawn – Instead of mixing, try layering spawn and substrate for more even colonization.
- Optimize bag size – Bags around 2–5 kg (wet weight) balance yield and manageability.
- Second flushes – After first harvest, keep bags humid and cut new slits for another crop.
- Monitor CO₂ – High CO₂ makes thin stems. Increase airflow if mushrooms look “leggy.”
- Rotate bags – Move bags around racks to balance light and air.
A non-obvious trick: If your first flush is weak, dunk the bag in clean water for 6–8 hours. This rehydrates the substrate and often leads to a strong second flush.
Another overlooked method: Gently massage the bag after the first flush to loosen the substrate. This helps the mycelium access new areas and can boost later harvests.
If you have space, stagger your bag inoculation dates. This spreads out your harvest and makes managing humidity and airflow easier, since not all bags will fruit at once.
Common Problems And How To Fix Them
Bag cultivation is efficient, but problems can occur. Here’s how to recognize and solve them:
Contamination
Symptoms: Green, black, or pink mold; foul smell.
Fix: Remove infected bags immediately. Clean your workspace and check sterilization methods.
Slow Colonization
Symptoms: Mycelium grows unevenly or stops.
Fix: Increase temperature (but not above 27°C), use more spawn, and check substrate moisture.
Small Or Deformed Mushrooms
Symptoms: Mushrooms are tiny, cracked, or misshapen.
Fix: Raise humidity, provide more fresh air, and check for drafts.
Bags Not Fruiting
Symptoms: Fully colonized but no mushrooms appear.
Fix: Lower temperature, increase light, or open the bag for fresh air.
Most issues come from poor hygiene or unstable environment. Small changes often make a big difference.
Another common problem: Mushrooms turn yellow or brown. This is usually a sign of too much CO₂ or not enough humidity. Adjust airflow and mist more often.
If your mushrooms stop growing suddenly, check for signs of bacterial contamination—a sour smell or slimy patches. Remove affected bags and improve cleanliness.
Species Selection: Which Mushrooms To Grow
Not all mushrooms are suited for bags. Here are the best choices:
- Oyster mushrooms (Pleurotus spp.) – Fast, forgiving, and high-yielding.
- Shiitake (Lentinula edodes) – Dense, meaty, but slower to fruit.
- Lion’s mane (Hericium erinaceus) – Unique appearance and flavor, needs high humidity.
- King oyster (Pleurotus eryngii) – Thick stems, does well in bags.
- Enoki (Flammulina velutipes) – Grows in cool conditions, slender stems.
For beginners, oyster mushrooms are the easiest. Advanced growers often try shiitake or lion’s mane for higher market value.
Other species, like reishi or maitake, can be grown in bags, but often require more specific conditions or take much longer to fruit. Start simple, then expand as you gain experience.
When choosing your species, think about your market (if selling), your available space, and your climate. For example, enoki grows best in cool rooms, while oyster mushrooms tolerate a wider range of temperatures.
Harvesting And Handling
Mushrooms are ready when caps open but before they flatten. Use a sharp knife or twist gently to pick. Harvest all at once for best quality.
After harvesting:
- Wipe off substrate bits.
- Store in a paper bag in the fridge.
- For commercial production, chill immediately to slow spoilage.
Do not wash mushrooms before storing—they absorb water and spoil faster.
If you want to maximize shelf life, harvest mushrooms early in the day when temperatures are cool. Keep handling gentle—bruising shortens storage time.
A tip for commercial growers: Pack mushrooms loosely to avoid crushing. Use breathable containers to prevent moisture buildup.
After harvest, inspect the substrate for signs of contamination or pests. If the bag still looks healthy, maintain humidity and wait for the next flush.
Cleaning And Reusing Bags
Polypropylene bags can often be reused, especially for non-commercial grows. Wash thoroughly with hot water and soap. Check for tears or worn-out filters.
However, for maximum yield and low contamination risk, most commercial growers use new bags every cycle. Old bags can be cut up and composted.
If you reuse bags, soak them in a mild bleach solution and rinse well before using again. Always inspect for tiny holes or cracks that could let in contaminants.
Spent substrate makes excellent garden compost or mulch. Some growers use it to inoculate outdoor mushroom beds or enrich garden soil.
Scaling Up: From Hobby To Small Business
If you want to grow more, plan for:
- More space – Shelving or racks maximize vertical space.
- Better climate control – Automated humidifiers and fans help keep conditions stable.
- Bulk substrate preparation – Large pasteurization drums or steamers save time.
- Workflow management – Set up separate areas for substrate prep, inoculation, incubation, and fruiting.
A hidden pitfall: Scaling too fast without solving contamination can wipe out a whole crop. Expand slowly and keep strict hygiene.
As you grow, track your yields, costs, and any issues. This data helps you improve your process and make smart decisions about expanding. Consider networking with other growers in your area to share tips and possibly pool resources for bulk purchases.
For marketing, start local—restaurants, farmers’ markets, and CSA programs are often looking for fresh, local mushrooms. Good packaging and reliable delivery can set you apart from larger competitors.
Economics: Costs, Yields, And Profits
Mushroom bag cultivation can be profitable, but know the numbers.
- Startup costs: Bags ($0.50–$1 each), substrate ($0.20–$0.50/bag), spawn ($1–$2/bag), equipment (varies).
- Yield: 1 kg substrate can produce 0.5–0.7 kg fresh mushrooms per cycle.
- Cycles: 2–4 harvests per bag, over 2–3 months.
- Market price: $5–$20/kg, depending on species and market.
Profit increases with scale and experience. Start small, track your results, and adjust as you grow.
Factor in hidden costs: energy for heating or humidification, cleaning supplies, and your time. If selling, research local regulations and any licenses needed.
A non-obvious insight: Some growers increase profits by selling spawn, growing kits, or even teaching workshops. Offering value-added products can make your business more stable year-round.
Environmental Impact And Sustainability
Bag cultivation can be very sustainable:
- Use agricultural waste (straw, sawdust, coffee grounds).
- Spent substrate is excellent compost.
- Polypropylene bags can be reused or recycled, but some growers are experimenting with biodegradable bags.
To minimize waste, try using local substrates and recycle water where possible.
If sustainability is a priority, research suppliers offering compostable bags. Join local composting programs to ensure spent substrate returns to the soil, rather than landfill.
One more idea: Partner with coffee shops or sawmills to collect waste materials for your substrate. This helps the environment and can lower your costs.
Safety And Hygiene
Mushrooms are safe, but only if hygiene is top priority.
- Always use gloves and a mask during inoculation.
- Clean all tools and surfaces with alcohol.
- Never eat mushrooms with unknown contamination.
For those selling mushrooms, follow local food safety laws. A good resource is the Wikipedia page on mushroom cultivation.
If you notice any allergies or respiratory irritation, wear a respirator, especially when handling dry substrate or mature spores. Good ventilation in your workspace helps protect your health.
Always store finished mushrooms in clean, cool conditions. Discard any that show signs of spoilage, such as slime, off smells, or discoloration.

Credit: northspore.com
Success Stories And Real-world Examples
In Vietnam, small farmers earn extra income by growing oyster mushrooms in bags inside old shipping containers. In the United States, urban growers use climate-controlled rooms to produce shiitake and lion’s mane for restaurants. Even in apartments, people are producing up to 10 kg a month for personal use.
In the UK, a group of friends turned a disused underground tunnel into a thriving mushroom farm, selling gourmet fungi to local chefs. In rural Kenya, women’s cooperatives use bag cultivation to improve nutrition and create new income sources, using straw and coffee waste that would otherwise go unused.
These growers all started small, learned from mistakes, and focused on hygiene and environment. Their success shows that bag cultivation isn’t just for big farms—it’s practical for anyone with the right knowledge and dedication.
Frequently Asked Questions
What Is The Best Mushroom Species For Beginners Using Bags?
Oyster mushrooms are the best choice for beginners. They grow fast, tolerate small mistakes, and give good yields on many substrates like straw or coffee grounds.
How Do I Know If My Bag Is Contaminated?
Look for unusual colors (green, black, pink) or bad smells. Healthy mycelium is bright white and smells earthy. If in doubt, throw the bag away to protect other bags.
Can I Reuse Spent Substrate Or Bags?
Spent substrate is great for compost or garden beds. Bags can be reused if cleaned well, but new bags reduce contamination risk. For commercial scale, always use new bags.
How Long Does It Take To Harvest Mushrooms From A Bag?
It usually takes 3–6 weeks from inoculation to harvest. Oyster mushrooms are fastest, fruiting in as little as 14 days after colonization.
What Is The Most Common Mistake In Bag Cultivation?
Poor hygiene is the top mistake. Not sterilizing substrate, using dirty tools, or handling bags without gloves leads to contamination and crop loss.
Mushroom bag cultivation is a powerful method for growing high-yield crops indoors. With the right techniques, attention to detail, and a focus on hygiene, you can enjoy fresh, delicious mushrooms year-round—whether you’re growing for fun, food, or business.