Growing mushrooms at home or on a small farm is more popular than ever. But for many beginners, the world of mushroom spawn can feel confusing. If you want healthy, abundant mushrooms, you must learn how to buy quality spawn, store it correctly, and inoculate your substrate the right way. These steps are the foundation for a successful harvest.
Understanding mushroom spawn is not just about buying a bag and sprinkling it on straw. It’s about knowing what makes spawn good, how to tell if it’s fresh, and how to avoid common mistakes that waste time and money. Many first-time growers lose entire batches because they bought the wrong type or didn’t store it well.
In this guide, you’ll discover how to handle every stage with skill and confidence—so you get tasty, reliable results.
Let’s explore the essential steps of purchasing, storing, and inoculating mushroom spawn—along with professional tips most beginners miss.
What Is Mushroom Spawn?
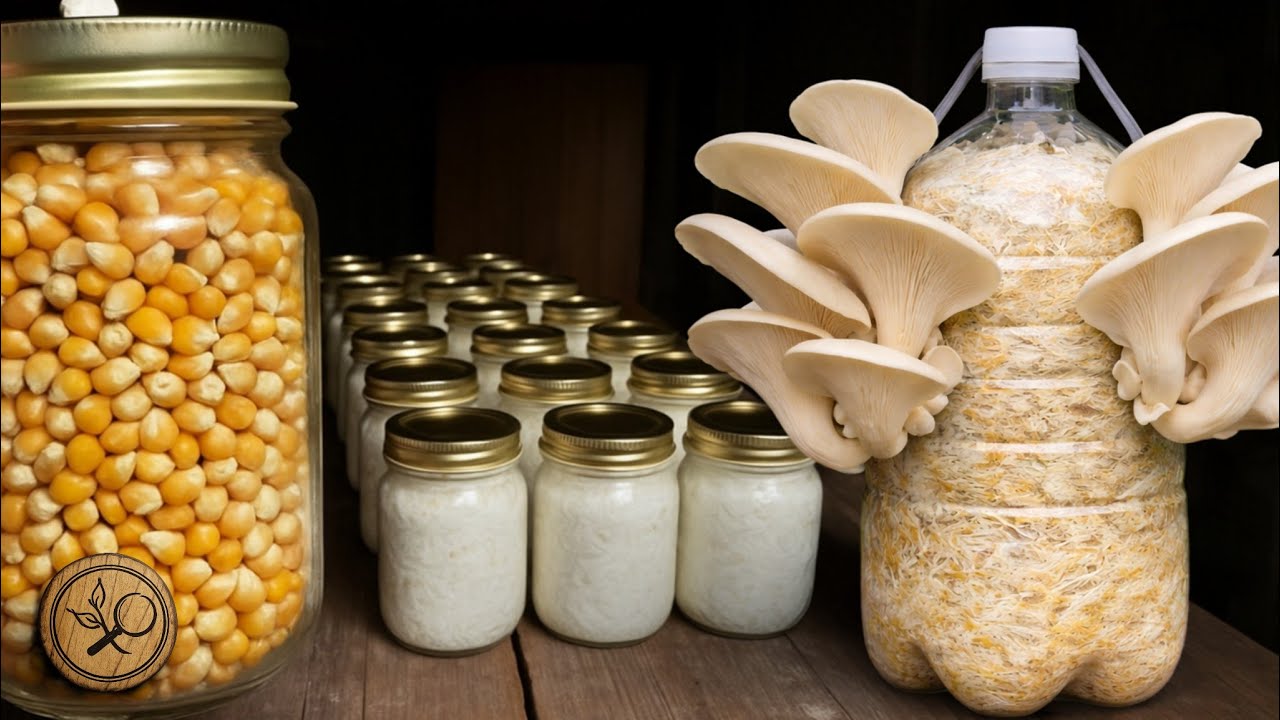
Before buying spawn, it helps to understand what it is. Mushroom spawn is a carrier material (like grains, sawdust, or plugs) that is fully colonized by mushroom mycelium. Think of it as the “seed” for mushrooms, although mushrooms technically reproduce by spores. Spawn acts as a starter for your chosen mushroom variety, helping it quickly take over the growing medium (like straw, logs, or compost).
Unlike spores, which are unpredictable and slow, spawn is vigorous. It gives you a head start and helps ensure consistency. When you add spawn to a substrate, the mycelium spreads and soon produces mushrooms.
A good analogy is yeast for bread. Just as yeast starts the fermentation process, spawn starts the mushroom-growing process. The key advantage is that spawn contains living mycelium, which is already active and strong, ready to spread when it finds a suitable food source.
This is why commercial and home growers almost always use spawn instead of spores for reliable harvests.
Some beginners think they can simply gather wild mushrooms and use their spores to start growing. While this works in nature, for home cultivation it’s risky. Wild spores often carry contaminants or may not be the strain you want. Using high-quality spawn removes much of the uncertainty, giving you a consistent crop with fewer surprises.
Different Types Of Mushroom Spawn
Not all mushroom spawn is the same. The type you choose depends on your mushroom species, grow method, and goals. Each has strengths and weaknesses.
| Spawn Type | Carrier Material | Best Use | Pros | Cons |
|---|---|---|---|---|
| Grain Spawn | Rye, millet, wheat | Bags, buckets, pasteurized substrates | Fast colonization, easy mixing | Short shelf life, contamination risk |
| Sawdust Spawn | Sterilized hardwood sawdust | Logs, blocks, outdoor beds | Long shelf life, good for wood lovers | Slower to colonize than grain |
| Plug Spawn | Inoculated wooden dowels | Log inoculation | Easy for logs, low contamination | Labor-intensive for big projects |
| Liquid Culture | Mycelium in nutrient solution | Expanding spawn or making your own | Can create a lot of spawn, rapid growth | Needs sterile work, contamination risk |
Grain Spawn
This is the most popular type for beginners and small growers. Grain spawn offers fast colonization, which means your substrate is quickly protected from contaminants. Rye and millet are common grains because they have the right nutrients and texture for mycelium to spread. However, grain spawn is sensitive to heat and has a shorter shelf life than sawdust.
Grain spawn is especially useful if you want to scale up your mushroom project. For example, you can use a small amount of grain spawn to inoculate a larger batch of sterilized grain, a process called grain-to-grain transfer. This way, you can multiply your spawn and save on costs over time.
But remember, this requires clean technique to avoid contamination.
Another advantage of grain spawn is its even distribution. The small grains can be mixed easily with substrate, allowing the mycelium to reach every part quickly. This is one reason commercial growers prefer grain spawn for indoor bags or buckets.
Sawdust Spawn
Sawdust spawn is perfect for wood-loving mushrooms like shiitake and lion’s mane. It is less likely to contaminate than grain and stores longer, but it colonizes substrate more slowly. Sawdust spawn is often used for log inoculation, outdoor beds, or making your own spawn at home.
A non-obvious benefit is that sawdust spawn adapts better to outdoor conditions. For example, if you are inoculating garden beds, sawdust spawn mixes well with wood chips, straw, or other outdoor substrates. It also tolerates lower temperatures during colonization, which is helpful if you don’t have climate control.
Sawdust spawn is bulkier than grain, so it may require more effort to mix thoroughly. Also, some hardwoods work better than others. Oak and beech are top choices, while softwoods like pine are less suitable due to resin content.
Plug Spawn
Plug spawn consists of wooden dowels that are inoculated with mycelium. They are hammered into holes drilled in logs. Plug spawn is great for outdoor growing because it’s easy to handle and has a lower risk of contamination. However, it’s not practical for large indoor projects.
For small backyard growers, plug spawn is ideal. You don’t need much equipment—just a drill and a hammer. Each plug acts as a mini colony, gradually spreading through the log over months. While this method takes patience, it requires less monitoring compared to indoor grows.
Plug spawn is also good for educational projects with kids. It’s hands-on, visible, and the steps are easy to follow. However, be prepared for a slow timeline: logs may take a year before fruiting heavily.
Liquid Culture
Liquid cultures are less common among beginners but are powerful for those who want to scale up. Liquid culture is a nutrient solution full of mycelium. You can inject it into sterilized grain jars to make your own spawn. It requires sterile technique but can be a cost-effective way to grow a lot of mushrooms.
A useful tip: liquid culture allows you to store genetic material from your favorite mushroom strains. You can keep small jars of liquid culture in the fridge for months, then use them to restart spawn production as needed. This is how many small farms maintain their best-performing strains.
However, contamination is a risk with liquid culture, so only attempt this if you have some experience with sterile work.
Credit: smallfarms.cornell.edu
How To Choose The Right Mushroom Spawn
Many new growers make the mistake of buying whatever spawn is cheapest or easiest to find. But not all spawn is equal, and the wrong choice can lead to slow growth, poor yields, or contamination.
- Species Compatibility: Make sure you buy spawn for the mushroom type you want to grow (e.g., oyster, shiitake, lion’s mane). Not all spawn works with all methods.
- Spawn Type: Choose based on your substrate and growing method. For example, grain spawn works best in bags or buckets, while plug spawn is for logs.
- Supplier Quality: Always buy from a reputable supplier with good reviews and a clear track record. Freshness and cleanliness matter more than price.
- Spawn Age: Ask how recently the spawn was made. Fresher spawn colonizes better and is less likely to fail.
- Quantity Needed: Calculate how much spawn you need. A common rule is 2-5% of the substrate weight, but more spawn usually means faster colonization.
If you’re growing for the first time, it’s smart to start with oyster mushrooms. They tolerate a wider range of conditions and substrates, and their spawn is usually cheaper and easier to find. Shiitake and lion’s mane are delicious but slightly more demanding in terms of temperature and substrate.
Another factor is your timeline. If you want a quick harvest, choose fast-colonizing spawn like oyster grain spawn. For patient, long-term projects, like shiitake logs, plug or sawdust spawn works well.
Common Beginner Mistakes
- Buying old spawn: Mycelium weakens over time. Avoid spawn older than 1-2 months.
- Using the wrong type: Plug spawn won’t work well in bags. Grain spawn isn’t ideal for logs.
- Ignoring reviews: A cheap supplier with bad results will cost you time and money.
Many beginners also forget to check if the spawn is for the right temperature range. For example, some oyster strains fruit only in cool weather, while others need warmth. Always read the supplier’s notes about the strain.
A less obvious mistake: overestimating how much spawn you’ll use. If you buy more than you can store and use quickly, some will go bad before you need it.
Trusted Spawn Suppliers
Look for suppliers that focus on mushroom cultivation, not just general gardening. In the US, companies like Field & Forest, North Spore, and Fungi Perfecti are well known for quality. In Europe and Asia, check for local mushroom labs or farms with strong reputations.
An extra tip: ask suppliers if they offer support for beginners. Good companies often provide guides or even answer questions by email. This can be a big help if you run into problems.
What To Look For When Buying Mushroom Spawn
When you’re ready to buy, check for these signs of quality:
- Firm, white mycelium: Healthy spawn should be densely colonized and white. Off-colors (green, black, pink) are signs of contamination.
- Moist, but not soggy: Spawn should not be dry or slimy.
- No bad smell: Fresh spawn smells earthy, not sour or rotten.
- Visible grains or sawdust: You should see the carrier material, not just a solid mass.
- Clean packaging: Sealed bags with air filters are best. Avoid torn or dirty packaging.
For plug spawn, check that the dowels are evenly covered with white mycelium. For sawdust and grain, look for a nice “mat” of mycelium with no bald or wet patches.
If you’re unsure, most suppliers will answer questions or send a recent picture. Don’t be afraid to ask for details, especially for larger orders.
A detail many overlook: the packaging date. Even if spawn looks good, if it’s been on a shelf for months, it may perform poorly. Always check for a clear date or ask when it was made.
How Much Mushroom Spawn Should You Buy?
How much spawn you need depends on your substrate amount and how fast you want results.
| Substrate Weight | Minimum Spawn | Recommended Spawn | Colonization Speed |
|---|---|---|---|
| 5 kg (11 lbs) | 100 g | 250 g | 10-14 days |
| 10 kg (22 lbs) | 200 g | 500 g | 10-14 days |
| 20 kg (44 lbs) | 400 g | 1 kg | 10-14 days |
Using more spawn speeds up colonization and reduces contamination risk, but it costs more. For most home growers, using at least 3-5% spawn by weight gives reliable results.
If you’re growing outdoors, you may need more spawn because of competing organisms in the environment. For logs or garden beds, following the higher end of recommendations pays off in the long run.
A practical tip: order a bit more than you think you need. Sometimes spills or clumping occur, and it’s frustrating to run short during inoculation.
How To Store Mushroom Spawn Properly
Fresh spawn is alive—it breathes, grows, and can spoil if not handled well. Storing it the right way is crucial for strong, healthy mushrooms.
Short-term Storage (up To 2 Weeks)
- Keep cool: Store spawn at 2-5°C (35-41°F) in the refrigerator. Do not freeze.
- Keep sealed: Leave spawn in its original bag until use. The filter patch on the bag allows mycelium to breathe.
- Avoid direct light: Light triggers fruiting; spawn should stay in the dark.
If you don’t have a fridge, use the coolest, darkest spot in your home. A cellar or unheated room in winter can work, but check temperatures regularly.
Medium-term Storage (2-6 Weeks)
- Monitor moisture: Open the fridge as little as possible. If your fridge is very dry, put the spawn bag inside a clean plastic box.
- Check weekly: Inspect for contamination (odd colors, foul smell) and condensation inside the bag.
If you see water pooling in the bag, gently tilt to drain excess—but keep the bag sealed. Too much moisture encourages bacteria.
Long-term Storage (over 6 Weeks)
- Do not store spawn for long if possible: Old spawn loses vigor and is more likely to fail. If you must store it, keep it at just above freezing and use within 2 months.
For plug spawn, long-term storage is possible if kept dry and cold. Sawdust spawn does better than grain, but all spawn declines with age.
Avoiding Common Storage Mistakes
- Never freeze spawn: Freezing kills living mycelium.
- Don’t store at room temperature: Warmth speeds up aging and contamination.
- Don’t break up spawn until ready: Breaking it releases nutrients and can trigger contamination.
One often-missed point: don’t crowd spawn bags. Leave space around them in the fridge for air flow. Overcrowding traps heat and encourages spoilage.
A pro tip: If you see a small patch of contamination in a spawn bag, don’t use any of it. Contamination usually spreads invisibly. Play it safe to avoid ruining your entire project.
A big mistake is buying more spawn than you can use quickly. Plan your projects so you start inoculation soon after your order arrives.
Credit: www.youtube.com
Preparing For Inoculation: Setting Up For Success
Inoculation means mixing your spawn with a sterile or pasteurized substrate so mycelium can take over. This step is where most failures happen, usually from poor preparation.
Clean Workspace
- Disinfect your work area: Wipe surfaces with alcohol or bleach.
- Wash hands and tools: Use soap and, if possible, wear clean gloves.
- Keep pets and drafts away: Air movement spreads contaminants.
Don’t forget to clean mixing containers and any utensils you’ll use. Even small bits of dirt or dust can carry unwanted bacteria or mold.
Prepare Substrate
Different mushrooms need different substrates. Oyster mushrooms like straw or coffee grounds. Shiitake prefers hardwood sawdust or logs. Always pasteurize or sterilize your substrate before adding spawn.
- Pasteurizing straw: Heat to 65-80°C (150-175°F) for 1-2 hours.
- Sterilizing sawdust: Use a pressure cooker (121°C / 250°F for 90 minutes).
Let substrate cool completely before adding spawn.
If you’re working with a large amount, consider preparing your substrate in batches. Hot substrate will kill mycelium, so patience matters here.
A common error: under-pasteurizing. Make sure all of your substrate reaches the target temperature. Cold spots are a welcome mat for mold.
Tools You Need
- Large mixing container: For blending spawn and substrate.
- Clean bag or bucket: For final incubation.
- Alcohol spray: For cleaning hands and surfaces.
- Mask and gloves (optional): Reduces contamination.
You can also use a kitchen scale to measure substrate and spawn for accuracy. Even a small mistake in ratio can impact colonization speed.
How To Inoculate Like A Pro
Now you’re ready for the most important step: inoculation. This process is simple but requires attention to detail.
- Break up the spawn: Gently crumble grain or sawdust spawn inside the sealed bag to separate the mycelium. This increases contact points with the substrate.
- Mix spawn and substrate: Pour substrate into your mixing container. Add spawn and mix thoroughly so mycelium touches as much substrate as possible.
- Fill containers: Transfer the inoculated mix into grow bags, buckets, or containers. Pack tightly but don’t crush.
- Seal and label: Close containers to maintain humidity. Add a label with the date and species.
- Incubate: Keep in a dark, clean space at 20-24°C (68-75°F). Most species will fully colonize in 10-21 days.
Take your time with mixing. The more evenly distributed the spawn, the more uniform your colonization will be. Uneven mixing leads to patchy growth and makes it harder to spot problems early.
If using bags, squeeze out extra air before sealing. Mycelium needs some oxygen, but too much air allows contaminants to grow.
Pro Tips
- More spawn, less risk: Using more spawn means faster colonization and less chance for mold.
- Temperature matters: Too hot or cold slows growth or kills mycelium.
- Check for contamination early: If you see green, black, or pink, remove that batch immediately.
Another tip: keep notes of your process. Write down the date, amount of spawn, and observations. This helps you improve with each batch and troubleshoot if something goes wrong.
Inoculating Logs With Plug Spawn
Log inoculation is a special case, usually for shiitake or oyster mushrooms.
- Drill holes: Use a 5/16” drill bit to make holes 1 inch deep, spaced 4-6 inches apart.
- Insert plugs: Hammer each plug flush with the log surface.
- Seal with wax: Brush melted cheese wax or beeswax over each plug and cut end.
- Stack logs: Place in a shady, moist area. Logs will fruit after 6-12 months.
A tip for logs: soak them in water for 24 hours before inoculating, especially if they’ve been cut for more than a few weeks. Moist logs colonize faster.
Monitoring Colonization And Troubleshooting
After inoculation, mycelium needs time to colonize the substrate. This stage is called incubation.
- Watch for white growth: Healthy mycelium covers the substrate in a white, fluffy layer.
- Check for contamination: Any green, black, or off-color patches are bad. Remove contaminated batches.
- Maintain temperature: Most mushrooms prefer 20-24°C (68-75°F) during incubation.
- Humidity is key: If using bags, do not open until colonization is complete.
Don’t disturb your bags or containers during colonization. Opening them too early lets in contaminants and slows progress.
If the mycelium stops growing or turns yellow, check temperature and moisture. Sometimes, a small increase in humidity revives growth.
Common Problems
- Slow growth: Usually from old spawn, cold temperatures, or poor mixing.
- Contamination: Often from dirty hands, unpasteurized substrate, or bad spawn.
- Dry substrate: Mycelium stops if there isn’t enough moisture. Squeeze a handful—it should feel like a wrung-out sponge.
If you see standing water, your substrate is too wet. Pour off excess water and remix if possible.
When And How To Fruit Your Mushrooms
Once your substrate is fully colonized, it’s time to trigger fruiting. This means giving the right mix of light, humidity, and fresh air.
- Move to fruiting conditions: Place in a bright, humid area. Indirect sunlight or fluorescent light is fine.
- Increase humidity: Mist with water or use a humidity tent.
- Fresh air exchange: Open bags or poke holes for air. Mushrooms need oxygen to develop.
- Harvest at the right time: Pick mushrooms when caps are fully formed but before they start dropping spores.
If you want to maximize yields, track the humidity with a simple hygrometer. Most mushrooms fruit best at 85-95% humidity. If your space is dry, mist more often or use a plastic tent.
A common mistake is harvesting too late. Overripe mushrooms drop spores and begin to spoil, reducing shelf life and taste.

Credit: mycopunks.com
Advanced Tips For Spawn Success
Experienced growers use special tricks to get even better results.
- Make your own spawn: Start with a clean spore or tissue culture, transfer to sterilized grains, and expand your own supply. This saves money and gives control.
- Layering spawn in substrate: Mixing is good, but layering spawn in the middle and top of substrate can speed colonization.
- Multiple species: Advanced growers sometimes run two compatible species (like different oyster strains) for variety, but this can be risky for beginners.
- Scaling up: If you want to grow commercially, consider learning about grain-to-grain transfer or using a flow hood for sterile work.
Another advanced technique is using liquid culture to refresh old spawn. If you have a batch of spawn that is still healthy but a bit old, injecting some fresh liquid culture can boost vigor and speed up colonization.
Key Data And Stats
- Shelf life of spawn: Grain spawn (2-4 weeks), sawdust spawn (up to 2 months), plug spawn (6 months if cold-stored).
- Contamination rates: Home growers report up to 25% contamination if not careful; pros keep it under 5%.
- Yield per kilogram: Oyster mushrooms can yield 1 kg of mushrooms per 2 kg of substrate using 5% spawn.
A less-known fact: using more spawn increases yields not just by speeding colonization, but by giving your mushrooms a stronger “head start” against bacteria and mold.
Case Study: Oyster Mushroom Success
A small farm in Wisconsin used 500 grams of grain spawn to inoculate 10 kg of straw. They pasteurized straw, mixed spawn in a sanitized room, and incubated at 22°C. Colonization finished in 12 days, and they harvested over 5 kg of fresh oyster mushrooms within 3 weeks.
They avoided contamination by using fresh spawn and high spawn rates.
This example shows how careful planning and following best practices pays off. The farm also rotated substrate batches to ensure a constant supply of mushrooms for their market.
Another detail: they kept detailed logs of every batch, noting spawn source, dates, and outcomes. Over time, this helped them spot which suppliers and methods gave the best results.
Buying Mushroom Spawn Online Vs. Local
Should you buy spawn online or from a local supplier? Both have pros and cons.
| Source | Pros | Cons |
|---|---|---|
| Online | More variety, easy ordering, reviews available | Shipping risk, possible delays, can’t inspect before buying |
| Local | Inspect quality in person, support local business, fresher spawn | Limited species, possibly higher price |
If you’re new, buy a small amount from each and compare results. Local spawn often has a freshness advantage.
For more information on mushroom cultivation, check out the Mushroom Cultivation Wikipedia page.
Frequently Asked Questions
What Is The Difference Between Mushroom Spawn And Spores?
Mushroom spawn is live mycelium on a carrier material, ready to colonize substrate quickly and reliably. Spores are the natural reproductive units of mushrooms, but they are slow, unpredictable, and more likely to pick up contaminants. Spawn is used for consistent results, while spores are mainly for strain development or research.
For most home growers, using spawn is like using a starter plant instead of planting seeds—it saves time and increases chances of success.
How Do I Know If My Spawn Has Gone Bad?
Signs of bad spawn include foul odors (sour, rotten), visible mold (green, black, pink), slimy or dried-out texture, and weak or patchy mycelium. Healthy spawn is white, firm, and earthy-smelling. When in doubt, don’t risk your whole batch—replace questionable spawn.
Can I Store Mushroom Spawn In The Freezer?
No, you should never freeze mushroom spawn. Freezing damages or kills the live mycelium, making it useless. Always store at refrigerator temperature (2-5°C / 35-41°F) but never below zero.
How Much Spawn Should I Use For Best Results?
Use at least 2-5% of your substrate weight in spawn. More spawn leads to faster colonization and lower contamination risk. For small home projects, using 3-5% is standard. For logs, follow supplier instructions—usually one plug per drilled hole.
Is It Safe To Make My Own Mushroom Spawn?
Yes, but only if you use sterile technique. Making your own spawn requires pressure cooking grains, working in a clean space, and understanding contamination risks. It’s a good way to save money and learn, but beginners often lose batches to mold if not careful.
Growing mushrooms at home is rewarding, tasty, and educational. By buying quality spawn, storing it properly, and inoculating your substrate with care, you can achieve great harvests—just like the pros. As you gain experience, you’ll find what works best for your space, climate, and favorite mushrooms.
Keep learning, stay curious, and enjoy the journey from mycelium to meal.