
Growing mushrooms at home or on a commercial scale starts with one critical step: preparing high-quality grain spawn. Grain spawn is the foundation of mushroom cultivation—without it, you can’t get a healthy, productive crop. Among many grains, rye berries are a top choice for mushroom growers because of their nutrient content and structure. But turning rye berries into fully colonized spawn jars or bags takes careful preparation, attention to detail, and patience. Small mistakes can ruin an entire batch, while small improvements can boost yields and reduce contamination.
This guide covers every step of mushroom grain spawn preparation using rye berries, from selecting and hydrating the grain, sterilization, inoculation, and colonization, all the way to troubleshooting common issues. You’ll learn not only the “how,” but the “why” behind each step—plus practical tips that even experienced growers sometimes miss. Whether you want to grow oyster, shiitake, lion’s mane, or other gourmet mushrooms, mastering grain spawn will set you up for success.
Why Rye Berries For Mushroom Spawn?
Choosing the right grain matters. Rye berries are the whole, unprocessed seeds of rye grass. They offer several features that make them ideal for mushroom cultivation:
- Nutrient-rich: Rye berries provide balanced nutrition, supporting fast mycelium growth.
- Moisture holding: Their structure absorbs water well without turning mushy.
- Size and texture: The small, firm grains allow mycelium to jump easily from one grain to another, speeding colonization.
- Low clumping: When prepared correctly, rye berries stay separate, which is important for even growth and later mixing.
Other grains like millet, wheat, and sorghum are also used, but rye berries remain a favorite, especially for species like Psilocybe cubensis, oyster, and shiitake mushrooms. Some growers prefer them because rye is less likely to be contaminated with pesticides compared to common wheat or corn.
Sourcing And Selecting Rye Berries
Getting good results starts with the right raw material. Not all rye berries are equal, and what you buy can affect your results in surprising ways.
What To Look For
- Whole, uncracked grains: Broken grains can turn mushy and invite contamination.
- Freshness: Old rye berries might be dry and take longer to hydrate.
- Organic when possible: Reduces the chance of chemical residues that can harm mycelium.
- Free from debris: Avoid rye with pebbles, husks, or visible mold.
You can find rye berries at health food stores, farm supply shops, or online. Look for products labeled “whole rye berries” or “rye grain for sprouting. ” Commercial mushroom suppliers also sell pre-cleaned rye, but this can be more expensive.
Pro tip: Test a small batch before buying in bulk. Some rye berries are treated with antifungals or have a high mold load, making them unsuitable for spawn.
Credit: www.midwestgrowkits.com
Prepping Rye Berries: Washing And Soaking
Clean rye is essential. Dirty or dusty grain will cause problems later.
Step 1: Washing
- Pour your measured rye berries into a large bowl or bucket.
- Fill with cold tap water. Stir vigorously with your hand.
- Pour off any floating debris, empty hulls, or dust.
- Repeat until the water runs mostly clear (usually 2-3 rinses).
This removes contaminants and makes the next steps more predictable.
Step 2: Soaking
Soaking hydrates the grains and starts to soften them for later sterilization.
- Cover the washed rye with at least twice as much water by volume (e.g., 1 liter rye, 2 liters water).
- Add a tablespoon of gypsum (calcium sulfate) per 5 liters of water. Gypsum is optional but helps keep grains from sticking.
- Soak at room temperature for 12–24 hours.
Non-obvious insight: Soaking also “wakes up” endospores (a dormant form of bacteria). When you later sterilize, these are more likely to be killed, reducing contamination risk.
If you skip soaking, grains will not hydrate fully, and you may see slow mycelium growth or dry spots in jars.
Simmering For Perfect Hydration
After soaking, you need to cook the rye berries briefly. This step ensures the grains are fully hydrated inside but not bursting or mushy outside.
How To Simmer
- Drain the soaked rye berries in a colander.
- Place them in a large pot with fresh water—just enough to cover the grains.
- Bring to a gentle simmer (not a rolling boil).
- Stir occasionally. Simmer for 10–20 minutes.
Test a few grains by breaking them open. The inside should be soft and moist but not doughy or falling apart.
Tip: Overcooked grains will burst and turn sticky, leading to clumping and higher contamination. Undercooked grains will be dry inside, and mycelium will struggle to colonize them.
Draining And Surface Drying
Proper drying is a step many beginners rush or skip. Extra surface moisture is a main cause of bacterial contamination and grain clumping.
- Pour the simmered rye into a large colander or onto a clean screen.
- Shake gently to remove steam and excess water.
- Spread grains in a thin layer for 20–60 minutes, until the outside of the grains feels dry but the inside is still hydrated.
If you grab a handful and squeeze, your hand should not get wet.
Non-obvious insight: If you’re using jars or bags, wet grains can cause the substrate to stick to the glass or plastic, making it hard for mycelium to move and for you to shake and mix later.
Adding Gypsum (optional Step)
Gypsum, or calcium sulfate, is a white powder that keeps grains from sticking and provides a small mineral boost. While optional, it’s a simple way to improve results.
- Add 1 teaspoon per kilogram of wet, drained grain.
- Mix thoroughly before loading into jars or bags.
Gypsum does not change pH, but it can make it easier to break up colonized spawn later.
Loading Grain Into Jars Or Bags
You need a sterile, airtight environment for colonization. The most common containers are glass mason jars (usually wide-mouth, quart size) or autoclavable polypropylene bags with filter patches.
How Much To Fill
- Fill jars or bags about 2/3 to 3/4 full. This leaves room for shaking and air exchange.
- Avoid overfilling, which can cause compaction and slow colonization.
Lids And Filters
- For jars, use metal or plastic lids with a small hole (about 1/4 inch) covered with micropore tape or a filter disk.
- For bags, use filter patch bags designed for mushroom growing.
A good filter allows air exchange but blocks most contaminants.
Pro tip: Label each container with the date and batch details. This helps you track progress and troubleshoot problems later.
Sterilization: Killing Contaminants
Sterilizing the grain is the most important step to prevent contamination. Home pressure cookers and autoclaves are both suitable.
Pressure Cooker Method
- Place jars or bags on a rack in the pressure cooker to keep them off the bottom.
- Add enough water to cover the bottom (usually 1–2 inches).
- Seal the cooker and bring to 15 PSI (pounds per square inch).
- Sterilize for 90–120 minutes.
Larger bags may need up to 2. 5 hours. Do not start timing until full pressure is reached.
Why Not Boiling?
Boiling only reaches 100°C (212°F), not enough to kill bacterial endospores. Pressure cooking raises the temperature to 121°C (250°F), which is needed for full sterilization.
Cooling
Let jars or bags cool completely to room temperature before opening or inoculating. Hot grains can kill mushroom mycelium or create a vacuum that sucks in contaminants.
Common mistake: Rushing this step by opening while still warm increases contamination risk.
Inoculation: Introducing Mycelium
Once your rye grains are sterilized and cool, it’s time to add mushroom culture. The two main ways are:
- Liquid culture (LC): A nutrient broth containing live mycelium.
- Agar wedge: A small chunk of colonized agar from a petri dish.
- Grain-to-grain transfer: Transferring colonized grain into fresh jars.
Working Clean: Still Air Box Or Flow Hood
You must work in a clean environment. The two most common setups are:
- Still air box: A sealed plastic box with arm holes, wiped with alcohol.
- Laminar flow hood: A filtered airflow device that blows clean air across your workspace.
Spray down surfaces with 70% isopropyl alcohol and let everything settle for a few minutes before starting.
Inoculation Steps
- Flame sterilize your scalpel, syringe needle, or tweezers.
- Open the grain jar or bag quickly.
- Add your inoculant:
- LC: Inject 1–2 ml per jar through the lid’s injection port or a self-healing rubber plug.
- Agar: Drop a small wedge (1×1 cm) onto the grains.
- Grain: Transfer 1–2 tablespoons of colonized grain.
- Reseal immediately.
- Shake gently to distribute the inoculant.
Tip: Less is more—adding too much liquid can make grains soggy and slow growth.
Incubation And Colonization
After inoculation, the mycelium needs time to colonize the grain. This is called incubation.
Ideal Conditions
- Temperature: 22–25°C (72–77°F) for most gourmet mushrooms.
- Darkness: Not strictly required, but avoid direct sunlight.
- Humidity: Not important at this stage—jars and bags are sealed.
Place containers on a shelf, away from drafts and extreme temperatures.
Monitoring Progress
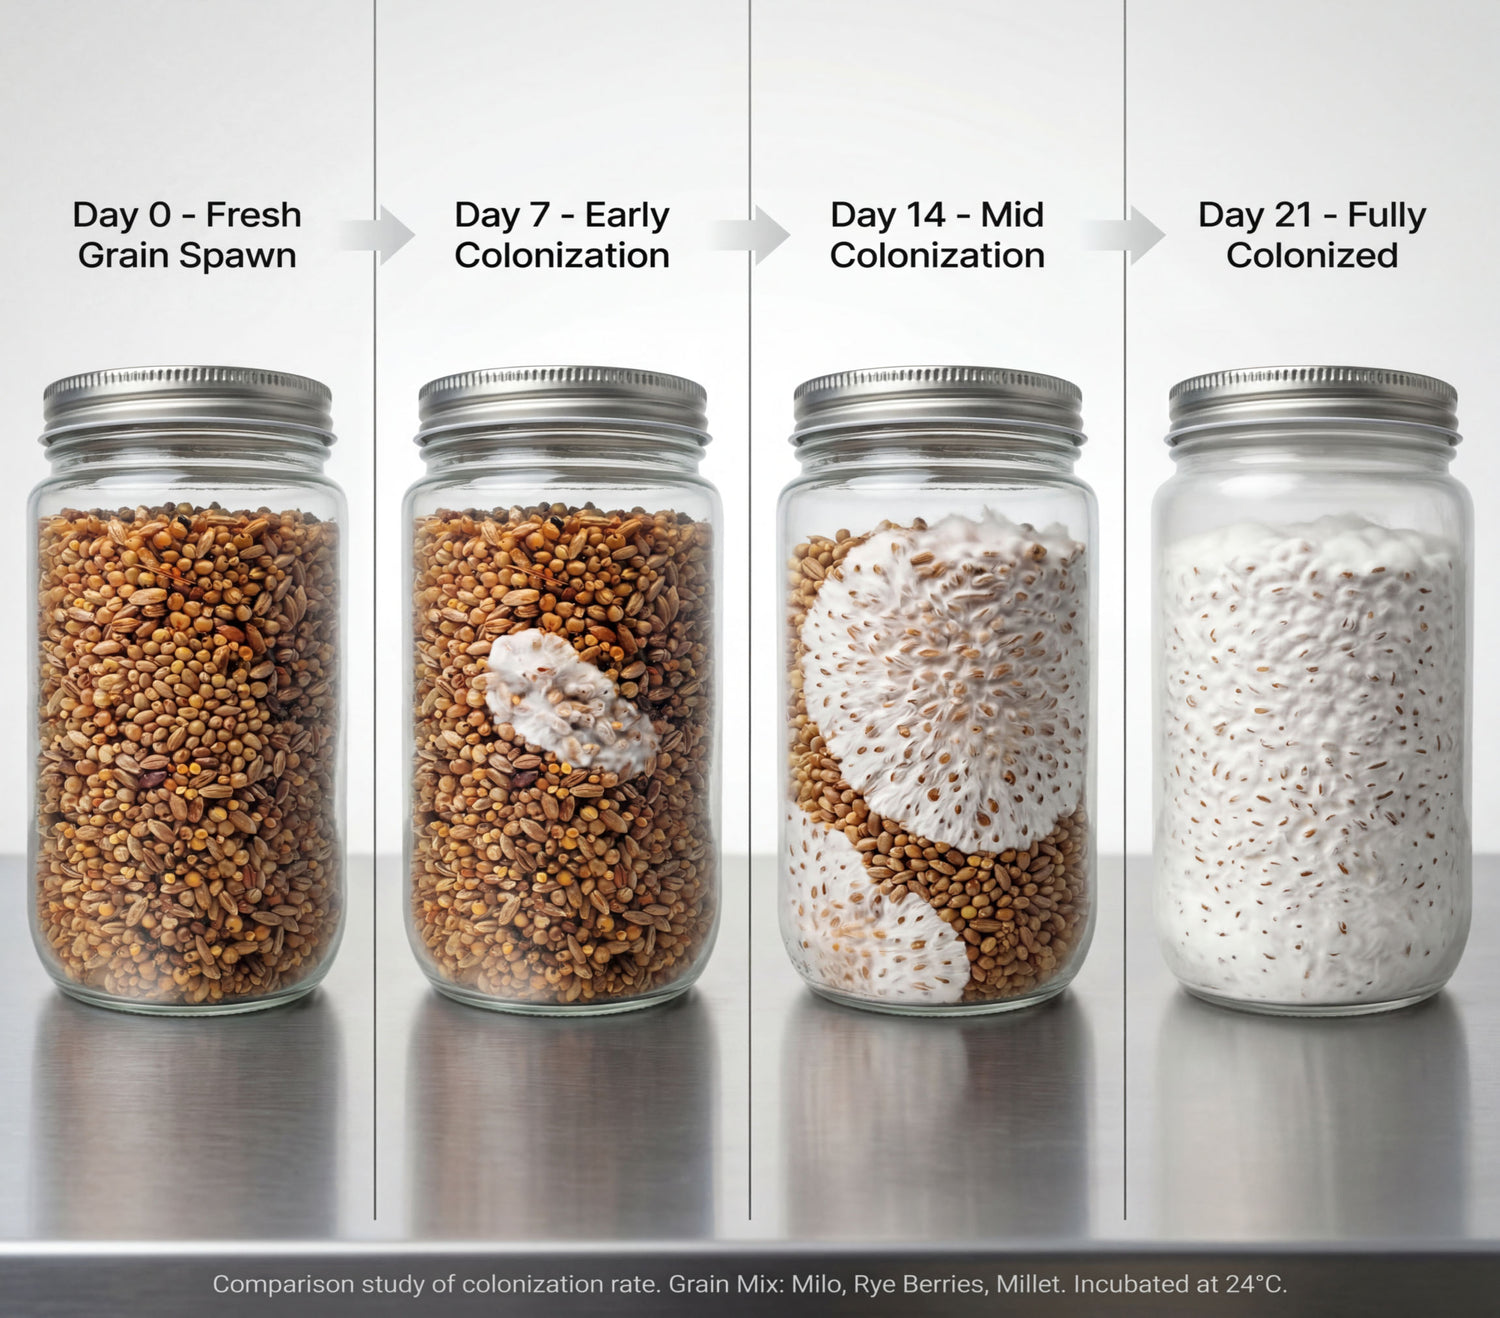
You should see white threads (mycelium) start to appear after 3–7 days.
- By 7–14 days: About 25–50% colonization.
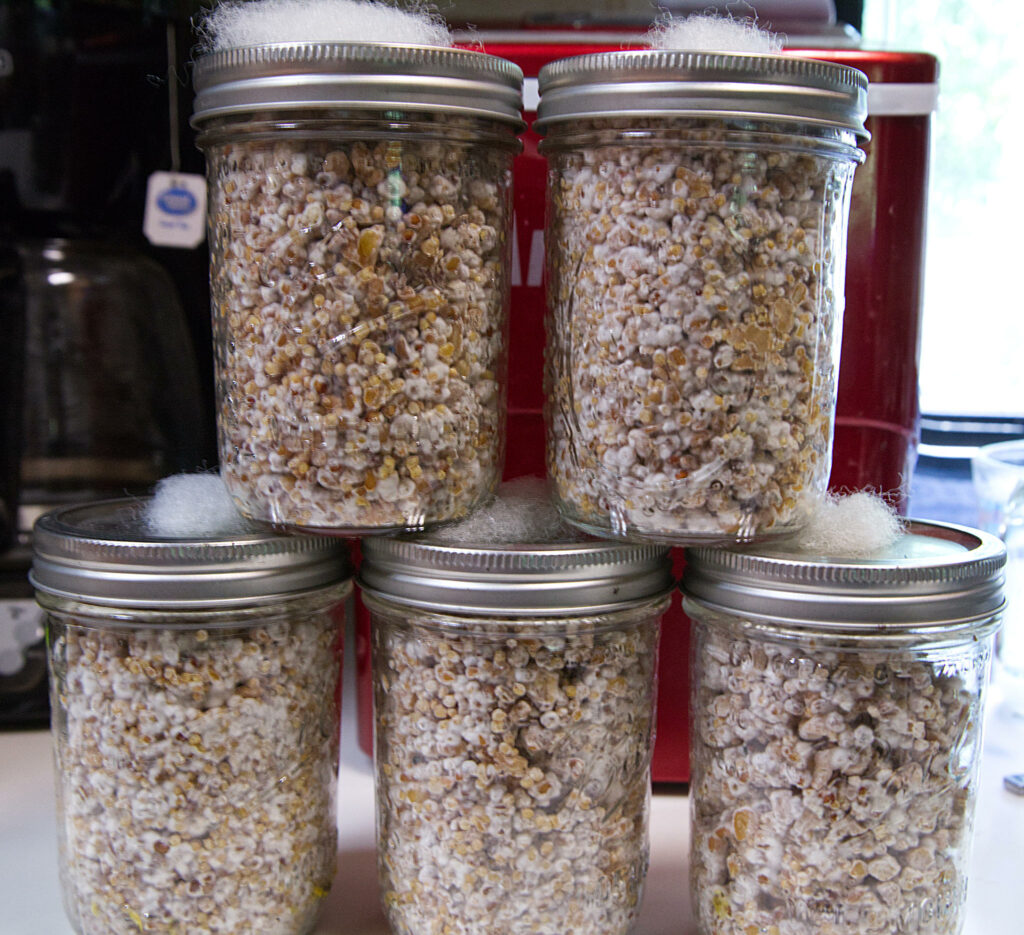
- By 2–4 weeks: Fully colonized, with no uncolonized grain visible.
If you see green, black, or pink patches, or if grains turn slimy, this is contamination. Remove and discard affected jars away from your growing area.
Shaking
When jars or bags are about 20–30% colonized, shake or mix gently to break up the mycelium and spread it evenly. This speeds colonization and helps spot hidden contamination.
Non-obvious insight: Don’t shake too early. If the mycelium is not strong enough, you can stall or delay growth.
Signs Of Healthy Colonization
A successful batch of rye grain spawn should look like this:
- Uniform white mycelium: Evenly distributed, no bald or patchy spots.
- No strange odors: Healthy spawn smells earthy, not sweet, sour, or chemical.
- No colors except white: Any green, black, yellow, or pink is contamination.
If you’re unsure, compare your jars to images from trusted mushroom cultivation resources.
Common Contaminants And How To Avoid Them
Even with perfect technique, contamination is a risk. Here are the most frequent culprits:
- Trichoderma (green mold): Fast-growing, powdery green patches. Usually due to insufficient sterilization or dirty inoculant.
- Bacterial contamination (“wet spot”): Grains appear slimy, wet, or have a foul odor. Often from over-wet grains or poor drying.
- Black mold (Aspergillus): Black or gray growth, sometimes with a strong odor.
- Yeast: Pink or orange color, usually from dirty equipment.
How to reduce contamination:
- Always sterilize for at least 90 minutes at 15 PSI.
- Let grains surface dry before filling containers.
- Work quickly and cleanly during inoculation.
- Discard any jars with off smells or colors.
Non-obvious insight: Some contamination is invisible at first. If a jar is slow to colonize compared to others, it may be subtly contaminated.
Uses Of Colonized Grain Spawn
Once your rye grain is fully colonized, it’s ready for the next stage. You can use it to:
- Inoculate bulk substrates like coco coir, manure, or straw for fruiting.
- Make more grain spawn (grain-to-grain transfer).
- Store in the fridge for several months (though fresher is better).
Grain spawn is the “seed” for growing mushrooms in larger quantities, and its quality directly affects yields.
Comparing Rye Berries To Other Grains
Not sure if rye is right for you? Here’s a comparison to other popular grains for mushroom spawn.
| Grain | Size | Nutrient Content | Clumping | Common Issues |
|---|---|---|---|---|
| Rye Berries | Medium | High | Low | Rare pesticides if organic |
| Millet | Small | Medium | Very low | Hard to hydrate evenly |
| Wheat Berries | Medium | High | Moderate | Can turn gummy |
| Sorghum (Milo) | Small | Medium | Low | More expensive |
| Popcorn | Large | Low | Low | Poor mycelium distribution |
For most beginners, rye offers the best balance of price, performance, and ease of use.
Key Mistakes In Grain Spawn Preparation
Even experienced growers occasionally slip up. Here are common mistakes and how to avoid them:
- Not rinsing enough: Dust and debris can cause contamination.
- Skipping the soak: Leads to dry grains and slow colonization.
- Overcooking the grains: Bursting grains make a sticky mess.
- Not draining well: Wet grains clump and breed bacteria.
- Inoculating hot jars: Kills mycelium or sucks in contaminants.
- Too much inoculant: Excess liquid can stall growth.
- Not shaking jars: Uneven colonization, more contamination risk.
- Poor labeling: Hard to track batches and spot problems.
Practical tip: Write down every batch’s steps and results. Over time, you’ll spot patterns and improve your technique.
Scaling Up: Bulk Preparation And Automation
If you plan to grow larger quantities, manual methods become slow. Here’s how professionals scale up:
Bulk Soaking And Cooking
- Use large mesh bags for soaking and draining.
- Steam kettles or large pressure cookers (autoclaves) can process 20–100 kg of grain at a time.
Filter Patch Bags
- Instead of jars, use filter patch bags. Easier to shake and mix, and they take up less space.
Automated Sterilization
- Commercial growers use steam tunnels or continuous autoclaves for high throughput.
- Automated grain washers save time but need regular cleaning.
Quality Control
- Regularly test batches for contamination by incubating small samples before large-scale use.
Non-obvious insight: As you scale up, even small process errors can ruin entire batches—automation reduces labor but increases the importance of quality checks.
Troubleshooting Slow Or Stalled Colonization
Sometimes, colonization is slow or stops entirely. Here are the main causes and fixes:
- Dry grains: Mycelium can’t bridge gaps; try longer soaking next time.
- Too cold: Below 20°C (68°F), growth slows. Raise the temperature.
- Compacted grain: Overfilled jars or bags; fill less and shake gently.
- Old or weak inoculant: Start with fresh, vigorous mycelium.
- Hidden contamination: Discard slow jars; don’t risk spreading problems.
Pro tip: Use a control jar with no inoculant to check your sterilization. If this jar colonizes with anything, review your process.
Safety And Cleanliness Tips
Working with grains and pressure cookers requires care:
- Always release pressure slowly to avoid burns.
- Use gloves and a mask when working in your still air box or flow hood.
- Clean all surfaces with alcohol before and after.
- Discard contaminated jars in sealed plastic bags.
Non-obvious insight: Even healthy-looking grain spawn can harbor invisible spores. Never open contaminated jars indoors—dispose of them outside.
Step-by-step Example: Oyster Mushroom Grain Spawn
Let’s walk through a real-world example for oyster mushrooms.
- Weigh out 2 kg of whole rye berries.
- Wash thoroughly and soak overnight in 4 liters of water with 1 tablespoon gypsum.
- Next morning, drain and simmer for 15 minutes.
- Drain and spread grains for 30 minutes until surface dry.
- Mix in 2 teaspoons gypsum.
- Load into 5 quart-sized mason jars, filling each about 2/3 full.
- Fit lids with filter disks.
- Sterilize at 15 PSI for 2 hours.
- Cool for 8 hours to room temperature.
- In a still air box, open each jar and add 1 agar wedge of oyster mushroom mycelium.
- Reseal and shake to distribute.
- Incubate at 24°C in the dark.
- After 5 days, shake jars at 20% colonization.
- After 14–18 days, jars are fully colonized and ready to use.
Result: Healthy, white, fluffy mycelium with no odors—perfect for spawning to straw or sawdust.
Shelf Life And Storage Of Grain Spawn
Freshness matters. Here’s how to keep your rye grain spawn usable:
- Store in the fridge (1–4°C / 34–39°F) for up to 3 months.
- Seal jars or bags tightly to prevent drying out.
- Label with the strain and date.
Over time, spawn loses vigor. For best results, use within 1 month of full colonization.
Non-obvious insight: Old spawn can start to fruit inside the jar, especially in warmer climates. This reduces its effectiveness for further inoculations.

Credit: www.midwestgrowkits.com
When To Move From Grain To Bulk Substrate
Timing the transfer is important. Move to your bulk substrate when:
- The grain is fully colonized, with no visible uncolonized spots.
- The mycelium looks strong and healthy.
- There are no signs of contamination.
Don’t wait too long—overgrown spawn can get compacted and harder to mix.
Practical tip: If you see pinning (tiny mushrooms) inside the jar, use the spawn immediately or discard.
Environmental Impact And Sustainability
Rye berries are a renewable agricultural product. To make your mushroom growing more sustainable:
- Buy organic rye when possible.
- Compost spent grain and substrate after use.
- Reuse or recycle jars and bags if contamination-free.
Some growers experiment with local grains or agricultural waste to reduce costs and environmental impact.
Credit: tagammeer-festival.de
Data Table: Grain Spawn Preparation Stages And Timing
Here’s a summary of each stage and how long it takes:
| Stage | Duration | Key Actions |
|---|---|---|
| Washing & Soaking | 12–24 hours | Rinse, soak in water + gypsum |
| Simmering | 10–20 minutes | Cook until grains are hydrated |
| Draining & Drying | 20–60 minutes | Surface dry grains thoroughly |
| Sterilization | 90–150 minutes | Pressure cook at 15 PSI |
| Cooling | 4–12 hours | Cool to room temperature |
| Inoculation | 10–20 minutes per batch | Add mycelium under sterile conditions |
| Incubation/Colonization | 14–28 days | Mycelium colonizes grain |
Understanding these timeframes helps with planning and troubleshooting delays.
Advanced Techniques: Supplementing And Experimenting
Some advanced growers add supplements or experiment with different methods to boost yields:
- Coffee grounds: Small amounts can provide extra nutrients but increase contamination risk.
- Vitamin/mineral mixes: Usually not needed if using high-quality rye.
- Different grains: Mixing rye with millet or wheat can improve structure for some mushroom species.
Try new approaches in small batches to avoid large losses if something goes wrong.
Resource: For more in-depth reading on mushroom cultivation methods, see the Wikipedia page on Mushroom Cultivation.
Frequently Asked Questions
How Do I Know If My Grain Spawn Is Contaminated?
Signs of contamination include unusual colors (green, black, pink), foul smells (sour, rotten, or sweet), and slimy or wet grains. Healthy mycelium is always white and smells earthy. If in doubt, compare with online pictures from reputable mushroom forums or discard the jar.
Why Are My Rye Berries Sticking Together After Sterilization?
Sticky grains are usually caused by overcooking or not drying the grains enough after simmering. Make sure to surface dry grains until they feel dry to the touch but are still hydrated inside. Adding a small amount of gypsum also helps keep grains separate.
Can I Use Other Grains Instead Of Rye Berries?
Yes, you can use wheat berries, millet, sorghum, or popcorn. Each has different properties—millet is smaller and less likely to clump, while wheat can get gummy. Rye is popular because of its balance of nutrition, structure, and cost.
How Long Can I Store Colonized Grain Spawn?
Store fully colonized spawn in the refrigerator for up to three months. Over time, spawn loses vigor and may start to dry out or fruit inside the container. For best results, use within one month.
What Should I Do With Contaminated Jars Or Bags?
Never open contaminated jars indoors. Seal them in a plastic bag and dispose of them outside to prevent spreading mold spores. Clean your workspace with alcohol and check your process for possible mistakes before starting a new batch.
Preparing mushroom grain spawn with rye berries is a rewarding process that lays the groundwork for a healthy, productive mushroom crop. Attention to detail at every stage—washing, soaking, sterilization, inoculation, and incubation—pays off in reduced contamination and higher yields. With practice, you’ll develop your own rhythm and discover small improvements that make a big difference. Remember, even the best growers face setbacks, but good technique and careful observation will set you on the path to successful mushroom cultivation, one jar at a time.