
Setting up a mushroom lab at home might sound like a project for experts, but with clear steps, the right tools, and a bit of patience, anyone can do it—even in a small apartment. Growing mushrooms isn’t just a hobby; it’s a science and an art. You’re creating a space where life can begin from a single spore and turn into a delicious, healthy food. But to get consistent results, you need more than just spores and hope. You need a controlled environment, reliable equipment, and a workflow that prevents contamination. This guide will walk you through every detail, from choosing the right space to every piece of equipment you’ll need. You’ll learn what matters, what’s optional, and what beginners often overlook. By the end, you’ll have a clear map for creating a home mushroom lab that works—no matter your budget or background.
Choosing The Right Space For Your Home Mushroom Lab
The first step is finding a suitable area in your home. Your choice will affect every part of the process, from how easy it is to keep things clean to the quality and safety of your mushrooms.
Size And Location
You don’t need a huge space to start. Many successful home mushroom labs fit into a small spare room, a large closet, or even a corner of a basement. The key is consistency. Pick a spot you can keep clean and control the environment. Avoid kitchens and bathrooms, which have high contamination risk.
Minimum space: A 2m x 2m area is enough for basic work. If you want to expand later, choose somewhere you can add shelves or a second table.
Think of your mushroom lab like a mini clean room. The smaller the space, the easier it is to manage cleanliness and environmental conditions. For example, a closet with a solid door is better than an open corner of a living room.
If you have little space, vertical shelving can help you use the area efficiently. Be sure there’s enough room to move around, set up equipment, and clean all surfaces easily.
If you’re living in a shared apartment, talk to your housemates. Explain that you’ll need a spot with limited traffic and no pets. It’s important that no one uses the space for other activities, as even bringing in outdoor shoes or moving laundry through can increase contamination risks.
Environmental Control
Mushrooms need specific conditions to grow well:
- Temperature: Most species prefer 20-24°C (68-75°F) for incubation and 15-20°C (59-68°F) for fruiting.
- Humidity: 60-70% for incubation, 80-95% for fruiting.
- Light: Indirect, diffuse light for fruiting. Total darkness for incubation.
- Airflow: Good air exchange reduces the risk of mold.
Practical example: Many home growers use a basement corner with a small window for indirect light and a portable humidifier.
If you’re in a region with big temperature changes, consider using a small electric heater or cooling fan with a thermostat. Humidity can be controlled with a simple spray bottle for small setups or an ultrasonic humidifier for larger ones.
Non-obvious insight: It’s easier to add humidity than to remove it. If your space is naturally humid (like a basement in summer), you may need a small dehumidifier during incubation. Monitoring with a digital hygrometer will help you adjust before problems start.
For airflow, opening the door for a few minutes a day can be enough for a small lab, but avoid creating drafts. Drafts can carry dust and spores, increasing contamination risks.
Isolation From Contaminants
Fungi are sensitive to bacteria and molds. Choose a space away from pets, houseplants, and cooking areas. Install a simple door sweep or weather stripping to limit airflow from the rest of the house.
Non-obvious tip: Avoid carpeted rooms. Carpets trap dust and spores, raising contamination risk.
Make it a habit to wipe your feet or change shoes before entering your lab area. If possible, wear a clean lab coat or dedicated clothes. Keep all food and drinks out of the lab, as crumbs and spills are a magnet for bacteria.
If your only option is a carpeted area, use a plastic floor mat or washable rugs you can clean with bleach. Never do mushroom work directly over carpet.
Essential Equipment For A Home Mushroom Lab
Every successful mushroom lab relies on equipment that helps you keep things sterile, consistent, and easy to monitor. Here’s what you’ll need, why it matters, and how to choose what fits your budget.
Sterile Work Area
This is the heart of any mushroom lab. It’s where you handle spores, grain, and substrate without letting in competing microbes.
Still Air Box (sab)
A still air box is a clear plastic container with armholes. It blocks air currents so you can work without dust or spores landing on your tools. SABs are cheap and easy to build at home.
A large storage tote works well. Cut two armholes in one side (smooth the edges with sandpaper), and wipe the inside with isopropyl alcohol before each use. Put your hands and materials inside through the armholes, and work slowly to avoid stirring up dust.
Why beginners miss this: Many skip building an SAB, thinking their kitchen counter is “clean enough.” This leads to failed grows.
Laminar Flow Hood
A laminar flow hood blows filtered air across your work surface, pushing away contaminants. It’s ideal for advanced setups but can cost $300-$800 or more. If you plan to grow mushrooms often, consider building one as your skills grow.
A good flow hood uses a HEPA filter and a strong blower. You can find DIY plans online, but building one safely requires attention to detail. The main benefit: you can pour agar plates, make liquid cultures, and do grain transfers with much less contamination risk.
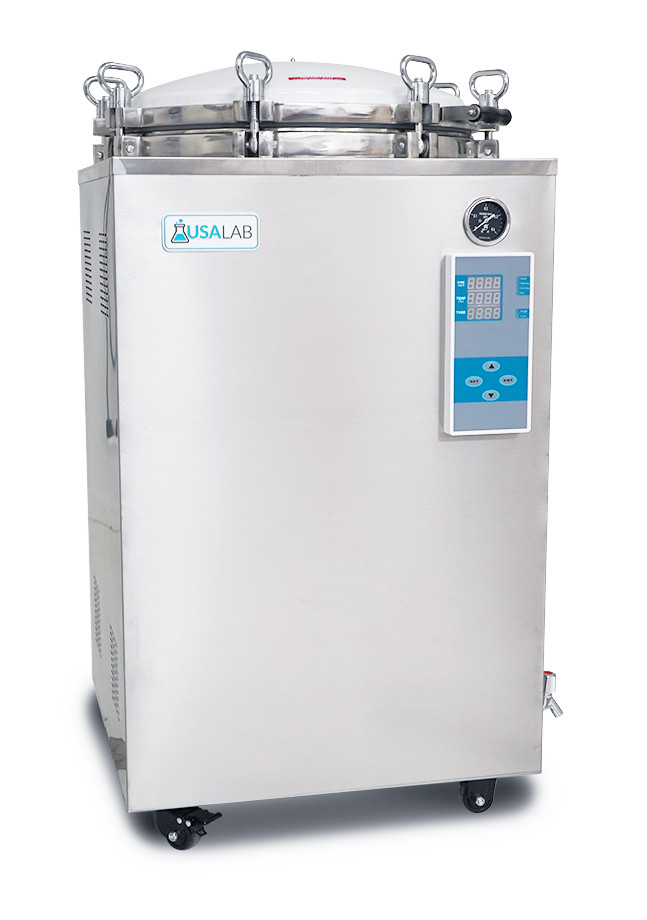
Pressure Cooker Or Autoclave
You’ll need to sterilize grains, tools, and sometimes water. A pressure cooker (at least 15 psi) is essential for home labs.
- Size: 8-23 liters (large enough for multiple jars or bags)
- Material: Stainless steel lasts longer and is easier to clean.
A pressure cooker lets you process several jars at once. Make sure your model can reach 15 psi; many cheaper cookers do not. If you can, buy a model with a safety lock and pressure gauge.
Autoclave
More expensive than a pressure cooker but offers automatic temperature control and higher capacity. Useful for larger or semi-commercial setups.
Autoclaves are common in labs and hospitals, but most home growers use pressure cookers due to cost.
Incubation Chamber
After inoculation, your spawn needs a warm, stable place to colonize. Simple options include:
- Insulated box: A cooler with a heating mat inside.
- Heated closet: Use a thermostat to keep the temperature steady.
Non-obvious tip: Place your chamber on a shelf, not the floor. Floors have bigger temperature swings and more dust.
If you’re in a cold climate, you can use a seedling heat mat with a thermostat. Avoid direct contact between jars and the heating mat—raise them on a rack or towel to prevent overheating. Check the temperature with a separate thermometer to be sure.
Fruiting Chamber
This is where your mushrooms actually grow. The chamber must keep humidity high and allow for fresh air.
- Plastic tote with holes: The “shotgun fruiting chamber” is a common DIY method.
- Mini-greenhouse: For larger setups, a zippered greenhouse with a humidifier works well.
Drill 1 cm holes every 10 cm around all sides of the tote for good airflow. Place a layer of perlite (moistened, not soaked) on the bottom to boost humidity. Clean the chamber with diluted bleach after every cycle.
A mini-greenhouse can be used for bigger crops. Place it on a waterproof mat and use a small fan to move air gently. If you use a humidifier, clean it weekly to avoid bacterial slime.
Air Filtration
Clean air is critical. Even a small HEPA air purifier makes a big difference.
- HEPA filters: Capture 99.97% of particles.
- Placement: Near the work area, but not blowing directly on open cultures.
If you’re on a budget, use a portable HEPA purifier and run it for an hour before working. Change filters as recommended by the manufacturer.
Non-obvious tip: Don’t forget to clean the outside of your air purifier. Dust can build up and reduce effectiveness.
Humidity And Temperature Control
Keeping your environment consistent is easier with:
- Digital hygrometers and thermometers for accurate readings
- Ultrasonic humidifiers for bigger fruiting chambers
- Inkbird temperature controllers (or similar) for precise heating
Check your readings at least twice a day—morning and night. If you notice humidity drops, mist more often or add a larger humidifier.
Lighting
Mushrooms need light to form normal fruit bodies, but not much. Use:
- LED strip lights with a timer (12 hours on, 12 off)
- Color temperature: 5000–6500K (daylight white)
Mount the lights above or to the side of your fruiting chamber, not inside (to avoid water damage). For oyster and shiitake mushrooms, consistent light leads to better shape and color.
Shelving And Storage
Strong, easy-to-clean shelves keep your workflow organized. Use:
- Plastic or metal racks (wood can harbor mold)
- Clear bins for tools, ingredients, and finished products
If space is limited, use stacking bins or wall-mounted shelves. Keep your most-used items at eye level.
Cleaning And Disinfection Supplies
Sterility is your best defense against failure. Always have:
- Isopropyl alcohol (70%) for tools and surfaces
- Bleach solution for deep cleaning
- Gloves, face masks, and hair covers for personal protection
Use color-coded cloths or paper towels—one for alcohol, one for bleach, and one dry. Change gloves if you touch non-sterile surfaces.
Other Useful Tools
- Scalpels and tweezers for precise work
- Petri dishes (glass or plastic) for culture work
- Syringes and needles for liquid cultures
- Parafilm or plastic wrap to seal dishes
- Measuring spoons and scales for recipes
Try to buy stainless steel tools—they’re easier to sterilize and last longer. If you use plastic Petri dishes, buy in bulk and store them in a clean, sealed bag.
Here’s a quick comparison of major equipment choices for home labs:
| Equipment | Low-Budget Option | Pro/Commercial Option | Why It Matters |
|---|---|---|---|
| Sterile Work Area | Still Air Box | Laminar Flow Hood | Reduces contamination when handling cultures |
| Sterilization | Pressure Cooker | Autoclave | Kills bacteria and spores in grain/substrate |
| Fruiting Chamber | Plastic Tote | Mini-Greenhouse | Keeps humidity and airflow ideal for mushrooms |
| Air Filtration | HEPA Purifier | Commercial Air Exchange Unit | Prevents mold spores and bacteria in the air |
Credit: www.usalab.com
Designing An Efficient Workflow
A good mushroom lab isn’t just about tools—it’s about process. The right workflow saves time, reduces mistakes, and improves yields. Here’s how to set up a step-by-step routine that works.
Step 1: Preparation
Before you even open a spore syringe, get everything ready.
- Clean the whole space: Wipe all surfaces with alcohol or bleach.
- Lay out supplies: Arrange tools in the order you’ll use them.
- Dress for sterility: Wear gloves, a mask, and a hair cover.
Tip: Turn off fans and close windows 20 minutes before starting. This lets dust settle.
Double-check that you have enough alcohol wipes, clean paper towels, and that your tools are all within reach. If you need to step out of the lab for any reason, change gloves before returning.
Non-obvious insight: Pre-label your jars, bags, and dishes before starting the sterile work. Writing on labels after inoculation can increase contamination risk.
Step 2: Sterilization
Sterilize everything that will touch your mushrooms:
- Jars or bags: Fill with grain or substrate, then pressure-cook at 15 psi for 90 minutes.
- Tools: Wipe with alcohol and flame sterilize scalpels/needles before each use.
Common mistake: Rushing this step leads to contamination. Always allow sterilized items to cool before opening.
If you’re using plastic bags, make sure they are suitable for high temperatures. Don’t try to speed up cooling by placing hot jars in cold water—they can crack or suck in contaminated air.
If your pressure cooker is full, increase the time by 15 minutes to ensure the center gets hot enough. For best results, let the jars cool overnight inside the cooker.
Step 3: Inoculation
This is when you introduce spores or cultures to your grain or substrate.
- Work inside your SAB or flow hood.
- Flame sterilize your needle or scalpel between each jar or dish.
- Seal everything quickly after inoculation.
Non-obvious insight: Label your jars with the date and strain. This helps you track growth and spot slow or contaminated batches.
Move slowly and deliberately—sudden movements stir up air. If you drop something inside your SAB, stop and wipe everything down with alcohol before continuing.
If you’re using a liquid culture syringe, squirt a few drops out before inoculating your substrate to clear any blockages or contaminants.
Step 4: Incubation
Place inoculated jars or bags in your incubation chamber.
- Check temperature and humidity daily.
- Avoid stacking containers too tightly—airflow is important.
- Look for signs of contamination: Green, black, or pink spots mean you should discard the batch immediately.
Incubation can take from 7 to 21 days, depending on the species. If you see condensation inside jars, make sure the room isn’t too cold. If you notice slow growth or odd smells, remove the affected containers to avoid spreading contaminants.
Non-obvious insight: Rotate jars or bags every few days so all sides get equal warmth. This helps avoid cold spots and uneven colonization.
Step 5: Fruiting
Once colonized, move your substrate to the fruiting chamber.
- Mist sides of the chamber, not the mushrooms directly.
- Fan fresh air into the chamber 3-6 times a day (unless automated).
- Harvest at the right time: Pick mushrooms just as the caps begin to open.
Monitor the color and texture of the caps. If they start to flatten or release spores, you’ve waited too long. Use clean scissors or a knife to cut mushrooms at the base, and avoid tearing the substrate.
If your mushrooms look thin or “leggy,” increase the light and airflow. If they turn yellow or have fuzzy stems, raise humidity.
Step 6: Cleaning And Reset
After harvesting, clean all surfaces and equipment. Dispose of old substrate safely—don’t compost contaminated material near your home.
Pro tip: Keep a written logbook. Note what worked and what didn’t to improve future grows.
Deep-clean your fruiting chamber with bleach or hydrogen peroxide, and let it dry completely before the next batch. Wash all tools and containers thoroughly. If you had contamination issues, take extra time to clean fans, filters, and any hard-to-reach places.
Common Problems And How To Avoid Them
Even with the best setup, things can go wrong. Most failures in home labs come from the same few issues.
Contamination
Cause: Dirty tools, poor air control, or rushed steps.
Prevention: Always sterilize, work slowly, and use a SAB or flow hood.
Example: If you see a green patch in one jar, remove it immediately—mold spreads quickly. Clean nearby surfaces with alcohol, and check your workflow for missed steps.
Poor Yields
Cause: Wrong temperature/humidity, old spores, or poor air exchange.
Prevention: Monitor conditions, use fresh cultures, and don’t overcrowd containers.
Non-obvious tip: Write down what changes you make for each batch. Sometimes a small adjustment (like raising humidity by 5%) can double your harvest.
Slow Colonization
Cause: Substrate too wet/dry, low temperatures, weak spores.
Prevention: Adjust substrate moisture, keep chamber warm, and buy spores from reputable sources.
Insight: If your substrate feels heavy or soggy, squeeze out extra water before sterilizing. Overly wet substrate is a common beginner mistake.
Equipment Failure
Cause: Cheap pressure cookers, bad thermometers, broken humidifiers.
Prevention: Invest in reliable brands. Test equipment before each run.
Even a small leak in your pressure cooker lid can reduce sterilization. Check gaskets and seals often. For digital equipment, keep spare batteries or cords handy.
Here’s a summary of common issues and solutions:
| Problem | Common Cause | Best Fix |
|---|---|---|
| Contamination | Poor sterilization, dirty workspace | Clean thoroughly, use SAB or flow hood |
| Slow growth | Low temperature, old spores | Increase warmth, use fresh cultures |
| Small mushrooms | Low humidity, poor lighting | Add humidifier, use proper lights |
| Equipment breaks | Cheap brands, poor maintenance | Buy quality, regular checks |

Credit: mycologyst.art
Safety Precautions In A Home Mushroom Lab
Mushroom cultivation is generally safe, but you should follow some important rules to protect your health and your results.
Personal Safety
- Wear gloves and masks when handling cultures and chemicals.
- Avoid open flames near alcohol or cleaning fluids.
- Wash hands thoroughly before and after lab work.
If you spill alcohol or bleach, wipe it up right away and ventilate the area. Keep a small first-aid kit in your lab for minor cuts or burns.
Preventing Allergies
Some people develop allergies to mushroom spores. If you notice sneezing, itchy eyes, or breathing problems, increase ventilation and wear a better mask (N95 or higher).
Non-obvious tip: Try working with different mushroom species. Some, like oyster mushrooms, produce more spores. If you have sensitive lungs, shiitake or king oyster produce fewer airborne spores.
Safe Disposal
Never dump contaminated substrate or cultures in your garden or regular trash. Bag them securely and put them in outdoor waste bins.
Non-obvious insight: Regularly clean air filters and humidifiers. These can become sources of mold if not maintained.
If you have large amounts of contaminated material, double-bag it and label it clearly. If your region allows, check for local hazardous waste collection.
Scaling Up: When And How To Expand Your Lab
Once you’re getting consistent harvests, you might want to scale up. Here’s how to do it without losing control over contamination or quality.
Adding More Shelving
Increase your growing space vertically. Use strong, adjustable racks and make sure each shelf gets enough light and airflow.
Non-obvious insight: Leave at least 20 cm (8 in) between shelves to make misting and harvesting easier. Overcrowded shelves can lead to poor yields and more contamination.
Upgrading To A Laminar Flow Hood
If you’re making lots of grain spawn or agar plates, a laminar flow hood will save time and reduce contamination. Build or buy one when you’re ready.
Having a flow hood allows you to clone wild mushrooms, experiment with new strains, and even share cultures with friends.
Automating Humidity And Fresh Air
Consider adding:
- Ultrasonic humidifiers on timers or controllers
- Small fans with HEPA filters to boost air exchange
As you automate, check your devices daily for clogs or leaks. Even automated systems need regular cleaning and maintenance.
Record Keeping
As your lab grows, keep detailed records of:
- Strains and results
- Contamination events
- Equipment maintenance
This will help you troubleshoot and repeat your best grows.
Pro tip: Join online mushroom communities for advice and troubleshooting. The Shroomery is a respected resource with many experienced growers.
Cost Breakdown: Setting Up Your First Home Mushroom Lab
Let’s look at the typical costs for a basic home lab setup versus a more advanced one.
| Item | Basic Setup (USD) | Advanced Setup (USD) |
|---|---|---|
| Still Air Box | 20 | — |
| Laminar Flow Hood | — | 400 |
| Pressure Cooker | 80 | 150 |
| Incubation Chamber | 20 | 50 |
| Fruiting Chamber | 30 | 120 |
| Air Purifier | 70 | 200 |
| Lighting | 15 | 60 |
| Shelving | 40 | 120 |
| Cleaning Supplies | 20 | 40 |
| Misc. Tools | 25 | 70 |
| Total | 320 | 1210 |
Note: Prices are estimates as of 2024 and may vary by region. You can start small and upgrade as your skills and needs grow.
Remember, many items can be found used or repurposed. For example, second-hand pressure cookers or plastic shelving are often available at a discount. Don’t try to save money on critical items like HEPA filters or pressure cookers—failure here costs more in ruined batches.
Smart Tips For Consistent Success
Many beginners struggle with contamination or uneven results. These practical tips will boost your success and confidence.
- Start small. Fewer jars or bags are easier to manage and monitor.
- Master sterilization. This is the most important skill in mushroom growing.
- Stay organized. Label everything, keep a log, and clean as you go.
- Monitor conditions daily. Small changes in temperature or humidity can make a big difference.
- Learn from mistakes. Every failed batch is a chance to improve.
Non-obvious tip: Use a calendar app to remind you when to check, mist, or harvest. This helps keep your workflow consistent even if you’re busy.
Extra insight: Try growing two different species at the same time. This teaches you how different mushrooms react to the same environment and helps you understand which species suit your local conditions.

Credit: www.midwestgrowkits.com
Frequently Asked Questions
What Is The Easiest Mushroom To Grow At Home?
The oyster mushroom (Pleurotus ostreatus) is the most beginner-friendly. It grows fast, tolerates a wider range of conditions, and is more resistant to contamination compared to species like shiitake or lion’s mane.
If you want to try something a bit more advanced, the king oyster and wine cap are also good choices, but require more precise humidity.
How Can I Tell If My Mushroom Culture Is Contaminated?
Look for unusual colors (green, black, pink), strong bad smells, or fuzzy textures that differ from your main mycelium. Healthy mycelium is usually white and uniform. If in doubt, throw it out—contaminants can be harmful.
Non-obvious insight: Smell is often the first sign. If your jar smells sour, sweet, or musty, even with no visible mold, it’s best to discard it.
Do I Need A Flow Hood To Grow Mushrooms At Home?
No. Many home growers succeed with just a still air box. A laminar flow hood is a good investment for advanced growers, but not required for beginners.
Can I Use Regular Kitchen Equipment For Mushroom Growing?
Some items—like pots, bowls, or measuring spoons—can be from your kitchen, but never reuse them for cooking after using them in your lab. Dedicated equipment helps prevent cross-contamination.
Extra tip: Color-code your lab tools with tape to make sure they don’t go back to the kitchen by accident.
Where Can I Find More Information About Home Mushroom Cultivation?
A respected resource is the Wikipedia page on mushroom cultivation. You’ll find guides, tips, and links to further reading.
Setting up a mushroom lab at home is both rewarding and practical. By following these steps and investing in the right equipment, you’ll enjoy reliable harvests and develop valuable skills. The process teaches patience, attention to detail, and respect for nature’s smallest miracles.
With the right workflow and a focus on cleanliness, your home can become a mini-laboratory for gourmet mushrooms—feeding both your curiosity and your kitchen.