
Growing mushrooms year-round is a dream for many home growers and urban gardeners. For those who want a reliable, indoor solution, the Martha tent setup has become a popular choice. It’s a flexible, scalable mini-greenhouse that creates the right environment for mushrooms, even if you don’t have a garden or much space. With a bit of planning and the right techniques, you can enjoy a steady harvest of mushrooms no matter the season.
The Martha tent method is named after the plastic shelving units originally sold under the Martha Stewart brand, but the concept works with any similar shelving and clear cover. This setup lets you control humidity, temperature, and airflow—three things mushrooms need to grow well.
As you read, you’ll learn how to set up your own Martha tent, keep it running, avoid common problems, and get the best yields possible from your mushroom projects.
Why Choose A Martha Tent For Mushrooms?
A Martha tent offers several advantages over traditional mushroom growing methods:
- Controlled Environment: You can adjust humidity, light, and airflow to fit the needs of many mushroom species.
- Space Efficiency: Shelving lets you use vertical space, growing more mushrooms in a small area.
- Easy Maintenance: The setup is simple to clean and monitor.
- Year-Round Growing: Indoor conditions mean you aren’t limited by weather or season.
Many growers, especially those in apartments or cities, find this method much easier than trying to build a full grow room. You can start small and expand later, making it perfect for both beginners and experienced cultivators.
What Is A Martha Tent?
A Martha tent is a DIY indoor greenhouse made from a shelving unit covered with clear plastic. It usually has:
- Shelves for holding mushroom blocks, trays, or bags
- A plastic cover (like a zip-up greenhouse cover or thick clear plastic sheeting)
- An air exchange system (fans, filters, or vents)
- A humidity system (ultrasonic humidifier, cool mist humidifier, or fogger)
The goal is to keep humidity high, air fresh, and light gentle—all things that help mushrooms grow healthy and strong.
Planning Your Martha Tent Setup
Before you start buying supplies, it’s important to plan your setup. Think about:
- Available space: How much room do you have? Measure the area.
- Mushroom types: Some mushrooms like more humidity or different temperatures.
- Budget: You can build a basic Martha tent for under $100, but costs rise with automation and larger size.
- Power supply: Most setups need electricity for humidifiers and fans.
Ask yourself: How many mushrooms do you want to grow? Will you expand in the future? Planning ahead will save you time and money.
Choosing The Right Shelving Unit
Your shelving unit is the backbone of the Martha tent. Here’s what to look for:
- Material: Metal or plastic shelves are best—they resist water and are easy to clean.
- Size: Choose a unit that fits your space. Most are about 4-5 feet tall and 2-3 feet wide.
- Strength: The shelves must hold the weight of wet substrate and fruiting blocks.
- Adjustable shelves: This helps you fit different sized containers or bags.
Many growers use wire shelving racks with 3-5 tiers. If you already have a suitable shelf, you can repurpose it to save money.
Picking A Cover For Your Tent
The cover is what turns your shelves into a mini-greenhouse. You have two main options:
- Pre-made greenhouse covers: Many online shops sell zip-up plastic covers sized for common shelving units.
- DIY plastic sheeting: Clear 4-6 mil polyethylene sheeting from a hardware store works well. Use zip ties or clips to secure it.
The cover should be clear (to let in light) and create a good seal to hold humidity, but allow some airflow so CO₂ doesn’t build up.
Mushroom Fruiting Chamber Essentials
To successfully fruit mushrooms year-round, your Martha tent needs to maintain the right environment. Focus on these essentials:
Humidity
Mushrooms need high humidity—usually 85% to 95%—to grow well. Too little humidity causes mushrooms to dry out or stop growing. Too much can cause mold.
- Use an ultrasonic humidifier or cool-mist humidifier placed outside the tent and piped in with tubing.
- Avoid putting humidifiers directly inside the tent; this can cause wet spots and increase contamination risk.
- Use a hygrometer (humidity meter) to monitor levels. Digital models with probes are best.
Air Exchange
Fresh air exchange is vital. Mushrooms breathe out carbon dioxide (CO₂), and stale air can lead to long, thin stems or poor fruiting.
- Install a small fan or computer fan to gently move air in and out. Place it near the top or side of the tent.
- Use HEPA filters or polyfill on air intakes to keep out contaminants.
- Passive air holes covered with micropore tape also help.
Temperature Control
Most mushrooms grow best between 60°F and 75°F (15°C–24°C). Some species, like oysters, tolerate a wider range.
- Place your Martha tent in a room with a stable temperature.
- Use a thermometer to track the inside temperature.
- For colder climates, a small space heater (outside the tent, for safety) can help.
Light
Mushrooms don’t need strong light, but they do use it to know when to fruit and grow straight.
- A LED light strip or fluorescent light on a 12-hour cycle is perfect.
- Avoid direct sunlight, which can overheat the tent.
Setting Up Your Martha Tent Step By Step
Let’s walk through the setup process in detail.
1. Assemble The Shelving Unit
- Build your shelving rack according to the instructions.
- Adjust shelves to fit the containers or bags you’ll use.
2. Attach The Plastic Cover
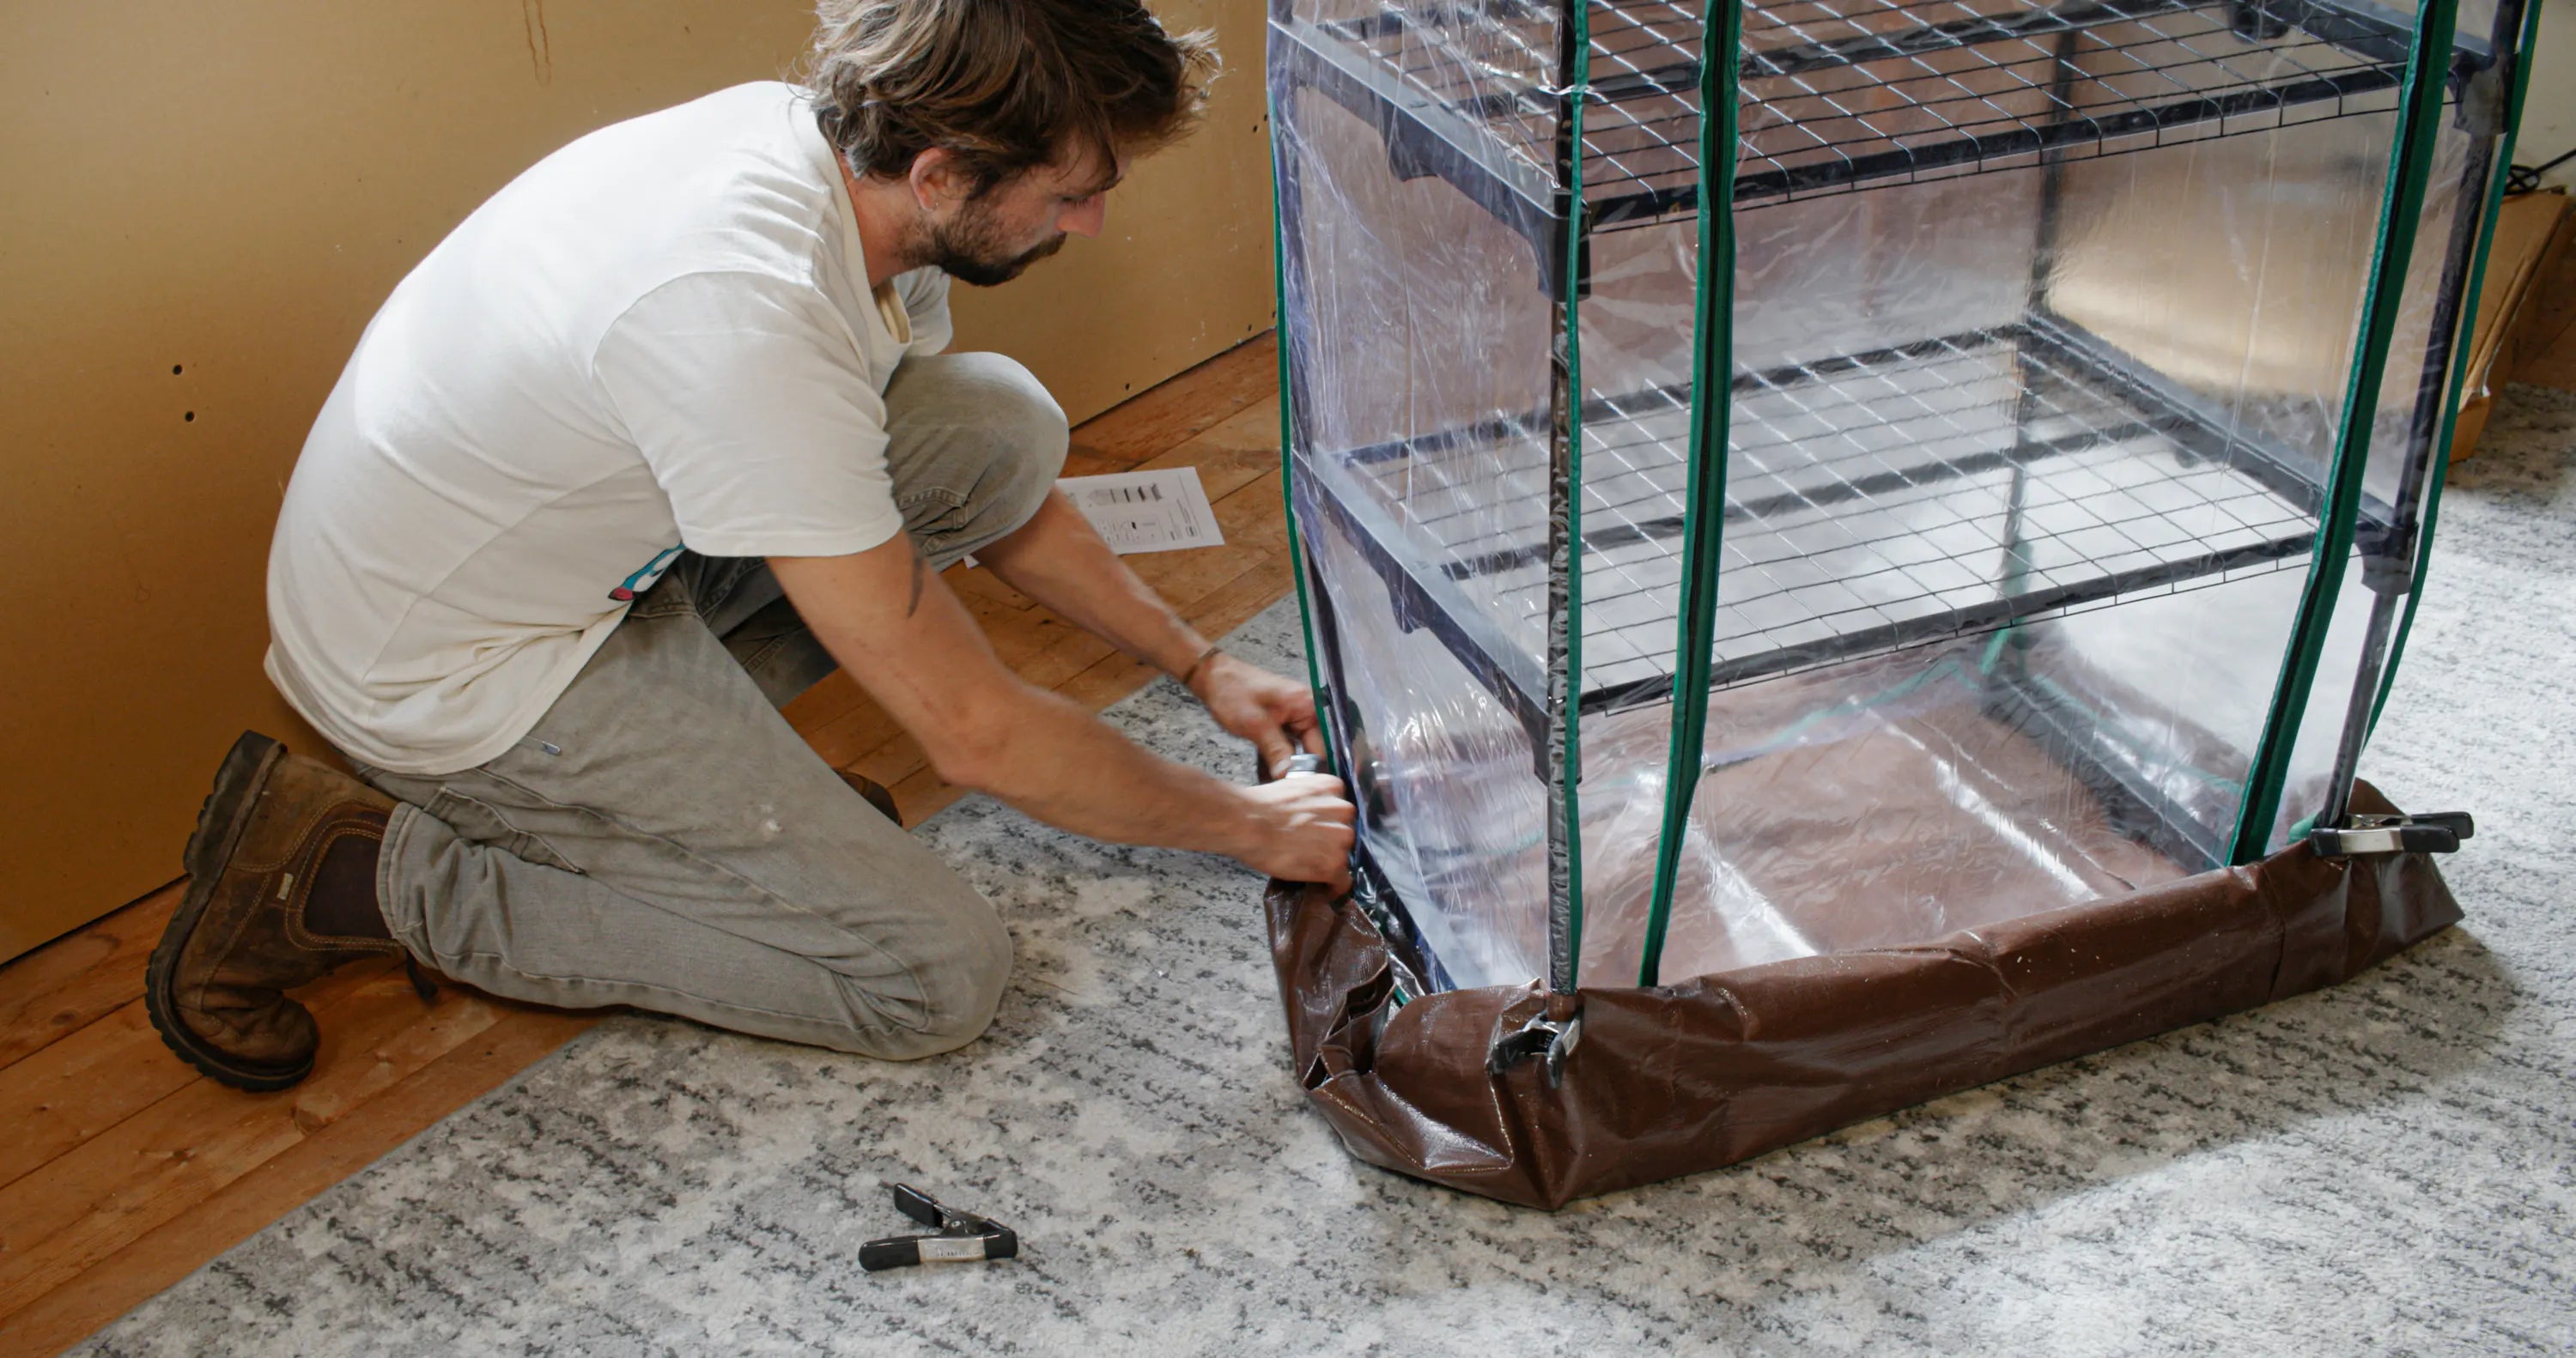
- If using a pre-made cover, slip it over the rack and zip closed.
- For DIY covers, cut plastic sheeting to size and secure with zip ties or binder clips.
- Make sure you can open the front easily to add or remove mushrooms.
3. Install Humidity System
- Place your humidifier outside the tent.
- Run a flexible tube (like PVC or aquarium tubing) into the tent, aiming the mist toward the top.
- Set the humidifier to run on a timer, or connect to a humidity controller for automatic adjustment.
4. Add Fresh Air Exchange
- Cut a few small holes near the bottom and top of the tent for passive airflow.
- Cover these with micropore tape or polyfill to filter dust.
- If using a fan, mount it to gently blow air in or out. Avoid strong airflow, which can dry out mushrooms.
5. Set Up Lighting
- Mount a LED strip or fluorescent tube above or beside the shelving.
- Use a timer to give mushrooms 12 hours of light and 12 hours of dark.
6. Place Your Mushroom Blocks Or Bags
- Arrange your substrate bags, blocks, or trays on the shelves.
- Leave space for air to move around each item.
7. Monitor And Adjust
- Use a thermometer and hygrometer to check conditions daily.
- Adjust humidifier, fans, or light as needed.
Choosing Mushrooms For Year-round Growing
Not all mushrooms are equally suited for Martha tents. Here are good species for beginners:
- Oyster mushrooms (Pleurotus ostreatus): Fast, forgiving, many colors.
- Lion’s mane (Hericium erinaceus): Unique look, prized for health benefits.
- Shiitake (Lentinula edodes): More challenging, but tasty and valuable.
- Enoki (Flammulina velutipes): Grows well in cooler weather.
- King oyster (Pleurotus eryngii): Needs more fresh air.
Try one or two species at first. Each type has its own needs, so it’s easier to learn with fewer variables.
Preparing Mushroom Substrate
The substrate is the food for your mushrooms. Martha tents work with several substrate types:
- Pasteurized straw: Cheap, popular for oysters.
- Hardwood sawdust: Best for shiitake, lion’s mane, and king oyster.
- Enriched sawdust blocks: Add bran or other nutrients for higher yields.
- Coco coir and vermiculite: Used for some gourmet species.
You can buy ready-to-fruit blocks from suppliers or make your own if you have a pressure cooker and supplies.
Substrate Preparation Methods
- Pasteurization: Soak straw or chips in hot water (160–170°F or 71–77°C) for 1–2 hours.
- Sterilization: Needed for sawdust or enriched blocks; use a pressure cooker at 15 psi for 2–3 hours.
- Hydration: Make sure substrate is moist but not dripping.
Learning proper substrate preparation is key to healthy, high-yield mushrooms.
Inoculation And Colonization
Once your substrate is ready, you’ll need to inoculate it with mushroom spawn:
- Work as cleanly as possible. Use gloves, wipe surfaces with alcohol.
- Add grain spawn (bought from a supplier) to your cooled, prepared substrate.
- Mix well, then pack into bags or containers.
- Seal with a filter patch or polyfill to allow gas exchange.
Place the inoculated substrate in a dark, warm spot (usually outside the tent) for colonization. This process takes 1–3 weeks, depending on species and conditions. When the substrate is fully white with mycelium, it’s ready to move into the Martha tent for fruiting.
Fruiting Mushrooms In A Martha Tent
Move your colonized blocks or bags to the Martha tent. Here’s what to watch for:
- Keep humidity high: 85%–95% is ideal for most species.
- Increase fresh air: Open more vents or run the fan more often.
- Provide gentle light: 12 hours per day.
- Mist if needed: If you see dry patches, mist lightly with clean water.
You’ll see primordia (tiny baby mushrooms) appear in a few days. These quickly grow into full-sized mushrooms. Harvest when caps are fully formed but not over-mature.
Maintaining Your Martha Tent
Year-round growing means keeping your tent clean and in good working order:
- Wipe down shelves and inside walls with diluted hydrogen peroxide or alcohol every few weeks.
- Empty and rinse humidifier tanks regularly to prevent bacteria.
- Clean or replace air filters as needed.
- Remove old mushroom blocks promptly to prevent contamination.
- Watch for pests like fungus gnats, and control them with sticky traps or better hygiene.
A clean tent is a productive tent. Never skip maintenance—contamination can quickly ruin a crop.
Common Problems And How To Fix Them
Even experienced growers run into issues. Here are some common problems and solutions:
Low Humidity
- Mushrooms dry out, shrink, or abort.
- Fix: Check for leaks in the cover, run the humidifier more often, or add a second unit.
High Co₂ Levels
- Mushrooms have long, thin stems or small caps.
- Fix: Increase fresh air exchange by opening more vents or running the fan longer.
Contamination (green Mold, Trichoderma, Etc.)
- Green, black, or odd-smelling patches appear.
- Fix: Remove contaminated blocks immediately, improve cleanliness, and check air filters.
Water Pooling
- Water collects on the floor or shelves.
- Fix: Adjust humidifier settings, use a drip tray, or improve airflow.
Uneven Growth
- Mushrooms on one shelf do better than others.
- Fix: Check for blocked airflow or uneven humidity/light.
Automation And Upgrades
As you gain experience, you may want to automate parts of your Martha tent:
- Humidity controller: Turns humidifier on and off automatically.
- Programmable timers: For fans, lights, and humidifiers.
- CO₂ sensor: Advanced option for precise control.
- WiFi cameras: For remote monitoring.
Upgrades can save time and increase reliability, especially if you want to grow larger batches or more sensitive mushrooms.
Credit: northspore.com
Comparing The Martha Tent To Other Growing Methods
Here’s a quick comparison of the Martha tent versus other popular indoor mushroom methods:
| Method | Cost | Skill Level | Yield | Best For |
|---|---|---|---|---|
| Martha Tent | Low–Medium | Beginner–Intermediate | High (with care) | Year-round, small spaces |
| Plastic Tote (SGFC) | Low | Beginner | Low–Medium | Small batches, low cost |
| Grow Room | High | Advanced | Very High | Commercial scale |
| Monotub | Low | Beginner | Medium | Single species |
The Martha tent stands out because it balances cost, yield, and complexity, making it a top choice for serious home growers.
Example: Year-round Oyster Mushroom Cycle
Let’s look at what a 12-month oyster mushroom cycle might look like with a Martha tent:
- January–March: Prepare and fruit new blocks every 3 weeks. Harvest every 7–10 days.
- April–June: Warm weather speeds up colonization. Increase fresh air to avoid heat stress.
- July–September: Maintain temperature with fans or air conditioning if needed.
- October–December: Cooler weather means slower growth, but higher quality mushrooms.
By staggering your inoculation and moving blocks in and out of the tent regularly, you can keep a steady supply of mushrooms for the whole year.

Credit: www.amazon.com
Key Tips For Success In Martha Tent Mushroom Growing
- Start small: Perfect your method with 2–4 blocks before scaling up.
- Cleanliness is crucial: Contamination is easier to prevent than to fix.
- Dial in conditions: Each species and even each room can need tweaks.
- Rotate crops: After a flush, swap out old blocks to keep yields high.
- Take notes: Record what works and what doesn’t for your setup and climate.
Many beginners overlook the importance of fresh air exchange and over-wet their tents, leading to poor yields or mold. Another common mistake is ignoring the quality of their spawn—always buy from trusted suppliers.
Data: Martha Tent Environmental Ranges
To help you fine-tune your setup, here’s a quick reference for common species:
| Mushroom Species | Humidity (%) | Temperature (°F) | Fresh Air Needs | Light (hours/day) |
|---|---|---|---|---|
| Oyster | 85–95 | 60–75 | High | 12 |
| Lion’s Mane | 85–95 | 60–70 | Medium | 12 |
| Shiitake | 80–90 | 60–75 | Medium | 12 |
| King Oyster | 80–90 | 60–70 | Very High | 12 |
Use this table to adjust your Martha tent for whatever mushrooms you want to grow.
Harvesting And Storing Mushrooms
When it’s time to harvest:
- Use a sharp knife or twist mushrooms off at the base.
- Harvest when caps are fully open but before edges flatten (for oysters).
- Remove old substrate to prevent contamination.
Storing tips:
- Place fresh mushrooms in a paper bag in the fridge for up to a week.
- For longer storage, dry them in a dehydrator or low oven.
- Avoid plastic bags—they cause mushrooms to sweat and spoil faster.
Fresh, home-grown mushrooms taste better and last longer when properly stored.
Safety And Hygiene
Year-round indoor growing is safe if you:
- Keep the tent clean and dry between crops.
- Disinfect tools and surfaces before each cycle.
- Use gloves and a mask when handling substrate or cleaning mold.
If you ever see black mold or smell something foul, discard the affected block immediately and clean the area. Good hygiene is the best defense against illness and crop loss.
Troubleshooting: Real-world Scenarios
Scenario 1: Your oyster mushrooms have long, thin stems and tiny caps.
- Likely cause: Not enough fresh air.
- Fix: Open more air holes, run the fan longer, and check for blocked vents.
Scenario 2: Mushrooms stop growing or abort halfway.
- Likely cause: Low humidity or a contaminated block.
- Fix: Increase misting, check humidifier, and inspect for green or black patches.
Scenario 3: Water pools at the bottom of the tent.
- Likely cause: Overactive humidifier or poor airflow.
- Fix: Adjust humidifier, add a drip tray, and gently increase air movement.
Addressing these issues quickly can save your crop and help you learn for next time.
Where To Get Supplies
Most Martha tent parts are available at hardware stores, garden centers, or online:
- Shelving units: Home Depot, Walmart, Amazon
- Plastic covers: Greenhouse supply shops, Amazon
- Humidifiers and fans: Electronics stores, online
- Spawn and substrate: Specialty mushroom suppliers
For a deeper dive into mushroom cultivation, check out this detailed resource: Wikipedia: Mushroom Cultivation.

Credit: www.amazon.com
Frequently Asked Questions
What Size Martha Tent Is Best For Beginners?
A shelving unit with 3–4 tiers, about 3 feet wide and 5 feet tall, is ideal for most beginners. It fits in a closet or spare room and holds enough blocks for regular harvests without being overwhelming.
Can I Grow Different Mushroom Species In One Tent?
Yes, but only if their environmental needs are similar. Oysters and lion’s mane often do well together. Avoid mixing species with very different humidity or temperature needs to prevent poor results.
How Do I Prevent Contamination In My Martha Tent?
Cleanliness is key. Always disinfect shelves and tools between cycles. Remove spent blocks quickly. Use filtered air and keep humidity balanced—not too wet or dry.
How Often Should I Harvest Mushrooms From A Martha Tent?
Most species produce a flush every 7–10 days. Harvest when mushrooms look fully formed but before they drop spores or caps flatten. Each block can produce 2–3 flushes before it’s spent.
What Is The Best Humidity Level For Mushrooms?
Most mushrooms prefer 85%–95% humidity during fruiting. Use a hygrometer to check levels and adjust your humidifier as needed for consistent results.
Growing mushrooms year-round with a Martha tent is a rewarding and accessible project. With careful setup and regular care, you can enjoy gourmet mushrooms at home, save money, and learn a valuable skill. Start small, be patient, and you’ll soon be harvesting your own delicious mushrooms in any season.