
Mushroom Mycelium Growth Stages: A Visual Timeline from Inoculation to Harvest
Growing mushrooms may look mysterious, but the process follows a clear, fascinating path. Understanding the mycelium growth stages is key for anyone who wants to cultivate healthy mushrooms—whether for home use, farming, or research. Each step, from inoculation to harvest, is like watching a living network build itself, adapt, and finally produce the fruiting bodies we call mushrooms. These stages are not only essential for good yields but also help you spot problems early and adjust your care for the best results. Let’s walk through every phase of this journey, clearing up common myths, sharing practical advice, and giving you a true visual guide to this hidden world.
The Basics: What Is Mycelium And Why Is It Important?
Before jumping into the timeline, it’s crucial to understand what mycelium is. Mycelium is the thread-like, white network that forms the main body of a fungus. Unlike the mushroom itself (the fruiting body), mycelium grows underground or inside substrates (like straw, wood, or compost). It absorbs nutrients, breaks down organic matter, and lays the foundation for mushrooms to appear.
Mycelium is often compared to the roots of a plant, but it’s even more important. It’s responsible for everything from nutrient absorption to the communication between different parts of the fungal colony. Without strong, healthy mycelium, there are no mushrooms.
Mycelium also acts as the immune system of the fungus. It fights off bacteria and molds by releasing enzymes and other natural chemicals. This is why a colony with vigorous mycelium can sometimes recover from minor contamination, while weak mycelium cannot.
Another interesting point is that mycelium is incredibly adaptable. In nature, it can move around obstacles, grow into new food sources, and even connect with other fungal colonies to share resources. In mushroom growing, this ability means mycelium can sometimes recover from small mistakes, like a brief drop in temperature or a small dry spot in the substrate.
The Timeline: Mushroom Mycelium Growth Stages Explained
Each mushroom species has its own speed and needs, but the main stages are similar. Let’s follow the journey of a mushroom from inoculation to harvest.
Stage 1: Preparing The Substrate
The substrate is the food source for mycelium. Popular choices include straw, sawdust, grain, coffee grounds, or specially formulated compost. Preparation is vital: the substrate must be cleaned and often sterilized or pasteurized to remove competing microbes.
- Sterilization can be done with pressure cookers (for grain) or by steaming (for straw).
- Pasteurization uses lower temperatures and is common for bulk substrates.
If the substrate isn’t properly prepared, bacteria and molds can outcompete the mushroom mycelium. Beginners sometimes skip this step, but it’s a common reason for poor results.
Non-obvious insight: Even tap water in your substrate can introduce contaminants. Use boiled or filtered water to reduce risk.
The quality of the substrate matters more than many realize. For example, using old straw or sawdust that has been sitting outside can introduce pests, including insects and mites, which might not be killed by pasteurization alone. Always use the freshest material you can find.
Another overlooked detail: the moisture level in the substrate must be just right. Too wet, and you risk anaerobic bacteria taking over. Too dry, and mycelium won’t spread. To test, squeeze a handful of substrate—only a few drops of water should come out. If water streams, it’s too wet.
Some growers add supplements to boost nutrition, such as bran or gypsum, but adding too much can cause contamination. It’s best to start simple and adjust as you gain experience.
Stage 2: Inoculation
Inoculation is when you introduce mushroom spores or mycelium (often as grain spawn) into the substrate. This is the moment you “plant the seeds” for your mushroom crop.
- Work in a clean, draft-free area.
- Use gloves, alcohol wipes, and sterilized tools if possible.
- Spread the spawn evenly for best results.
The choice between spores and spawn matters. Spores are cheaper but take longer to colonize and are more prone to contamination. Spawn (like rye grain colonized with mycelium) is faster and more reliable for most growers.
Some home growers use a still air box (a clear container with armholes) to reduce airborne contaminants during inoculation. Professionals may use laminar flow hoods, which push clean air over the workspace.
If you’re using a bag or tub, mix the spawn into the substrate as evenly as possible. Clumps of spawn lead to uneven colonization and can create weak spots where mold or bacteria can start.
If you have to take a break in the middle of inoculation, cover everything with clean foil or plastic wrap to prevent dust or spores from landing on your materials.
Stage 3: Germination
In this stage, spores (if used) begin to germinate, or the mycelium from spawn starts to “wake up” and spread. You’ll notice:
- Thin, wispy white strands forming in the substrate.
- A faint mushroom smell, sometimes sweet or earthy.
This stage is quiet but essential. The mycelium is fragile—disturbing the container can slow growth or introduce contamination.
Non-obvious insight: If you see green, black, or pink patches, that’s likely contamination. Remove affected substrate early to save your crop.
During germination, temperature is important. Too cold, and germination may take much longer or not happen at all. Most species prefer a range of 21–27°C (70–80°F) at this stage. If you use a closet or a small room, make sure it does not get too hot, as high temperatures can also slow or kill mycelium.
It’s normal to worry if you don’t see growth right away. Some species, like shiitake, can take over a week to show visible mycelium. Patience is key—resist the urge to open the container or poke at the substrate.
Another tip: If you’re using spores rather than spawn, you may see different strains of mycelium start to compete. Sometimes only the strongest will survive and take over, leading to a more robust colony, but occasionally, this can cause uneven growth.
Stage 4: Colonization
Colonization is when the mycelium fully takes over the substrate. This is the longest phase, typically lasting 10–28 days depending on species, temperature, and substrate.
What happens:
- White mycelium spreads in all directions.
- The substrate becomes solid and covered in a thick mat.
Ideal conditions:
- Temperature: 21–27°C (70–80°F) for most species.
- Humidity: 60–70% is often enough, but avoid standing water.
- Darkness or dim light (mycelium does not need bright light).
Visual Signs Of Healthy Colonization
- White, fluffy or rope-like growth.
- Even coverage with no bare spots.
As colonization continues, the smell of the substrate becomes stronger—rich and mushroomy, but not sour or foul. If you’re growing in jars or bags, you may see condensation on the inside. This is normal, but pools of water should be avoided, as they can create anaerobic spots where bacteria thrive.
If you notice parts of the substrate aren’t colonizing, check for dry patches or compacted areas. Sometimes, gently shaking or rotating bags during colonization (only if the substrate is fully sealed and you’re using grain spawn) can help even things out.
Colonization Speed By Mushroom Type
| Mushroom Species | Substrate Type | Colonization Time (days) |
|---|---|---|
| Oyster | Sawdust/Straw | 10–14 |
| Shiitake | Sawdust/Wood | 21–28 |
| Button | Compost/Manure | 14–21 |
Practical tip: If colonization stalls, check for dry substrate or low temperatures.
Non-obvious insight: Many beginners think more light helps colonization, but mycelium actually prefers darkness or dim light at this stage. Too much light can stress the mycelium and even trigger early pinning, which is not desirable before the substrate is fully colonized.
Stage 5: Consolidation
After full colonization, the mycelium enters a brief period of consolidation. It “rests” and strengthens before moving on to fruiting.
- This lasts 3–7 days.
- The mycelium grows denser and sometimes forms “hyphal knots”—small bumps that are the first sign of mushroom development.
Beginners often skip this waiting phase, but it improves yields and reduces the risk of weak mushrooms.
During consolidation, you may see the mycelium get a little more robust and “ropey” on the surface. If you’re growing in bags or tubs, don’t open them yet—let the mycelium use up the last bits of food and recover from colonization.
Non-obvious insight: The consolidation phase allows the mycelium to break down harder pieces of substrate, like wood chips in a sawdust block. This gives the mushrooms more nutrients and energy when fruiting starts.
If you see tiny droplets on the surface of the mycelium, this is called “mycelium exudate” or “metabolite. ” It’s usually a sign the colony is working hard and can be normal, but large amounts or strange colors may suggest stress or contamination.
Stage 6: Initiation (pinning)
Pinning is when the mycelium starts to form tiny mushroom primordia, or “pins.” This is triggered by changes in environment:
- Lowering CO₂ (increase fresh air exchange).
- Adding light (indirect natural or LED light).
- Increasing humidity to 85–95%.
Pins look like tiny white or brown bumps—these are baby mushrooms.
Pinning Triggers By Species
| Mushroom Species | Pinning Trigger | Pin to Harvest (days) |
|---|---|---|
| Oyster | Fresh air, light, humidity | 4–7 |
| Shiitake | Shock with cold water, light | 7–10 |
| Button | Fresh air, lower temp | 6–10 |
Non-obvious insight: Direct water spray on pins can stunt growth or cause deformities. Mist the air, not the pins.
Many growers get impatient and try to force pinning by making dramatic changes, but sudden temperature drops or too much air can shock the mycelium. It’s better to gradually shift conditions over 24–48 hours. For shiitake, soaking the block in cold water for 12–24 hours is the traditional trigger, but for oysters and buttons, just increasing fresh air and humidity is often enough.
If you see pins forming only at the edges of your container, it may mean the surface is too dry or the air exchange is uneven. Adjust humidity and airflow to encourage pins across the whole surface.
Stage 7: Primordia Development
Once pins appear, they grow quickly into primordia. These are small, well-formed baby mushrooms.
- Growth speeds up if conditions are right.
- Maintain high humidity and gentle airflow.
- Avoid temperature spikes.
Primordia are sensitive. If they dry out, they may stop growing or become misshapen.
Keep a close eye on surface moisture. If the surface looks shiny or slightly moist, you’re in the sweet spot. If it looks dry and dull, mist the air more often. If puddles form, reduce misting and improve ventilation.
An easy way to check if primordia are happy: they should increase in size every day, and their color should deepen slightly. Stalled or shrinking pins are a warning sign.
Non-obvious insight: Overcrowding can cause pins to compete for space, leading to twisted or “fused” mushrooms. If you notice this, thin out the weakest pins gently with clean tweezers to give the strongest ones more room.
Stage 8: Fruiting And Growth
This is the most exciting stage. Primordia swell and mature into full mushrooms.
- Caps and stems develop.
- Mushrooms double in size every day or two.
- You may notice a strong mushroom aroma.
Care at this stage:
- Keep humidity high (90–95%).
- Give 12–16 hours of indirect light.
- Remove any mushrooms that look diseased.
Fruiting Temperature And Humidity Needs
| Mushroom Species | Ideal Fruit Temp (°C) | Humidity (%) |
|---|---|---|
| Oyster | 16–21 | 85–95 |
| Shiitake | 15–20 | 85–90 |
| Button | 14–18 | 90–95 |
Practical tip: If mushrooms develop “fuzzy” stems, the air is too humid or stale—improve ventilation.
Another sign of poor airflow is a strong ammonia or sour smell. If you notice this, open up the fruiting area for a few minutes or use a small fan on low, aimed away from the mushrooms to avoid drying them out.
Some growers use plastic tents, humidity domes, or even converted refrigerators as fruiting chambers. The key is to balance high humidity with enough fresh air to avoid mold and keep mushroom growth strong.
If you’re growing in a dry climate, set up a simple humidifier or place trays of wet perlite in the fruiting chamber to help maintain moisture.
Stage 9: Harvest
The final stage is harvest. Timing is crucial for both taste and quality.
- Harvest when caps are fully open but not flat.
- For oyster mushrooms, pick before edges curl up.
- For button mushrooms, pick before the veil under the cap breaks.
To harvest, twist gently at the base or use a clean knife. Remove all mushrooms—this encourages a second flush.
Non-obvious insight: Overripe mushrooms can drop spores and reduce the quality of later flushes.
Be gentle when harvesting. Pulling too hard can damage the mycelium and reduce future yields. Some growers like to brush off debris from the harvested base to keep the next flush clean.
After harvest, check the substrate for leftover stems or debris and remove them. This helps prevent rot or mold from developing before the next flush.
If you plan to store your mushrooms, avoid washing them—just brush off any substrate. Store in a paper bag in the fridge for best shelf life.
What Happens After Harvest? Second And Third Flushes
A single substrate block can produce multiple “flushes” of mushrooms. After the first harvest:
- Rest the substrate for a few days.
- Mist and maintain humidity.
- New pins will appear for a second and sometimes third flush.
Yields decrease with each flush, but it’s a way to maximize your crop.
Some species, like oyster, can give three or four flushes if the substrate is rich and conditions are right. Others, like shiitake, often give the biggest harvest after a “rest” period of 7–14 days.
Non-obvious insight: Sometimes, flipping or rotating the substrate block between flushes exposes new surfaces and encourages more pins. Just be sure to keep everything clean.
If the substrate dries out after the first flush, you can soak it in clean water for a few hours (especially for shiitake) to rehydrate and trigger more growth.
Common Problems And How To Avoid Them
Growing mushrooms isn’t always smooth. Here are frequent issues and their solutions:
- Contamination (mold, bacteria): Most common in early stages. Prevent by sterilizing everything and working cleanly.
- Slow colonization: Often due to cold, dry substrate, or poor quality spawn.
- No pinning: Usually a sign of high CO₂, low humidity, or lack of light. Adjust conditions.
- Deformed mushrooms: Caused by direct misting, low humidity, or contamination.
- Small yields: Often from weak mycelium, contaminated substrate, or skipped consolidation.
Practical tip: If you’re not sure about contamination, look for strong, sweet mushroom smells—bad smells mean trouble.
Some beginners believe that adding more spawn always gives bigger yields, but too much spawn can crowd the substrate and actually slow colonization. Follow recommended ratios—usually 5–10% spawn by weight of substrate.
Another mistake is using tap water with high chlorine or chloramine, which can harm mycelium. If in doubt, let water stand overnight or use filtered water.
Optimizing Each Stage For Best Results
Every step matters. Here’s how to get the most out of each stage:
- Substrate: Use the freshest, cleanest materials possible. Old substrate invites pests.
- Inoculation: Don’t rush. Take time to be clean and thorough.
- Colonization: Maintain stable temperature and moisture. Don’t disturb the mycelium.
- Pinning: Switch to fruiting conditions gradually. Sudden changes can shock the mycelium.
- Fruiting: Watch for signs of drying or overwatering. Small changes in humidity can have big effects.
- Harvest: Pick mushrooms at their peak for best taste and nutrition.
Keep records of each batch—what substrate you used, how long each stage took, what problems you saw. This helps you learn and improve over time.
Non-obvious insight: Sometimes, less is more. Trying too many new techniques at once can cause confusion and inconsistent results. Master the basics, then experiment slowly.
Visual Timeline: What To Look For Each Week
To help you track progress, here’s a sample visual timeline for oyster mushrooms (timing is similar for other species, but check specifics):
Day 1–2: Inoculation. Substrate is clean and moist, no visible mycelium.
Day 3–7: Germination. Thin white strands begin to appear.
Day 8–14: Colonization. Substrate turns white and dense.
Day 15–17: Consolidation. Mycelium thickens, surface may look “fluffy.”
Day 18–21: Pinning. Tiny pins form at the surface, especially at edges or near air holes.
Day 22–26: Fruiting. Mushrooms grow rapidly, caps expand.
Day 27–28: Harvest. Mushrooms reach full size, ready to pick.
If your timeline is slower, check your temperature and moisture.
For shiitake, add 7–10 days to colonization, and remember to cold-shock before pinning. For button mushrooms, expect a bit longer at the colonization and pinning stages.
Photographing each stage can help you compare batches and notice subtle signs of trouble or success.
Real-world Example: Comparing Oyster And Shiitake Growth
Let’s compare two popular mushrooms—oyster and shiitake—to see how their growth stages differ.
- Oyster mushrooms grow fast, colonize straw in 10–14 days, and fruit quickly. They’re forgiving and good for beginners.
- Shiitake mushrooms are slower, taking 3–4 weeks to colonize and needing a “cold shock” before fruiting. Their yield is often higher, but patience is required.
Oyster mushrooms tolerate a wider range of temperatures and can fruit even in less-than-ideal conditions, though yields are best in cooler climates. Shiitake, on the other hand, can be more sensitive to humidity and prefer wood-based substrates like sawdust or logs.
One more difference: oyster mushrooms can be grown on a variety of waste products (coffee grounds, cardboard), while shiitake requires more specific wood-based materials. This makes oyster mushrooms a top choice for urban or small-space growers.
Advanced Tips For Healthy Mycelium And High Yields
After you master the basics, these tips help you improve:
- Supplement substrates with small amounts of bran or gypsum for extra nutrition.
- Use HEPA filters or clean rooms for large-scale growing to reduce contamination.
- Test different light sources. LED grow lights with a blue spectrum improve pinning for some species.
- Track your results. Keep a notebook or spreadsheet to see what works best in your environment.
Non-obvious insight: Overly rich substrates can lead to “overlay”—thick mats of mycelium that refuse to fruit. Simpler is sometimes better.
Another advanced method is to test different fruiting triggers. For example, some growers use cycles of light and dark, or brief cold shocks, to encourage larger flushes. Try changing one thing at a time so you can see what really makes a difference.
If you’re growing on logs outdoors, try partially burying the logs in soil or mulch. This helps retain moisture and can lead to bigger mushrooms.

Credit: www.amazon.sg
Signs Of Trouble: What Healthy Mycelium Looks Like
Healthy mycelium is:
- Bright white (sometimes with hints of yellow or brown, depending on species).
- Smells like mushrooms, not sour or foul.
- Spreads evenly, with no slimy or colored patches.
Unhealthy mycelium is:
- Green, black, pink, or bright yellow.
- Smells rotten or chemical.
- Grows in patches, not a network.
Always remove contaminated substrate quickly. For a visual guide, the Mycelium Wikipedia page has detailed images and further reading.
Some types of contamination can be confused with healthy growth. For example, some oyster mushrooms naturally produce faint yellow droplets, but if you see large orange or red spots, that’s likely a mold.
If you’re unsure, it’s safer to remove a suspicious patch than risk losing the whole batch.
The Science Behind Mycelium Development
Mycelium grows by extending hyphae, which are microscopic tubes. These hyphae:
- Secrete enzymes to break down complex materials in the substrate.
- Absorb nutrients and water.
- Communicate chemically to coordinate growth.
Environmental signals (like fresh air, light, and moisture) tell the mycelium when to switch from growing to fruiting. This is why attention to detail at each stage pays off.
Interesting fact: Mycelium can sense gravity, chemicals, and even some forms of touch. This is how it finds the best place to form mushrooms.
Researchers are still learning how mycelium “decides” to fruit. Some believe it’s a combination of stress (lack of food, changes in environment) and signals from the colony. In a way, fruiting is the fungus’s last effort to reproduce before resources run out.
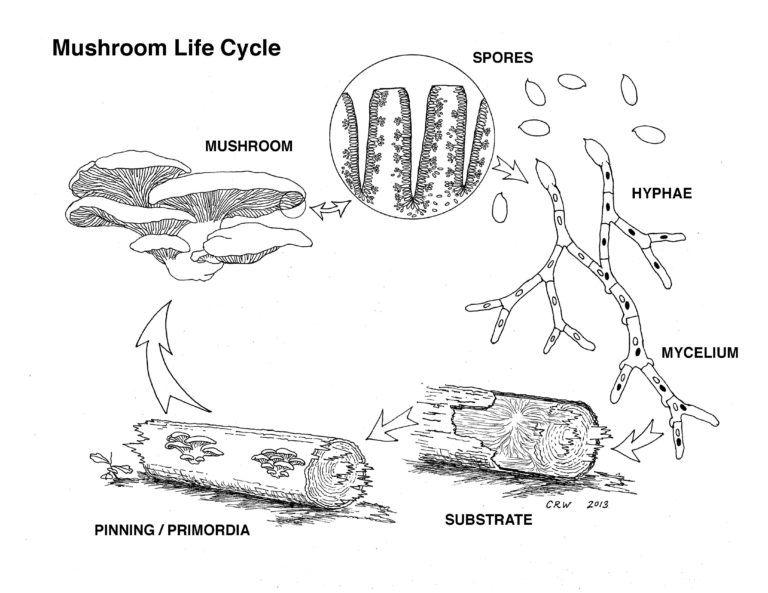
Credit: smallfarms.cornell.edu
Sustainable Practices In Mushroom Cultivation
Growing mushrooms with care for the environment is possible:
- Use recycled materials (like coffee grounds or sawdust) as substrate.
- After harvest, use spent substrate as compost or animal feed.
- Minimize use of chemicals—sterilize with heat or steam, not bleach.
This approach reduces waste and creates a closed-loop system. Many urban farms now grow gourmet mushrooms from food industry waste.
If you have a garden, spent mushroom substrate is an excellent soil amendment. It adds organic matter, helps retain water, and can even suppress some plant diseases.
Some innovative growers use mushroom cultivation to clean up contaminated soils—a process called mycoremediation. Mycelium breaks down toxins and heavy metals, making soil safer for future crops.
Mycelium Beyond Mushrooms: Other Uses
While this article focuses on mushrooms, mycelium is used in other industries:
- Biodegradable packaging (mycelium foam).
- Mycoremediation (cleaning up oil spills or toxins).
- Building materials stronger than concrete.
Understanding mycelium’s growth stages is valuable far beyond food.
Mycelium-based packaging is already being used by some companies to replace plastics. This material is light, strong, and completely compostable.
In construction, mycelium bricks are being developed for use in eco-friendly buildings. They are fire-resistant, insulating, and can be grown in shapes that would be difficult with traditional materials.

Credit: www.bootstrapfarmer.com
Frequently Asked Questions
What Is The Difference Between Mycelium And Mushroom?
Mycelium is the network of thread-like cells that make up the main body of a fungus. The mushroom is the reproductive fruiting body that emerges from the mycelium. Think of mycelium as the roots and the mushroom as the fruit.
How Do I Know If My Mycelium Is Healthy?
Healthy mycelium is bright white, grows evenly, and smells fresh—like mushrooms or earth. Unhealthy mycelium may have colors like green, black, or pink and can smell bad. Even a small patch of color can indicate contamination.
Can I Use Coffee Grounds As A Substrate For Mycelium?
Yes, coffee grounds are a good substrate for many species, especially oyster mushrooms. However, they should be pasteurized and used fresh. Old coffee grounds can attract mold or bacteria.
How Many Times Can I Harvest From One Substrate?
Most substrates produce 2–3 “flushes” or harvests. The first flush is the largest, with smaller harvests after. Some growers manage 4 or more flushes, but yields drop each time.
What Are Common Mistakes Beginners Make With Mycelium?
- Not sterilizing or pasteurizing the substrate well enough.
- Using low-quality spawn or spores.
- Overwatering or letting the substrate dry out.
- Touching the mycelium with unclean hands or tools.
- Skipping the consolidation phase.
Watching mushroom mycelium grow from invisible threads to a full harvest is both science and art. Each stage of growth has its own wonders and challenges. With patience and the right knowledge, anyone can enjoy the magic of mushroom cultivation—seeing the entire process unfold from inoculation to harvest.