Growing mushrooms at home or on a small farm is an exciting journey, but it comes with one major challenge: keeping your substrate clean and safe from unwanted microorganisms. The substrate, which is the material mushrooms grow on (like straw, sawdust, or coco coir), must be prepared carefully. If you skip this step or do it poorly, your entire mushroom crop could be lost to mold, bacteria, or other fungi. Two common ways to prepare substrate are pressure cooker sterilization and pasteurization. Both aim to create the best environment for your mushrooms, but they work differently and have their own pros and cons.
Understanding how to sterilize your substrate properly is critical. It’s not just about killing germs—it’s about giving your mushrooms the best possible start and reducing the risk of contamination. Many beginners believe simply heating or soaking their substrate is enough, but the truth is, not all methods work for all types of mushrooms, and the smallest mistake can mean starting over from scratch.
This in-depth guide will walk you through the science and practical details of both methods. You’ll learn exactly how pressure cooker sterilization and pasteurization work, when to use each, and how to avoid common mistakes. By the end, you’ll be able to choose the right technique for your mushroom project with confidence.
What Is Mushroom Substrate And Why Prepare It?
A mushroom substrate is any material that provides nutrients and a place for mushroom mycelium to grow. Common substrates include:
- Straw: Popular for oyster mushrooms
- Sawdust: Often used for shiitake and lion’s mane
- Coco coir and vermiculite: Great for beginner-friendly species like the common button mushroom
- Manure: Used for some gourmet and medicinal species
These substrates are full of nutrients, but they’re also attractive to bacteria, molds, and other fungi. If you don’t prepare your substrate properly, these competitors will outgrow your mushrooms, ruining your project.
Preparation usually means either sterilizing or pasteurizing the substrate. The goal is to remove or reduce contaminants to a level where your mushroom mycelium can take over quickly.
The Main Threats: Contaminants
Contaminants can include:
- Bacteria: Compete with mycelium and create unpleasant smells
- Trichoderma: A green mold that often kills mushroom crops
- Yeasts: Sometimes harmless, but can slow mushroom growth
- Other fungi: Compete for space and nutrients
Even a small amount of contamination can destroy a batch. That’s why experienced growers are almost obsessive about substrate preparation.
Sterilization Vs. Pasteurization: What’s The Difference?
People often confuse sterilization and pasteurization, but they are not the same.
- Sterilization means destroying all living things in the substrate—bacteria, spores, fungi, everything. This is usually done with a pressure cooker at high temperatures.
- Pasteurization means reducing the number of contaminants to a safe level, but not killing everything. This is usually done with hot water or steam.
Which method you choose depends on your substrate, mushroom species, and growing environment.
When To Sterilize
- You are using nutrient-rich substrates (like grain or manure)
- You are growing mushrooms that are sensitive to contamination
- You want maximum control over the growing environment
When To Pasteurize
- Your substrate is mostly straw, sawdust, or coco coir
- You are growing hardier species like oyster or king oyster
- You don’t have a pressure cooker or want a simpler method
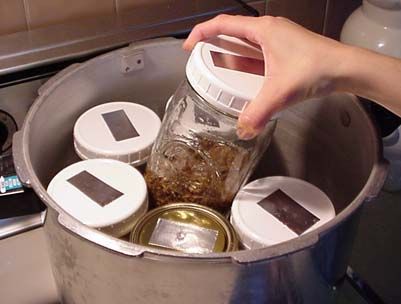
How Pressure Cooker Sterilization Works
Pressure cooker sterilization is the gold standard for many serious mushroom growers. Here’s how it works:
- The substrate is placed in heat-proof bags or jars
- It is heated under pressure (usually at 15 PSI)
- The temperature reaches about 121°C (250°F)
- The high heat and pressure kill all microorganisms, including tough spores
This method is highly effective but requires careful handling and special equipment.
Step-by-step: Sterilizing Substrate With A Pressure Cooker
- Prepare the substrate: Mix your materials (for example, hardwood sawdust, bran, or grains) and add water until the moisture is right.
- Load into containers: Place the substrate into heat-resistant bags or glass jars. Leave some space at the top.
- Seal the containers: If using bags, tie them with a filter patch or leave jars loosely capped to allow steam out.
- Place in pressure cooker: Arrange containers so steam can circulate around them.
- Add water to the cooker: Usually 2-3 inches at the bottom.
- Close the lid and heat: Bring to pressure (15 PSI).
- Sterilize for 90–120 minutes: Time depends on how much substrate you have.
- Let cool slowly: Don’t open the pressure cooker until it is cool and safe to handle.
- Move to a clean area: Only open bags or jars in a clean space, ideally in front of a still air box or laminar flow hood.
What You’ll Need
- Pressure cooker or autoclave: Must reach 15 PSI
- Heat-resistant bags or jars
- Water
- Substrate ingredients
Why Use A Pressure Cooker?
Pressure cookers kill even the most stubborn spores. This is necessary for substrates like grain, which are very attractive to contaminants. It’s also essential for growing mushrooms indoors, where conditions are often perfect for bacteria and molds.
Common Mistakes With Pressure Cooker Sterilization
- Not reaching full pressure: Anything less than 15 PSI is not enough for sterilization
- Overfilling the pressure cooker: Steam must circulate around all containers
- Opening too soon: Steam burns are dangerous, and containers can explode if pressure is not released slowly
- Using non-heatproof plastic: This can melt and ruin your substrate
Pro Tip: Always use a pressure cooker with a working safety valve and never leave it unattended.
How Pasteurization Works
Pasteurization is less intense than sterilization but is often enough for less risky substrates. It’s done by soaking or steaming the substrate at temperatures between 60–80°C (140–176°F) for 1–2 hours. This kills most harmful bacteria and mold spores, but not all.
Why not kill everything? Some friendly microbes (like certain bacteria) can help protect your substrate from more dangerous invaders. Pasteurization leaves these behind while removing the worst competitors.
Step-by-step: Pasteurizing Mushroom Substrate
- Prepare the substrate: Chop straw or hydrate coco coir and mix with water until damp (not soaking).
- Heat water to 70–80°C (158–176°F): Use a large pot or drum.
- Soak the substrate: Fully submerge for 1–2 hours.
- Drain and cool: Pour off water and let the substrate cool to room temperature.
- Use immediately: Fill your growing containers and inoculate with mushroom spawn.
What You’ll Need
- Large pot or drum
- Thermometer (essential for correct temperature)
- Substrate (straw, coir, etc.)
- Clean water
- Colander or mesh bag for draining
Pasteurization Variations
- Lime bath: Some growers add hydrated lime to water (pH 11–12) to kill contaminants, especially when pasteurizing straw.
- Cold water fermentation: Substrate is soaked in water for several days, allowing beneficial bacteria to outcompete contaminants.
Common Pasteurization Mistakes
- Not holding the right temperature: Too cool, and contaminants survive; too hot, and you start sterilizing (which can backfire without proper equipment)
- Uneven heating: Large batches may have cold spots
- Over-soaking: Substrate can become too wet, leading to anaerobic bacteria growth
- Using dirty tools: Always use clean containers and utensils
Pro Tip: Pasteurized substrate should be used as soon as possible, ideally within 12 hours. Delays can invite contamination.
Credit: www.waldeneffect.org
Comparing Pressure Cooker Sterilization And Pasteurization
Understanding the key differences will help you choose the right method for your mushroom project. Below is a side-by-side comparison:
| Feature | Pressure Cooker Sterilization | Pasteurization |
|---|---|---|
| Temperature | 121°C (250°F) | 60–80°C (140–176°F) |
| Pressure Required | 15 PSI | Atmospheric (none) |
| Time Needed | 90–120 minutes | 1–2 hours |
| Equipment Cost | High | Low |
| Risk of Contamination | Very Low (if handled correctly) | Moderate |
| Suitable Substrates | Grain, manure, sawdust/bran | Straw, coco coir, wood chips |
| Skill Required | Advanced | Beginner to Intermediate |
Key Takeaways
- Pressure cooker sterilization is best for high-nutrient substrates and indoor growing.
- Pasteurization is ideal for outdoor growing or less contaminated substrates like straw and coir.
Detailed Steps: Pressure Cooker Sterilization
Let’s look closer at each step for pressure cooker sterilization, including tips and common pitfalls.
1. Substrate Preparation
The first step is mixing your substrate. For example, for a classic sawdust block:
- 1 kg hardwood sawdust
- 300 g wheat bran
- 1 liter water
Mix until the material holds its shape when squeezed but doesn’t drip water.
2. Filling And Sealing
Pack substrate into autoclavable bags or glass jars. For bags, squeeze out air and seal with a filter patch (lets air in, keeps contaminants out). For jars, use lids with small holes and cover with micropore tape.
3. Sterilization Process
- Place containers in the cooker, leaving space for steam.
- Add water (never let cooker run dry).
- Lock the lid and heat until the gauge reads 15 PSI.
- Start timing once pressure is reached—90 minutes for jars, up to 2 hours for large bags.
4. Cooling And Handling
Let the pressure drop naturally. Opening early can cause substrate to suck in contaminated air. Once cool, move the substrate to a clean area. Open bags or jars only in a still air box or near a laminar flow hood.
5. Inoculation
Add mushroom spawn as quickly and cleanly as possible. Reseal and incubate.
Real-world Example
A grower in a humid climate used sterilized rye grain for oyster mushrooms. By following careful sterilization, they achieved a 95% success rate. One batch failed due to opening jars before cooling—highlighting the importance of patience.
Insider Tip: If you notice a sweet or sour smell after sterilization, your substrate may be contaminated—discard and start over.

Credit: www.reddit.com
Detailed Steps: Pasteurization Techniques
Pasteurization can be done several ways. Here’s a breakdown of the most popular.
Hot Water Pasteurization
- Heat water to 70°C (158°F).
- Submerge chopped straw in a mesh bag for 1–2 hours.
- Stir every 30 minutes to prevent cold spots.
- Drain and cool completely before use.
Steam Pasteurization
- Place substrate in a container with holes at the bottom.
- Fill a pot with water and set the container above, not touching the water.
- Cover and steam for 1–2 hours.
- Let cool before inoculation.
Lime Bath Pasteurization
- Add 1 cup hydrated lime to 20 liters water.
- Soak substrate (usually straw) for 12–24 hours.
- Drain and use immediately.
Cold Water Fermentation
- Place substrate in a bucket of water.
- Cover and let sit 5–7 days. Beneficial bacteria will outcompete contaminants.
- Drain and use.
Real-world Example
A small-scale grower using hot water pasteurization for straw-based substrate saw 80–90% success rates for oyster mushrooms, provided they inoculated within a few hours after draining.
Insider Tip: Pasteurized straw should still feel springy and not waterlogged. Squeeze out excess water before use.
Which Method Should You Use?
Choosing between pressure cooker sterilization and pasteurization depends on several factors:
- Type of mushroom: Gourmet and medicinal mushrooms (shiitake, lion’s mane, etc.) Often require sterilization.
- Substrate used: Grain and manure need sterilization; straw and coir can be pasteurized.
- Scale of operation: Small home projects may not justify the cost of a large pressure cooker.
- Contamination risk: If you’ve struggled with green mold before, sterilization may be worth the extra effort.
Decision Flow
- Are you using grain or manure? Sterilize.
- Is your substrate mostly straw or coir? Pasteurize.
- Growing indoors with high humidity? Sterilize for safety.
- Outdoor beds or log cultivation? Pasteurization is usually enough.
Cost And Equipment Comparison
Understanding the investment needed for each method will help you plan your setup.
| Item | Pressure Cooker Sterilization | Pasteurization |
|---|---|---|
| Initial Equipment | $100–$300 (pressure cooker/autoclave) | $20–$50 (large pot/drum) |
| Running Costs | High (energy, maintenance) | Low |
| Batch Size | Small to medium (limited by cooker size) | Medium to large |
| Skill Level | Intermediate/Advanced | Beginner/Intermediate |
| Safety Concerns | High (steam burns, pressure) | Moderate (hot water) |
Non-obvious insight: Investing in a pressure cooker pays off for frequent growers, but pasteurization is better for those just starting out or growing mushrooms as a hobby.
Safety Tips For Both Methods
Safety is often overlooked, especially by beginners. Here are important tips:
- Pressure cookers must never be opened until all pressure is released.
- Always use gloves and eye protection when handling hot substrate.
- Clean all tools, work surfaces, and hands before touching sterilized or pasteurized substrate.
- If you see or smell contamination (sour, sweet, or musty odors), dispose of the substrate safely—do not attempt to use it.
Pro Tip: Label your containers with the date and type of substrate for easy tracking.
Common Beginner Mistakes And How To Avoid Them
Most failures in mushroom growing trace back to poor substrate preparation. Here’s what to watch out for:
- Rushing the cooling stage: Opening hot containers pulls in contaminated air.
- Uneven heating: Stir substrate halfway through pasteurization.
- Wrong moisture content: Substrate should be damp, not dripping.
- Skipping tool cleaning: Even clean-looking tools can harbor contaminants.
- Inoculating in a dirty area: Always work in the cleanest space possible.
Non-obvious insight: Many new growers blame their mushroom spawn for failures, but often the real cause is contamination from poor substrate prep.
Advanced Techniques And Innovations
Experienced growers may use hybrid or innovative methods to save time and reduce contamination.
Modified Pasteurization
- Some use “super pasteurization” at 85°C for 2 hours, which is almost sterilization but can be done with a simple pot.
- Adding lime or ash to water raises pH, making it harder for contaminants to survive.
Bulk Substrate Sterilization
- For large projects, use a 55-gallon barrel as a giant steam sterilizer. This can handle 20+ substrate bags at once.
- Commercial growers use autoclaves, but these are very expensive.
Pre-packaged Substrate
- Some companies sell ready-to-use sterilized substrate. This is expensive but eliminates most contamination risks.
- Mushroom cultivation science is advancing quickly, with new substrate recipes and methods emerging each year.
Credit: hydrobuilder.com
Troubleshooting: When Things Go Wrong
Even with perfect technique, problems can still happen. Here’s how to diagnose and fix common issues:
Contaminated Substrate
- Green, black, or pink spots mean mold—discard the batch.
- Sour or sweet smell: Bacterial infection—do not use.
- White, fluffy mycelium is normal; yellow or slimy is not.
Slow Colonization
- Substrate too wet or too dry.
- Temperature too low or high.
- Not enough air exchange (especially in sealed bags).
Substrate Turns Slimy
- Overhydration
- Incomplete pasteurization—some bacteria survived and are growing.
Tip: If you lose more than 20% of your batches, review your cleaning and preparation steps.
Environmental And Sustainability Considerations
Both sterilization and pasteurization use energy and water. Here’s how to be more sustainable:
- Use solar-heated water for pasteurization if possible.
- Reuse substrate for compost after harvesting mushrooms.
- Insulate your pots or pressure cookers to save energy.
- Grow mushrooms on local agricultural waste (like straw) instead of buying expensive ingredients.
Non-obvious insight: Pasteurized straw or coir is much easier to compost after use than sterilized grain, which can attract unwanted pests if not handled properly.
Real-life Success Stories And Lessons
Many small-scale growers started with simple pasteurization methods and moved to sterilization as they expanded.
- A hobbyist in California grew oyster mushrooms in pasteurized straw with 80% success in their first year, moving to sterilized sawdust blocks for shiitake with a pressure cooker later.
- An urban farmer in Brazil used lime bath pasteurization with local sugarcane bagasse, achieving reliable yields with minimal contamination.
Lesson learned: Start simple, master the basics, and scale up as your experience grows.
Frequently Asked Questions
What Is The Best Method For Beginner Mushroom Growers?
For most beginners, pasteurization of straw or coco coir is the best choice. It’s less risky, requires cheaper equipment, and is safer to learn. Start with oyster mushrooms, as they handle contamination better.
Can I Sterilize Substrate Without A Pressure Cooker?
You can try oven sterilization or chemical sterilization (with hydrogen peroxide), but neither is as reliable as a pressure cooker. For most home growers, pasteurization is the better alternative if you don’t own a pressure cooker.
How Do I Know If My Substrate Is Contaminated?
Look for unusual colors (green, black, pink), bad smells (sour or sweet), or slimy textures. Healthy mycelium is white and fluffy. If you’re unsure, it’s safer to discard the batch.
How Long Can I Store Sterilized Or Pasteurized Substrate?
Use sterilized substrate within a week if kept sealed and refrigerated. Pasteurized substrate should be used within 12–24 hours for best results, as it can quickly attract contaminants.
What Is The Biggest Mistake In Mushroom Substrate Preparation?
The most common error is not keeping things clean—from your hands to your tools to your work area. Even a small lapse can introduce contaminants, wasting all your hard work.
Growing mushrooms successfully means mastering substrate preparation. Whether you choose pressure cooker sterilization or pasteurization, understanding the science and following careful steps will lead to healthier, more productive crops. Take your time, learn from each attempt, and soon you’ll be harvesting beautiful mushrooms with confidence.