Growing your own shiitake mushrooms on logs is more than just a gardening project. It connects you with a centuries-old tradition, provides healthy food, and can even help the environment. Whether you have a backyard or a small forest patch, this method is both simple and rewarding.
But it’s not just about drilling holes and waiting for mushrooms to pop up. There are steps, choices, and small tricks that make a big difference in your harvest. This guide will take you through every detail of the traditional log method, from choosing the right wood to harvesting your first flush of shiitake.
Many people find the experience surprisingly meditative. Working with logs outdoors, watching the slow changes, and sharing mushrooms with friends adds a personal touch that indoor methods can’t match. Even families with children enjoy watching the process unfold. Plus, it’s a way to connect with nature and learn about fungi, a group of living things often overlooked but important for ecosystems.
Why Grow Shiitake Mushrooms On Logs?
Many people wonder why they should use logs instead of other methods like sawdust blocks or bags. The answer lies in flavor, sustainability, and tradition. Shiitake grown on logs often have richer taste and better texture. The logs can produce mushrooms for many years, reducing waste. This method also avoids the use of plastic and chemicals, making it a favorite for those wanting a natural, eco-friendly approach.
Growing on logs is also cost-effective in the long run. After the first setup, you may get mushrooms each year without buying new materials. For homesteaders, small farmers, and mushroom lovers, it’s a way to grow gourmet food with minimal ongoing cost.
Another advantage is the resilience of the system. Logs are not as sensitive to short droughts or small mistakes as indoor mushroom kits. They can handle a few missed waterings or a change in weather. You don’t need special indoor space or controlled light.
Plus, the logs blend into your garden or woods—they don’t create extra work or clutter.
One detail beginners miss is that log-grown shiitake have a deeper, more “woodsy” aroma compared to block-grown mushrooms. Chefs and foodies often pay extra for log-grown shiitake in markets. If you want mushrooms for cooking, the difference in taste and texture is clear.
Understanding The Shiitake Mushroom Life Cycle
To succeed, it helps to know how shiitake mushrooms grow. The shiitake mycelium (the fungus “body”) spreads through the wood inside the log. This stage, called colonization, is invisible but very important. Only after the mycelium is strong enough will the mushrooms (the fruiting bodies) appear on the outside.
This process can take 6 to 18 months, depending on your local climate and how you care for your logs. Patience is essential. But with each year, the logs should produce more mushrooms, sometimes for up to 4-7 years. Knowing this helps set the right expectations and reduces frustration.
Many beginners expect mushrooms right away, but understanding this life cycle helps avoid disappointment. The mycelium first “digests” the wood, breaking down fibers and storing energy. This hidden phase is when the log is most sensitive to drying out or competing fungi.
After colonization, the fungus waits for the right signals—temperature, rain, or soaking—to send up mushrooms.
A less obvious point is that not all white growth seen on the log is shiitake. Sometimes, wild fungi may try to colonize the log, especially if the wood is too old or has been stored incorrectly. Checking for a pure white, firm layer under the bark or at the log ends is a good sign that your shiitake is winning the race.
Choosing The Right Logs
Not all wood is equal for shiitake mushrooms. Selecting the right type, size, and age of logs is key to good results.
Best Tree Species For Shiitake
Shiitake prefer hardwood logs. The most recommended species include:
- Oak (especially white and red oak)
- Sugar maple
- Beech
- Hornbeam
- Ironwood
- Sweetgum
Avoid softwoods like pine, cedar, or spruce. These often have resins or chemicals that block shiitake growth.
Some regions have other suitable hardwoods. For example, in the southern United States, sweetgum works well and is often available as a byproduct of thinning forests. In Europe, beech is a top choice. Always research which hardwoods grow locally and are easy to obtain.
A small but important detail: even within the same species, logs from healthy, mature trees perform best. Young saplings may have thin bark that dries out too fast or cracks easily. Very old trees can have internal rot or too much competition from wild fungi.
Size And Age Of Logs
The ideal log size is 3 to 8 inches in diameter and 3 to 4 feet long. Thicker logs last longer but are heavy and slower to colonize. Thinner logs colonize faster but don’t produce as many years.
Cut logs from healthy trees during the dormant season (late fall to early spring). This is when sugar content is highest and the bark is tight. Never use rotten, diseased, or very old logs.
A common mistake is using freshly cut logs right away. Wait at least 2 weeks, but not more than 2 months, before inoculation. This lets the tree’s natural anti-fungal defenses fade without letting wild fungi take over.
If you cut logs after the leaves have fallen but before the tree starts growing in spring, you’ll get the best results. If you must wait longer before inoculation, store logs with the cut ends off the ground and loosely cover them to prevent drying.
Preparing Your Logs
Stack your logs off the ground in a shaded, airy spot. Avoid direct sunlight and dry winds. If you must wait longer before inoculating, cover the logs with a tarp but allow air flow. Check for signs of mold or wild mushrooms—discard any logs that show these.
It’s wise to inspect each log carefully. Look for bark that is tight and smooth, not peeling. If you see any small holes or sawdust, it could mean insect activity—avoid these logs. Logs with green shoots, fungus, or a musty smell are not ideal and should not be used.
Gathering Tools And Materials
Before you begin, gather all necessary supplies. This avoids delays and ensures your logs are colonized quickly.
You Will Need:
- Shiitake spawn (either plug, sawdust, or thimble)
- Drill with the right bit (usually 5/16” for plugs, 7/16” for sawdust)
- Hammer or inoculation tool (for plugging holes)
- Wax (cheese wax or beeswax)
- Small brush or wax dauber
- Log stands or pallets (to keep logs off the ground)
- Gloves and safety glasses
Don’t forget buckets for carrying spawn and wax, and old clothes for working outdoors. If you’re working with children, explain tool safety and keep hot wax out of reach.
Types Of Shiitake Spawn
There are three main types:
- Plug spawn: Wooden dowels pre-colonized with shiitake mycelium. Easy to handle and insert.
- Sawdust spawn: Loose sawdust with mycelium. Colonizes logs faster but requires a special tool.
- Thimble spawn: Small “caps” containing mycelium, easy to use but less common.
For beginners, plug spawn is the most forgiving. Sawdust spawn is faster but needs more practice and equipment.
A less obvious tip: If you’re inoculating many logs, sawdust spawn can be much more cost-effective. You get more inoculation points per package, but you’ll need an inoculation tool (sometimes called a “palm inoculator”).
Where To Buy Quality Spawn
Purchase spawn from reputable suppliers. Look for companies that specialize in mushroom cultivation and offer different shiitake strains. Always check for freshness and storage instructions on arrival.
One non-obvious tip: Order spawn as close as possible to your planned inoculation date. Shiitake mycelium loses vigor if stored for many months.
Also, check that the spawn is matched to your climate (warm or cool weather strains). Ask the supplier for advice if you’re not sure. Store spawn in a refrigerator if you need to delay your project, but try not to wait too long.
The Inoculation Process
This is the heart of the traditional log method. Done carefully, it sets your project up for years of harvest.
Drilling The Holes
- Mark your log with a wax pencil or chalk.
- Drill holes 1 to 1.5 inches deep, spaced about 6 inches apart in rows along the length.
- Offset the rows to create a diamond pattern (improves coverage).
A four-foot log typically needs 30-50 holes depending on diameter.
Drilling in a diamond pattern allows the mycelium to spread evenly and colonize the log faster. Keep your drill bit sharp for clean holes, and wear safety glasses to protect your eyes from wood chips.
Inserting The Spawn
- Insert plug spawn into each hole, tap gently with a hammer until flush with the bark.
- If using sawdust spawn, fill each hole using the special inoculation tool and tamp it down firmly.
- For thimble spawn, push the thimble into the hole until snug.
Never leave spawn exposed—work methodically, hole by hole.
It’s important to inoculate logs on a cool, cloudy day if possible, or work in the shade. Mycelium is sensitive to heat and sunlight. If you’re working slowly or have many logs, cover finished logs with a cloth until you can wax the holes.
Sealing With Wax
- Melt wax in a small pot over low heat (do not overheat).
- Brush or dab wax over each filled hole to seal in moisture and block pests.
- Seal any log ends with wax if they show cracks (optional but helpful).
Using food-grade cheese wax is safest. Beeswax works too but is more expensive and can attract wildlife.
A non-obvious tip: If you spill wax, let it harden and peel it up—it won’t harm the log. Some growers use a small turkey baster to drip wax quickly over holes, but a brush works just as well for beginners.
Common Mistakes
- Skipping holes or uneven spacing—leads to patchy colonization.
- Using too little wax—spawn dries out, reducing success.
- Not cleaning drill bits between logs—can spread disease or wild fungi.
It’s worth noting that using too much force when inserting spawn can crack the bark or crush the spawn—be gentle and consistent. Keep your tools clean and organized to make the process smooth.
Incubating The Logs (colonization Phase)
After inoculation, the logs need time for the shiitake mycelium to spread and take over the wood. This is called the colonization phase, and it’s both simple and critical.
Placement And Stacking
- Place logs in a shaded, moist area. Under trees, on the north side of buildings, or under a tarp with good airflow.
- Raise logs off the ground using bricks, pallets, or rails to prevent rot and pest invasion.
- Stack logs in a crisscross (“log cabin”) or lean them upright (“lean-to” style) for good airflow.
If you have many logs, leave a few inches between each for air movement. Avoid stacking in a way that traps heat or restricts rainfall. If you live in a dry climate, mist the area around the logs occasionally to keep humidity up.
Moisture Management
Logs should not dry out. Rain helps, but you may need to water logs in dry periods. A good rule: Logs should feel heavy and damp, but not wet or slimy.
Water logs with a gentle spray, never a hard jet. Soak logs if they become very dry—immerse in water for 12-24 hours, then return them to their stack.
A detail beginners miss: Overwatering can be as bad as underwatering. Soaked logs left in standing water can rot. If you notice the bark becoming soft or falling off, reduce watering and improve airflow.
Timeframe
Colonization takes 6 to 18 months. Thinner logs, warmer climates, and sawdust spawn speed things up. Patience pays off here.
Signs Of Progress
- White patches or streaks may appear at cut ends or under the bark. This is shiitake mycelium—good news!
- No mushrooms will appear until colonization is complete.
If you see green, black, or other colored molds, remove that log from the stack to protect others.
Some growers notice a “mushroom smell” around the logs after several months—a sign the mycelium is active. If you’re unsure, carefully peel back a small piece of bark to check for white, stringy growth (don’t do this too often).

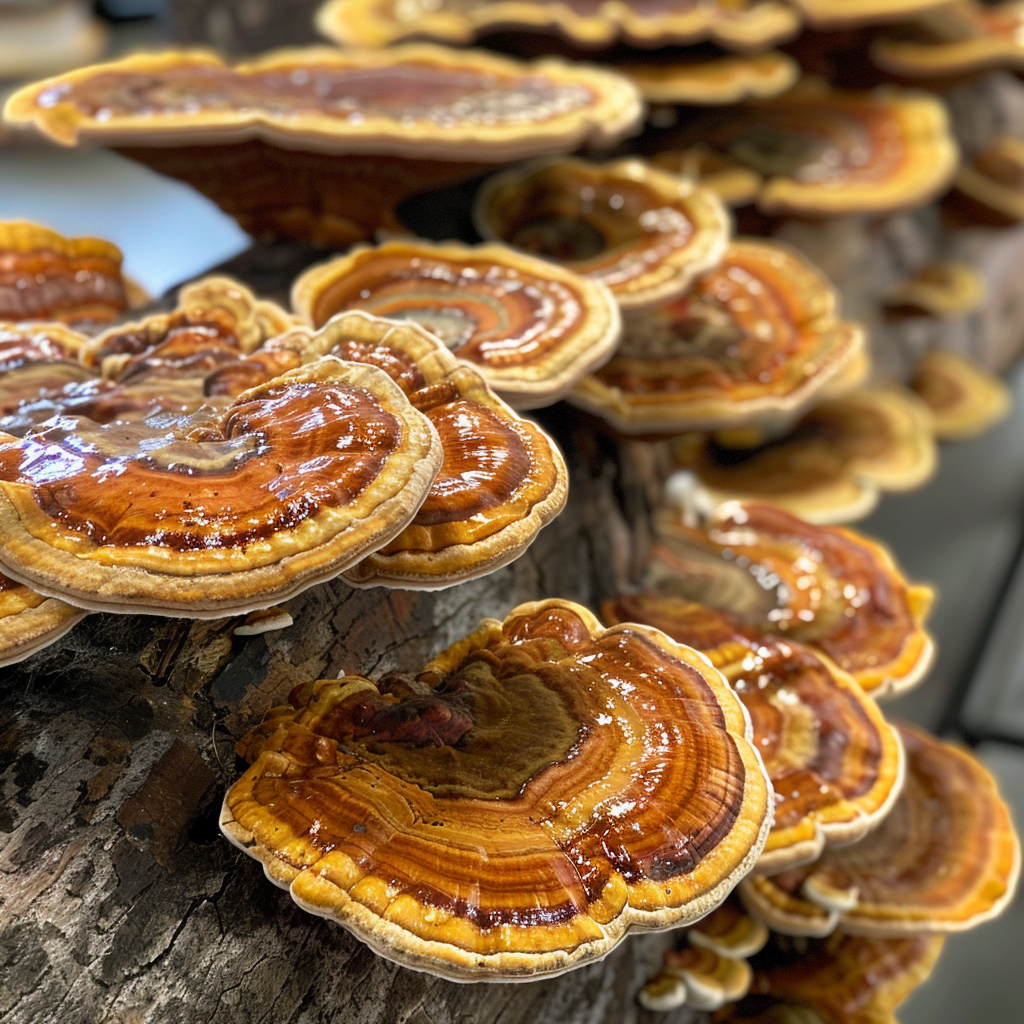
Credit: lykyn.com
Forcing And Fruiting
Once the logs are fully colonized, they will begin to produce mushrooms. There are two ways: natural fruiting and forced fruiting.
Natural Fruiting
If you have patience and the right weather, logs will fruit after heavy rains in spring and fall. This is the easiest method. Just check your logs regularly.
The timing of the first flush can depend on your local climate. In some areas, you may see fruiting after the first big rain of spring; in warmer regions, fall rains may trigger the best flush. Watching the weather and learning from experience helps you time your harvest.
Forced Fruiting
To speed things up and control your harvest, you can force fruiting:
- Soak the colonized log in cold water (bathtub, livestock tank, or clean pond) for 24 hours.
- Stand logs upright or lean them against a support in a humid, shady place.
- Mushrooms should appear in 7-14 days.
Logs can usually be forced every 6-8 weeks. Over-forcing weakens the log, so let it rest between fruitings.
A tip few mention: After soaking, thump the log gently on the ground. This mimics falling branches in nature and can help trigger fruiting.
Harvesting Your Shiitake Mushrooms
- Pick mushrooms when the cap is 70-90% open but edges are still curled.
- Twist and pull gently at the base to avoid damaging the bark.
- Harvest every 1-2 days during fruiting.
A mature log can yield 1-2 pounds of mushrooms per year. With 10 logs, you can expect 10-20 pounds yearly—a bounty for home use.
Practical Tips
- Store fresh mushrooms in paper bags in the fridge for up to 2 weeks.
- Dry excess harvest for storage, or cook and freeze.
To dry mushrooms, slice them thinly and lay them in a single layer on screens or in a dehydrator. Once crisp, store in airtight containers away from light. Rehydrate in warm water before use.
Common Harvest Mistakes
- Waiting too long to pick—overripe mushrooms attract bugs and lose flavor.
- Breaking bark—damages future harvests.
- Ignoring slugs—pick mushrooms early in the morning to beat pests.
If you find slugs or insects, rinse mushrooms gently and harvest more frequently. Broken bark is a common problem if you pull too hard—use a gentle twist instead.
Maintaining And Caring For Your Shiitake Logs
Proper care extends the life of your logs and boosts yield.
Log Placement Over Time
Rotate logs every few months to check for mold, pests, or excessive dryness. Move logs to cooler spots in summer and wind-protected areas in winter.
In very hot weather, logs can dry out quickly. Move them to the shadiest, coolest part of your yard or woods. In snowy climates, logs can stay outside but should be kept off the ground to avoid rot.
Pest And Disease Management
Shiitake logs are tough, but some problems can occur:
- Slugs and snails: Hand-pick or use physical barriers (copper tape, wood ash).
- Squirrels and rodents: Cover logs with wire mesh if they chew the bark.
- Mold: Remove and destroy badly infected logs.
Never use pesticides or fungicides—they can harm the shiitake.
A tip for slug control: Surround the base of log stacks with crushed eggshells or diatomaceous earth. This creates a rough barrier slugs don’t like to cross.
Extending Log Life
Logs will fruit until the wood is mostly decomposed. Larger logs can last 6-7 years; smaller ones 3-4 years. When productivity drops, you can use the old logs as garden mulch.
As logs age, the bark may peel and production slows. Don’t be discouraged—this is natural. Old logs can be stacked in shady parts of your garden to provide habitat for insects and native fungi, continuing their eco-friendly life.
Comparing Log-grown Vs. Other Methods
Some people ask how the traditional log method compares to newer techniques like sawdust blocks or bottles. Here’s a helpful summary:
| Method | Yield per year (per log/block) | Setup Cost | Longevity | Flavor | Eco-friendliness |
|---|---|---|---|---|---|
| Log-grown (traditional) | ~1-2 lbs/log | Low | 3-7 years | Excellent | High |
| Sawdust block | ~3-5 lbs/block | Medium | 3-6 months | Good | Medium |
| Bottle/bag culture | ~2 lbs/bottle | Medium | 3-5 months | OK | Low |
The traditional log method is best for people who want natural flavor, long harvests, and minimal waste. Block and bag methods are faster but need more supplies and produce plastic waste.
Another key difference is the investment of time. Log-growing is more “set and forget,” with work concentrated during inoculation and harvest. Block methods need regular cleaning and replacing. For people with busy lives or those wanting a low-tech, outdoor activity, logs are hard to beat.
Key Factors For Shiitake Log Success
Here’s what really matters for a bountiful shiitake harvest:
- Fresh, healthy hardwood logs—the foundation of success.
- Good spawn quality—old or weak spawn leads to failure.
- Careful inoculation—even spacing, deep holes, full wax coverage.
- Moisture management—logs must never dry out.
- Patience—shiitake are slow but generous in time.
A non-obvious tip: Strain selection matters. Some shiitake strains fruit best in cool weather, others in warm. Ask your spawn supplier about the strain you’re buying.
Another subtle factor is location. Placing logs near a natural water source or in an area with morning dew can increase humidity and boost yields. Avoid windy, sunny spots that dry out logs.
Seasonal Timeline: What To Expect
Here is a typical timeline for growing shiitake mushrooms on logs:
| Month | Activity | Notes |
|---|---|---|
| January – March | Cut and prepare logs | Best time for most hardwoods |
| February – April | Inoculate logs | Do within 2 months of cutting |
| Spring to Fall | Stack and incubate | Keep logs moist and shaded |
| Next Spring/Fall | Fruiting begins | Natural or forced; harvest mushrooms |
| Year 2-7 | Annual harvests | Logs produce until mostly rotted |
This slow, steady rhythm is part of the method’s appeal. It ties your garden to the seasons and rewards patience with years of mushrooms.
Also, by labeling your logs with the inoculation date, you can track which logs are ready to fruit each year and plan your harvests more efficiently. Many growers keep a simple notebook to record yields and problems, which helps with future planning.
Dealing With Common Problems
Even with care, you might face some challenges. Here’s how to handle the most frequent issues:
Logs Not Fruiting
- Check moisture: Logs too dry won’t fruit. Soak logs for 24 hours.
- Colonization not complete: Wait another season, especially with thick logs.
- Wrong strain for climate: Some strains need cooler or warmer weather.
If you’re unsure, gently scratch the log end to check for white mycelium. If you see it, your log is alive and just needs more time or moisture.
Mold Or Rot
- Remove affected logs to protect others.
- Increase airflow and reduce stacking density.
- Use only fresh, healthy logs in future.
Some light green mold can occur, especially in humid climates. If it doesn’t spread, you can scrape it off with a knife. If mold covers the whole log or smells bad, discard it.
Small Or Deformed Mushrooms
- Low humidity or over-aged logs can cause this.
- Water logs during dry spells.
- Replace logs after 4-7 years.
Sometimes, very small mushrooms mean the log is running out of nutrients. Move older logs to a different part of the garden as mulch and start new ones each year for a steady supply.
Insect Damage
- Harvest mushrooms as soon as they’re ready.
- Store logs off the ground.
- Use physical barriers if needed, but avoid chemicals.
If you see small holes in mushrooms, slugs or beetles are likely the cause. Harvesting early in the morning or using traps can reduce losses.
Sustainability And Environmental Benefits
Growing shiitake on logs is one of the most eco-friendly ways to produce gourmet mushrooms. Logs are a renewable resource, and the process recycles small-diameter wood that might otherwise go to waste. No plastic waste, no chemical fertilizers, and the logs eventually become rich mulch for your soil.
This method also supports biodiversity. Shiitake logs can attract beneficial insects and improve the microclimate in your garden. If you have extra logs, they can become homes for native fungi and wildlife after their productive years.
Another often-missed benefit: cultivating shiitake can help manage forests by using thinnings from sustainable logging or storm-damaged branches. It turns “waste” into valuable food. And since shiitake help break down tough wood fibers, they contribute to the natural recycling of organic matter in your landscape.
Using And Storing Shiitake Mushrooms
Fresh shiitake are delicious and versatile. Here are some tips for using and preserving your harvest:
- Cooking: Slice and sauté in butter or oil, add to soups, stir-fries, or pasta.
- Drying: Place in a dehydrator or sun-dry until crisp. Store in airtight jars for a year or more.
- Freezing: Cook mushrooms first, then freeze in meal-sized portions.
Dried shiitake have intense flavor and can be rehydrated for use in broths and sauces.
A useful insight: Dried shiitake are prized in Asian cuisine for their umami flavor—sell or share your extras with friends who love Asian cooking.
For best flavor, trim off tough stems before cooking or drying. If you have more mushrooms than you can use, try making mushroom powder by grinding dried shiitake—this adds a rich flavor to soups and stews.

Credit: antioxi-supplements.com
Getting The Most From Your Shiitake Logs
- Label logs with date and strain. This helps track performance and plan future inoculations.
- Try different strains to extend your harvest window. Some fruit in spring, others in fall.
- Join a local mushroom club. Sharing experiences helps you solve problems faster.
If you want even deeper detail, you can find research and community resources from the North American Mycological Association or other mushroom grower groups.
For more about the science and history of shiitake cultivation, see this excellent resource: Shiitake – Wikipedia.
Frequently Asked Questions
How Long Does It Take To Get Mushrooms After Inoculating Logs?
Typically, shiitake logs need 6 to 18 months to fully colonize before they produce mushrooms. Thinner logs and warmer climates speed up the process, but patience is essential.
Which Hardwood Is Best For Shiitake Mushroom Logs?
Oak is widely considered the best wood for shiitake. Sugar maple, beech, and hornbeam also work well. Avoid softwoods like pine, as they contain resins that block shiitake growth.
Can I Use Logs From My Backyard Trees?
Yes, as long as the tree is a suitable hardwood and the log is healthy, freshly cut, and free from rot or disease. Let logs rest for 2 weeks after cutting before inoculating.
How Many Times Can A Shiitake Log Produce Mushrooms?
A well-cared-for log can produce mushrooms every 6-8 weeks during the fruiting season, for 3 to 7 years depending on size and species.
Do I Need Special Equipment To Grow Shiitake On Logs?
You need some basic tools: a drill, the correct drill bit, spawn, wax, and a hammer or inoculation tool. Most people have these already, and kits are available for beginners.
Growing shiitake mushrooms on logs is a blend of simple tradition and rewarding patience. With careful setup and a little seasonal attention, you’ll enjoy a harvest that brings both flavor and satisfaction—year after year.
Credit: wildspore.farm