Growing Turkey Tail mushrooms on hardwood logs can be a rewarding journey for both beginner and experienced mushroom growers. These unique mushrooms, known for their beautiful, fan-shaped fruiting bodies and health benefits, grow naturally on decaying wood in forests worldwide. When you cultivate them at home, you not only enjoy fresh, organic mushrooms but also help recycle wood waste and support biodiversity in your environment.
Many people are drawn to Turkey Tail mushrooms for their immune-boosting properties, culinary uses, and vibrant colors. But success doesn’t come just by putting spores on logs and waiting. It takes the right materials, timing, and steps to ensure a good harvest.
In this guide, you’ll learn everything you need to know to grow Turkey Tail mushrooms on hardwood logs—from selecting the right wood to troubleshooting common problems.
Let’s explore the practical steps, real-world tips, and expert insights that will help you master this process, even if you’re starting with no experience.
Understanding Turkey Tail Mushrooms
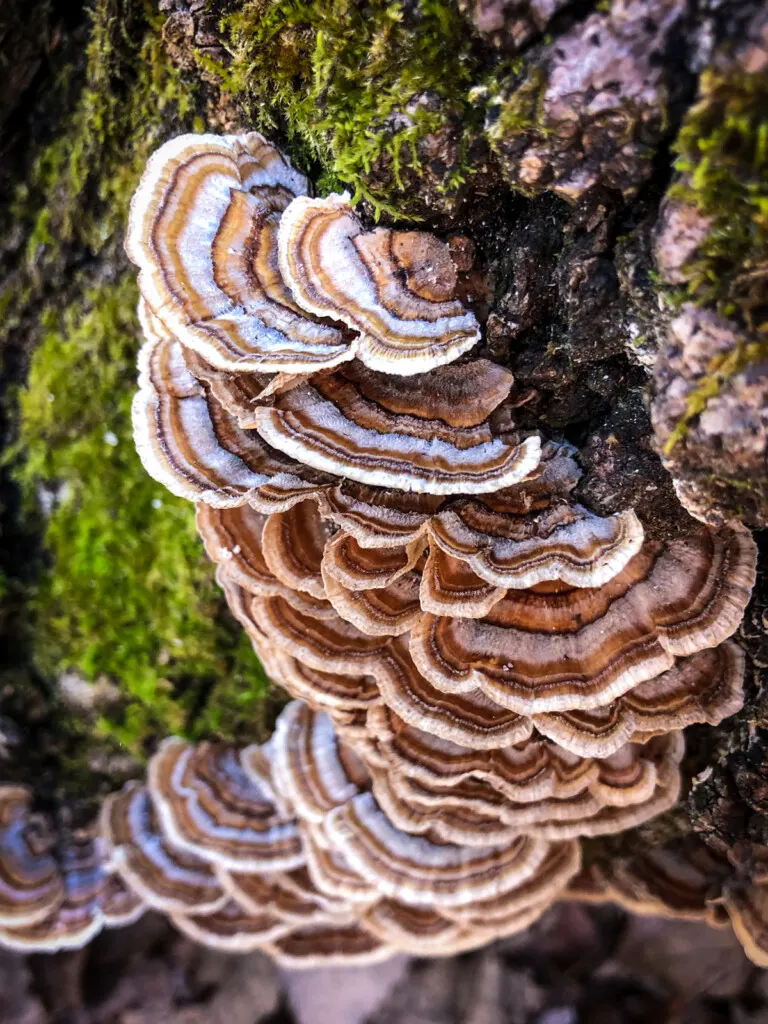
Turkey Tail (Trametes versicolor) is a common polypore mushroom that grows on dead logs and stumps. The name comes from its colorful rings, which look like a turkey’s tail. These mushrooms are famous for their role in traditional medicine and modern research.
They’re packed with polysaccharides that are believed to boost the immune system. While not usually eaten for taste, Turkey Tail is often dried and made into teas or extracts.
Turkey Tail mushrooms are saprotrophic, which means they feed on dead organic matter, especially hardwood. They break down lignin and cellulose, helping wood decay in nature. This is why they’re ideal for log cultivation—they naturally thrive on logs, and the process is close to their wild environment.
What many beginners don’t realize is that Turkey Tail mushrooms are extremely adaptable. They can grow in many climates and tolerate a wide range of temperatures, as long as they have moisture and shade. This makes them a smart choice for first-time growers who want reliable results.
Another unique feature is their resistance to pests compared to some gourmet mushrooms. Their tough texture and bitter compounds mean fewer animals and insects are interested in eating them, which reduces loss.
Even though Turkey Tail is not a gourmet mushroom for the kitchen, its value in wellness and as a natural recycler in your garden is hard to match.
Why Grow Turkey Tail Mushrooms On Logs?
Choosing hardwood logs as your growing medium has many benefits:
- Sustainability: Logs are a renewable resource. You can use storm-damaged trees or pruned limbs.
- Low Maintenance: Once inoculated, logs need very little care compared to other methods like sawdust bags.
- Long Harvest Window: A single log can produce mushrooms for several years.
- Natural Growth: The mushrooms grow just as they do in the wild, leading to high-quality, potent fruiting bodies.
- Outdoor Cultivation: Logs can be placed outside, saving indoor space.
Another advantage is that log-grown Turkey Tail develops stronger medicinal compounds. The outdoor environment, natural wood, and slow growth process are believed to enhance the concentration of polysaccharides and other beneficial molecules. This is important for anyone growing Turkey Tail for health reasons.
However, there are some challenges. Turkey Tail grows more slowly than some gourmet species, and you’ll need to be patient. The logs must be prepared and placed correctly to avoid contamination and ensure steady growth.
A point often missed by new growers is that log cultivation creates a small ecosystem. You’re not just growing mushrooms—you’re creating habitats for insects, birds, and beneficial fungi. Over time, your mushroom logs help enrich your soil as they break down, making your garden healthier overall.
Selecting Hardwood Logs
Choosing the right wood is critical for success. Turkey Tail mushrooms prefer hardwoods because these contain the nutrients and structure they need.
Best Tree Species
- Oak: The top choice, providing a dense, long-lasting substrate.
- Maple: Also excellent, slightly softer than oak but very nutritious.
- Beech: Good for Turkey Tail, with consistent yields.
- Alder: Works well but decays faster.
- Sweetgum, Poplar: Suitable but logs won’t last as long as oak.
Turkey Tail will also fruit on other hardwoods, such as willow or birch, but yields may be lower, and the logs won’t last as long. If you have access to multiple types of hardwood, try using a mix to see what works best in your climate.
Avoid softwoods (pine, spruce, cedar) because the resin and oils can inhibit mushroom growth.
Log Size And Age
- Diameter: 4–8 inches (10–20 cm) is ideal. Thicker logs last longer, but are heavier to handle.
- Length: 3–4 feet (90–120 cm) is standard. This size is easy to move and stack.
- Freshness: Cut logs from healthy trees during late winter or early spring. Wait 2–4 weeks after cutting before inoculation to let natural antifungal compounds fade, but don’t wait more than 2 months, or other fungi may take hold.
If you have logs that are slightly older, you can still use them as long as there is no sign of rot or heavy mold. The bark should be mostly intact, as it helps protect the mycelium from drying out and from pests.
Practical Insights
- Logs from storm-damaged or pruned branches are fine, as long as the wood is healthy.
- Avoid logs with visible mold, rot, or bark damage.
- If you must store logs before use, keep them shaded and off the ground to avoid contamination.
Another tip: If you’re collecting logs from urban areas, be sure they haven’t been treated with chemicals or pesticides. Even small amounts of these substances can harm your mushroom crop.
Preparing Logs For Inoculation
Proper preparation increases your success rate and reduces contamination.
Cleaning And Trimming
- Remove twigs and leaves attached to the log.
- Trim ends if they are jagged or split.
- Clean bark of mud and debris with a stiff brush.
A clean log is essential not only for successful inoculation but also for long-term health of your mushroom colony. Dirt and debris can hold mold spores or bacteria that compete with the Turkey Tail mycelium.
Drilling Holes
To inoculate logs, you’ll insert Turkey Tail spawn into holes drilled in the wood.
- Drill bit size: 5/16-inch (8 mm) is standard for most plug spawn.
- Hole depth: 1–1.5 inches (2.5–4 cm).
- Spacing: Drill holes every 6 inches (15 cm) along the length of the log, in a diamond or spiral pattern. Stagger the holes to maximize coverage.
Example Hole Layout
- For a 3-foot log, drill 30–40 holes.
- Stagger each row to cover as much surface as possible.
Don’t forget to drill holes at both ends of the log. This helps the mycelium spread more evenly and quickly.
Non-obvious Tips
- Mark holes with a marker before drilling to keep spacing even.
- Drill holes on the side and bottom, not just the top. Turkey Tail can fruit from all sides.
If you’re preparing many logs, drilling all at once and stacking them neatly will save time. Wear ear and eye protection, especially if you’re using power tools.

Credit: fieldforest.net
Choosing And Using Turkey Tail Mushroom Spawn
Spawn is the medium where mushroom mycelium is already growing. You’ll need to buy Turkey Tail spawn from a reliable supplier or make your own (advanced).
Types Of Spawn
- Plug Spawn: Wooden dowels colonized with mycelium. Easiest for beginners.
- Sawdust Spawn: Loose, colonized sawdust. Colonizes logs faster but requires a special tool (inoculation plunger).
- Grain Spawn: Not common for log use, but possible for large projects.
Comparison Of Spawn Types
| Type | Ease of Use | Colonization Speed | Tools Needed |
|---|---|---|---|
| Plug Spawn | Very easy | Slow to medium | Drill, hammer |
| Sawdust Spawn | Moderate | Fast | Drill, plunger |
| Grain Spawn | Difficult | Fastest | Special tools |
Where To Buy
Only use spawn from reputable suppliers to ensure purity and disease-free mycelium. Avoid spawn that looks dry, moldy, or has strange colors.
An important but often-overlooked detail is shipping time. Mycelium is alive and sensitive to heat or freezing. If ordering online, plan delivery so your spawn arrives when you’re ready to inoculate and the weather is mild.
How Much Spawn To Use
- Plug spawn: 30–50 plugs per log (one per hole).
- Sawdust spawn: Fill each hole completely.
Using more spawn leads to faster colonization, but costs more.
A non-obvious tip: Leftover spawn can be used to inoculate wood chips or small branches nearby. This can create a “mushroom patch” effect in your garden, increasing your overall harvest.
Inoculating The Logs
This is the most hands-on part of the process. Timing and cleanliness matter.
Step-by-step Inoculation
- Clean Hands and Tools: Wash your hands and wipe tools with alcohol to reduce contamination.
- Insert Spawn:
- For plug spawn: Tap a plug into each hole with a hammer until flush with bark.
- For sawdust spawn: Use the plunger to pack spawn into each hole firmly.
- Seal Holes:
- Melt food-grade wax (cheese wax or beeswax works well).
- Dab wax over each hole to keep moisture in and pests out.
- Also seal any cut ends or injuries in the bark.
Why Sealing Matters
Unsealed holes dry out quickly and may attract insects or mold. Wax creates a barrier so the mycelium can spread inside the log.
Practical Tips
- Use a small paintbrush or old spoon to apply wax.
- If you don’t have cheese wax, unscented candle wax will work in a pinch.
If working outdoors, keep your wax warm in a small pot on a camping stove or slow cooker. This keeps the process efficient and prevents the wax from hardening too soon.
Be sure not to overheat the wax, as it can become dangerous. Heat only until just melted.
Incubating The Logs
After inoculation, logs need time to let the mycelium spread and colonize the wood.
Placement
- Shade: Place logs in a shady, moist area. Under trees or next to a north-facing wall is ideal.
- Ground Contact: Lay logs on the ground or stack them loosely. Some contact with soil helps maintain humidity, but too much can lead to contamination.
- Spacing: Leave room between logs for airflow.
Logs placed in areas with consistent humidity—such as near a garden pond or under a thick tree canopy—tend to colonize more quickly. However, avoid spots with standing water, as this can cause rot.
Stacking Methods
Here are common ways to arrange logs:
- Log Cabin Stack: Logs are stacked in alternating directions for stability and airflow.
- Leaning Teepee: Logs lean against a support, giving good sun and rain exposure.
- On the Ground: Logs are laid flat, mimicking natural fallen trees.
Stacking Comparison
| Method | Pros | Cons |
|---|---|---|
| Log Cabin | Stable, good airflow | Takes more space |
| Teepee | Efficient, easy to water | Can fall over |
| Flat | Simple, natural | Moisture loss on top |
If your region has hot summers, place logs where they get morning sun and afternoon shade. This keeps them warm enough to support growth but cool enough to hold moisture.
Moisture Management
Logs must stay damp but not soggy.
- Water logs with a garden hose or soaker once per week in dry weather.
- Avoid letting logs dry out completely, or mycelium may die.
- Too much rain can wash away nutrients, so some cover is helpful in heavy rains.
For extra dry climates, wrapping logs in breathable garden cloth or placing straw mulch around them helps retain moisture. Don’t use plastic, as it can trap too much water and cause mold.
Incubation Time
- Turkey Tail is slow. It takes 6–12 months for mycelium to fully colonize the log. Patience is key.
How To Check Progress
- Look for white mycelium at log ends, under loose bark, or near drilled holes after several months.
- A sweet, earthy smell is a good sign. Sour or rotten smells suggest contamination.
A less obvious sign of healthy colonization is the presence of small, white “primordia” (baby mushrooms) that sometimes appear in humid weather. Even if these don’t mature, they indicate the mycelium is active.
Fruiting: Encouraging Mushrooms To Grow
Once the mycelium has colonized the log, you can encourage it to fruit.
Signs Of Readiness
- White mycelium is visible on log ends.
- The log feels lighter (mycelium has digested some wood).
- 6–18 months have passed since inoculation.
In some climates, Turkey Tail may fruit naturally after heavy rain, especially in the fall. Keep an eye out for new growth during wet, cool months.
How To Trigger Fruiting
- Shock the Log: Soak in cold water for 12–24 hours. Use a tub, barrel, or stream. This mimics heavy rain, which triggers mushrooms to fruit.
- Return to Shade: Place logs back in their original spot, standing or laying flat.
- Keep Moist: Water logs if weather is dry.
If you don’t have a large tub, laying the logs in a shallow ditch and spraying with water every few hours can also work. The key is to soak the log thoroughly without washing off the wax.
Turkey Tail Mushroom Development
- Small, colorful fans appear on the log surface. These grow larger over 2–3 weeks.
- Fruiting is most common in spring and fall, when temperatures are 50–75°F (10–24°C) and humidity is high.
If you see pale or faded mushrooms, this can mean either too much sun or not enough moisture. Move logs to shadier spots and increase watering.
Harvesting
- Pick Turkey Tail mushrooms when edges are crisp and colors are bright.
- Use a sharp knife or twist gently to remove.
- Harvest regularly to keep logs healthy and prevent pests.
Frequent harvesting encourages more mushrooms to form, as it keeps the log surface open for fresh growth.
Common Problems And Solutions
Even with good preparation, problems can happen. Here’s how to handle them.
1. Contamination By Other Fungi
- Problem: Competing mushrooms, like Trametes species or mold, appear.
- Solution: Remove visible invaders. If log is fully colonized, Turkey Tail will often out-compete them. If contamination is heavy, start with fresh logs.
To reduce contamination, avoid placing logs near compost heaps or piles of decaying leaves. These areas are full of competing fungi spores.
2. Logs Drying Out
- Problem: Mycelium stops growing, log looks dry.
- Solution: Soak logs for 24 hours and keep watered. Consider moving to a shadier spot.
Adding a layer of straw or wood chips under and around logs can help hold moisture, especially during summer.
3. Insect Damage
- Problem: Beetles or slugs eat spawn or young mushrooms.
- Solution: Seal holes well, raise logs off ground, and use physical barriers if needed.
If slugs are a big problem, try sprinkling crushed eggshells or diatomaceous earth around logs as a natural barrier.
4. Poor Fruiting
- Problem: Few or no mushrooms form.
- Solution: Check moisture, shade, and colonization. Try shocking with cold water again. Sometimes logs fruit only after a year or more.
If logs are in a windy spot, they may dry out too quickly. Move them to a more sheltered location.
5. Bark Falls Off
- Problem: Bark peels, exposing wood.
- Solution: Logs may still produce, but yields will drop. Try to keep bark intact during handling.
If bark loss is a recurring issue, try using thicker logs or wood from trees with tougher bark.
Harvesting And Processing Turkey Tail Mushrooms
When your logs finally produce mushrooms, proper harvesting and drying will help you get the most value.
When To Harvest
- Pick Turkey Tail when the fans are fully formed, edges are thin and flexible, and colors are bright.
- Don’t wait too long, or the mushrooms will get tough and dry out.
A less obvious tip: Harvest in the morning when humidity is lower. Mushrooms collected in the afternoon may have more surface moisture, which slows drying and can lead to mold.
How To Harvest
- Use a sharp knife or scissors to cut clusters off the log.
- Be gentle to avoid damaging the bark or disturbing new growth.
If harvesting after rain, let mushrooms dry on the log for a few hours before picking. This reduces the risk of mold during storage.
Cleaning And Drying
- Brush off dirt and insects. Do not wash with water, or they may mold.
- Spread mushrooms in a single layer in a well-ventilated spot.
- Dry at room temperature for 3–5 days, or use a dehydrator at 95–105°F (35–40°C).
If the weather is humid, a fan can help speed drying and prevent spoilage.
Storing
- Keep dried Turkey Tail in an airtight jar or bag, in a cool, dark place.
- Properly dried mushrooms last up to a year.
Check stored mushrooms every month for signs of moisture or mold. If you find any, dry the batch again before using.
Usage
- Turkey Tail is too tough to eat fresh. Use in teas, tinctures, or powdered supplements.
- For tea, steep 2–3 grams of dried mushroom in hot water for 20 minutes.
For a stronger extract, simmer the mushrooms for up to an hour. You can also blend dried Turkey Tail into powder for easy mixing with smoothies or soups.
Maximizing Yields And Log Longevity
To get the best results, follow these extra steps.
Rotate Fruiting Logs
- Move logs to new spots every year to avoid pests and disease.
- Let some logs rest while others fruit.
This rotation helps keep your mushroom “farm” productive and reduces the buildup of soil pathogens.
Add Mulch
- Place mulch or leaves under logs to keep humidity high.
- Avoid thick mulch that holds too much water and causes rot.
Small stones or bricks under logs can also improve airflow and prevent waterlogging.
Monitor Over Time
- Logs usually fruit for 3–5 years before breaking down.
- Replace logs every few years for continuous harvests.
Older logs can be chipped and added to garden beds, where they continue to feed soil microbes.
Advanced Tip: Use Multiple Species
- Inoculate some logs with other mushrooms like shiitake or oyster for variety.
- Keep different species logs separate to avoid competition.
If growing multiple species, label each log with waterproof tags to remember what’s where and track which species perform best in your environment.
Real-world Examples And Insights
Many hobby growers have found success with Turkey Tail, but here are a few insights that often surprise beginners:
- Logs left untouched outdoors can still fruit: If you forget to shock the logs, heavy natural rains may trigger fruiting on their own. Don’t give up if you miss a season.
- Wild Turkey Tail vs. Cultivated: Wild mushrooms often carry more contaminants. Home-grown logs produce cleaner, safer mushrooms with higher potency.
- Stacking logs vertically can save space: In small gardens, standing logs upright (burying ends slightly) still works, though they’ll need more frequent watering.
Another practical observation is that Turkey Tail logs can be decorative. The colorful fans add beauty to shaded garden corners and create conversation pieces for visitors.
It’s also common for logs to produce small flushes in the first year, followed by much larger harvests in the second and third years. This delayed payoff is normal and shows that the mycelium is establishing itself.
Success doesn’t require fancy equipment. With patience and attention to moisture, anyone can harvest beautiful Turkey Tail mushrooms.
Credit: www.thesophisticatedcaveman.com
Safety And Legal Considerations
Before starting, check local regulations about mushroom cultivation, especially if you live in an apartment or urban area. In most places, growing Turkey Tail for personal use is legal and even encouraged as a sustainable practice.
When foraging or selling mushrooms, always confirm identification with an expert. Some look-alike species can grow on similar logs, but Turkey Tail’s distinctive bands and pore surface make it easy to spot.
If you’re new to mushroom identification, join a local mycological society or online group. Sharing photos and asking questions helps prevent mistakes and builds your confidence.
Resources For Further Learning
If you want to dive deeper, explore mushroom cultivation books, local mycology clubs, and reputable online sources. One helpful resource is the Wikipedia entry on Turkey Tail, which covers scientific details, history, and more.
You can also find practical guides and videos from growers around the world, offering tips for your specific climate and resources.

Credit: www.youtube.com
Frequently Asked Questions
What Is The Best Time Of Year To Inoculate Logs?
Late winter to early spring is best. This is when trees are dormant, and the logs have high moisture. The temperature is cool, which slows competing fungi and gives Turkey Tail a head start.
How Long Does It Take To Get Mushrooms After Inoculating Logs?
Most Turkey Tail logs fruit in 6 to 18 months, depending on wood type, climate, and spawn quantity. Patience is important—some logs may take up to two years to produce their first flush.
Can I Grow Turkey Tail Indoors?
While possible, it is not practical for most people. Turkey Tail prefers outdoor conditions, especially humidity and fresh air. Indoor cultivation requires advanced setups to control airflow and moisture.
How Do I Know If My Logs Are Contaminated?
Signs of contamination include unusual colors (green, black, or pink mold), foul smells, or fast-growing fuzzy growths. Healthy Turkey Tail mycelium is white and smells earthy. If contamination is mild, Turkey Tail often out-competes it, but heavy contamination may require new logs.
Are Turkey Tail Mushrooms Safe To Eat?
Turkey Tail is not toxic, but it is very tough and woody. Most people use it in teas or extracts, not as a cooked mushroom. Always confirm identification before use, as some look-alikes exist.
Growing Turkey Tail mushrooms on hardwood logs is a simple, sustainable way to enjoy the many benefits of this remarkable fungus. With careful preparation, patience, and a bit of nature’s help, you can turn ordinary logs into a source of health and beauty in your garden for years to come.