Growing mushrooms outdoors is an adventure that connects you with nature and brings fresh, delicious fungi right to your table. Instead of relying on store-bought varieties, you can cultivate many types of mushrooms in your own backyard, using simple methods that have been practiced for centuries. Outdoor mushroom growing is not just about food—it’s about understanding life cycles, patience, and the small miracles that happen beneath leaves and wood. Whether you have a garden, a small yard, or even a few shaded corners, there are ways to grow mushrooms that fit your space and lifestyle. This guide will walk you through everything you need to know about outdoor mushroom cultivation using beds, logs, and stumps. You’ll find practical steps, expert tips, and real-world examples that make the process clear, even if you’re a total beginner.
Why Grow Mushrooms Outdoors?
Mushrooms are not just a culinary delight—they’re packed with nutrients, including B vitamins, vitamin D, protein, and unique antioxidants. Growing them outdoors is often cheaper and more sustainable than buying them. Unlike vegetables, mushrooms can thrive in areas where sunlight is limited.
Outdoor cultivation methods use natural cycles and less energy, and they can even improve your soil and recycle organic waste.
Another big benefit: outdoor mushrooms are exposed to natural conditions, which can make them hardier and sometimes even more flavorful than indoor-grown varieties. Outdoor beds, logs, and stumps can yield mushrooms for years with minimal effort once established.
Many people also find that outdoor mushroom cultivation encourages them to spend more time outside and observe the rhythms of the seasons. For example, you’ll become more aware of rainfall, humidity, and temperature changes—factors that directly affect mushroom growth. This connection to the environment can be deeply rewarding and makes the process feel almost magical.
A less obvious benefit is that mushrooms can contribute to the health of your whole garden ecosystem. As they break down wood chips and other organic material, mushrooms help return nutrients to the soil, making it richer for other plants.
Some species even help control harmful nematodes or suppress disease-causing fungi in the soil. In this way, growing mushrooms is about more than just harvesting food—it’s about supporting the health of your whole backyard.
Choosing The Right Mushroom Species For Outdoor Cultivation
The first big decision is which type of mushroom to grow. Not every mushroom is suited for outdoor cultivation, and some work better in beds, while others prefer logs or stumps. Here are some of the most popular and reliable species:
- Oyster Mushrooms (Pleurotus ostreatus): Fast-growing, forgiving, and productive. They grow well on logs, stumps, and beds.
- Shiitake (Lentinula edodes): Famous for deep flavor. Best grown on hardwood logs and sometimes stumps.
- Wine Cap (Stropharia rugosoannulata): Also called “garden giant,” these thrive in beds of wood chips and straw.
- Lion’s Mane (Hericium erinaceus): Unique texture and taste. Grows well on hardwood logs.
- Maitake (Grifola frondosa): Also known as “hen of the woods,” excellent on large stumps or logs.
- Nameko (Pholiota nameko): Popular in Japanese cuisine, loves cool, moist outdoor conditions.
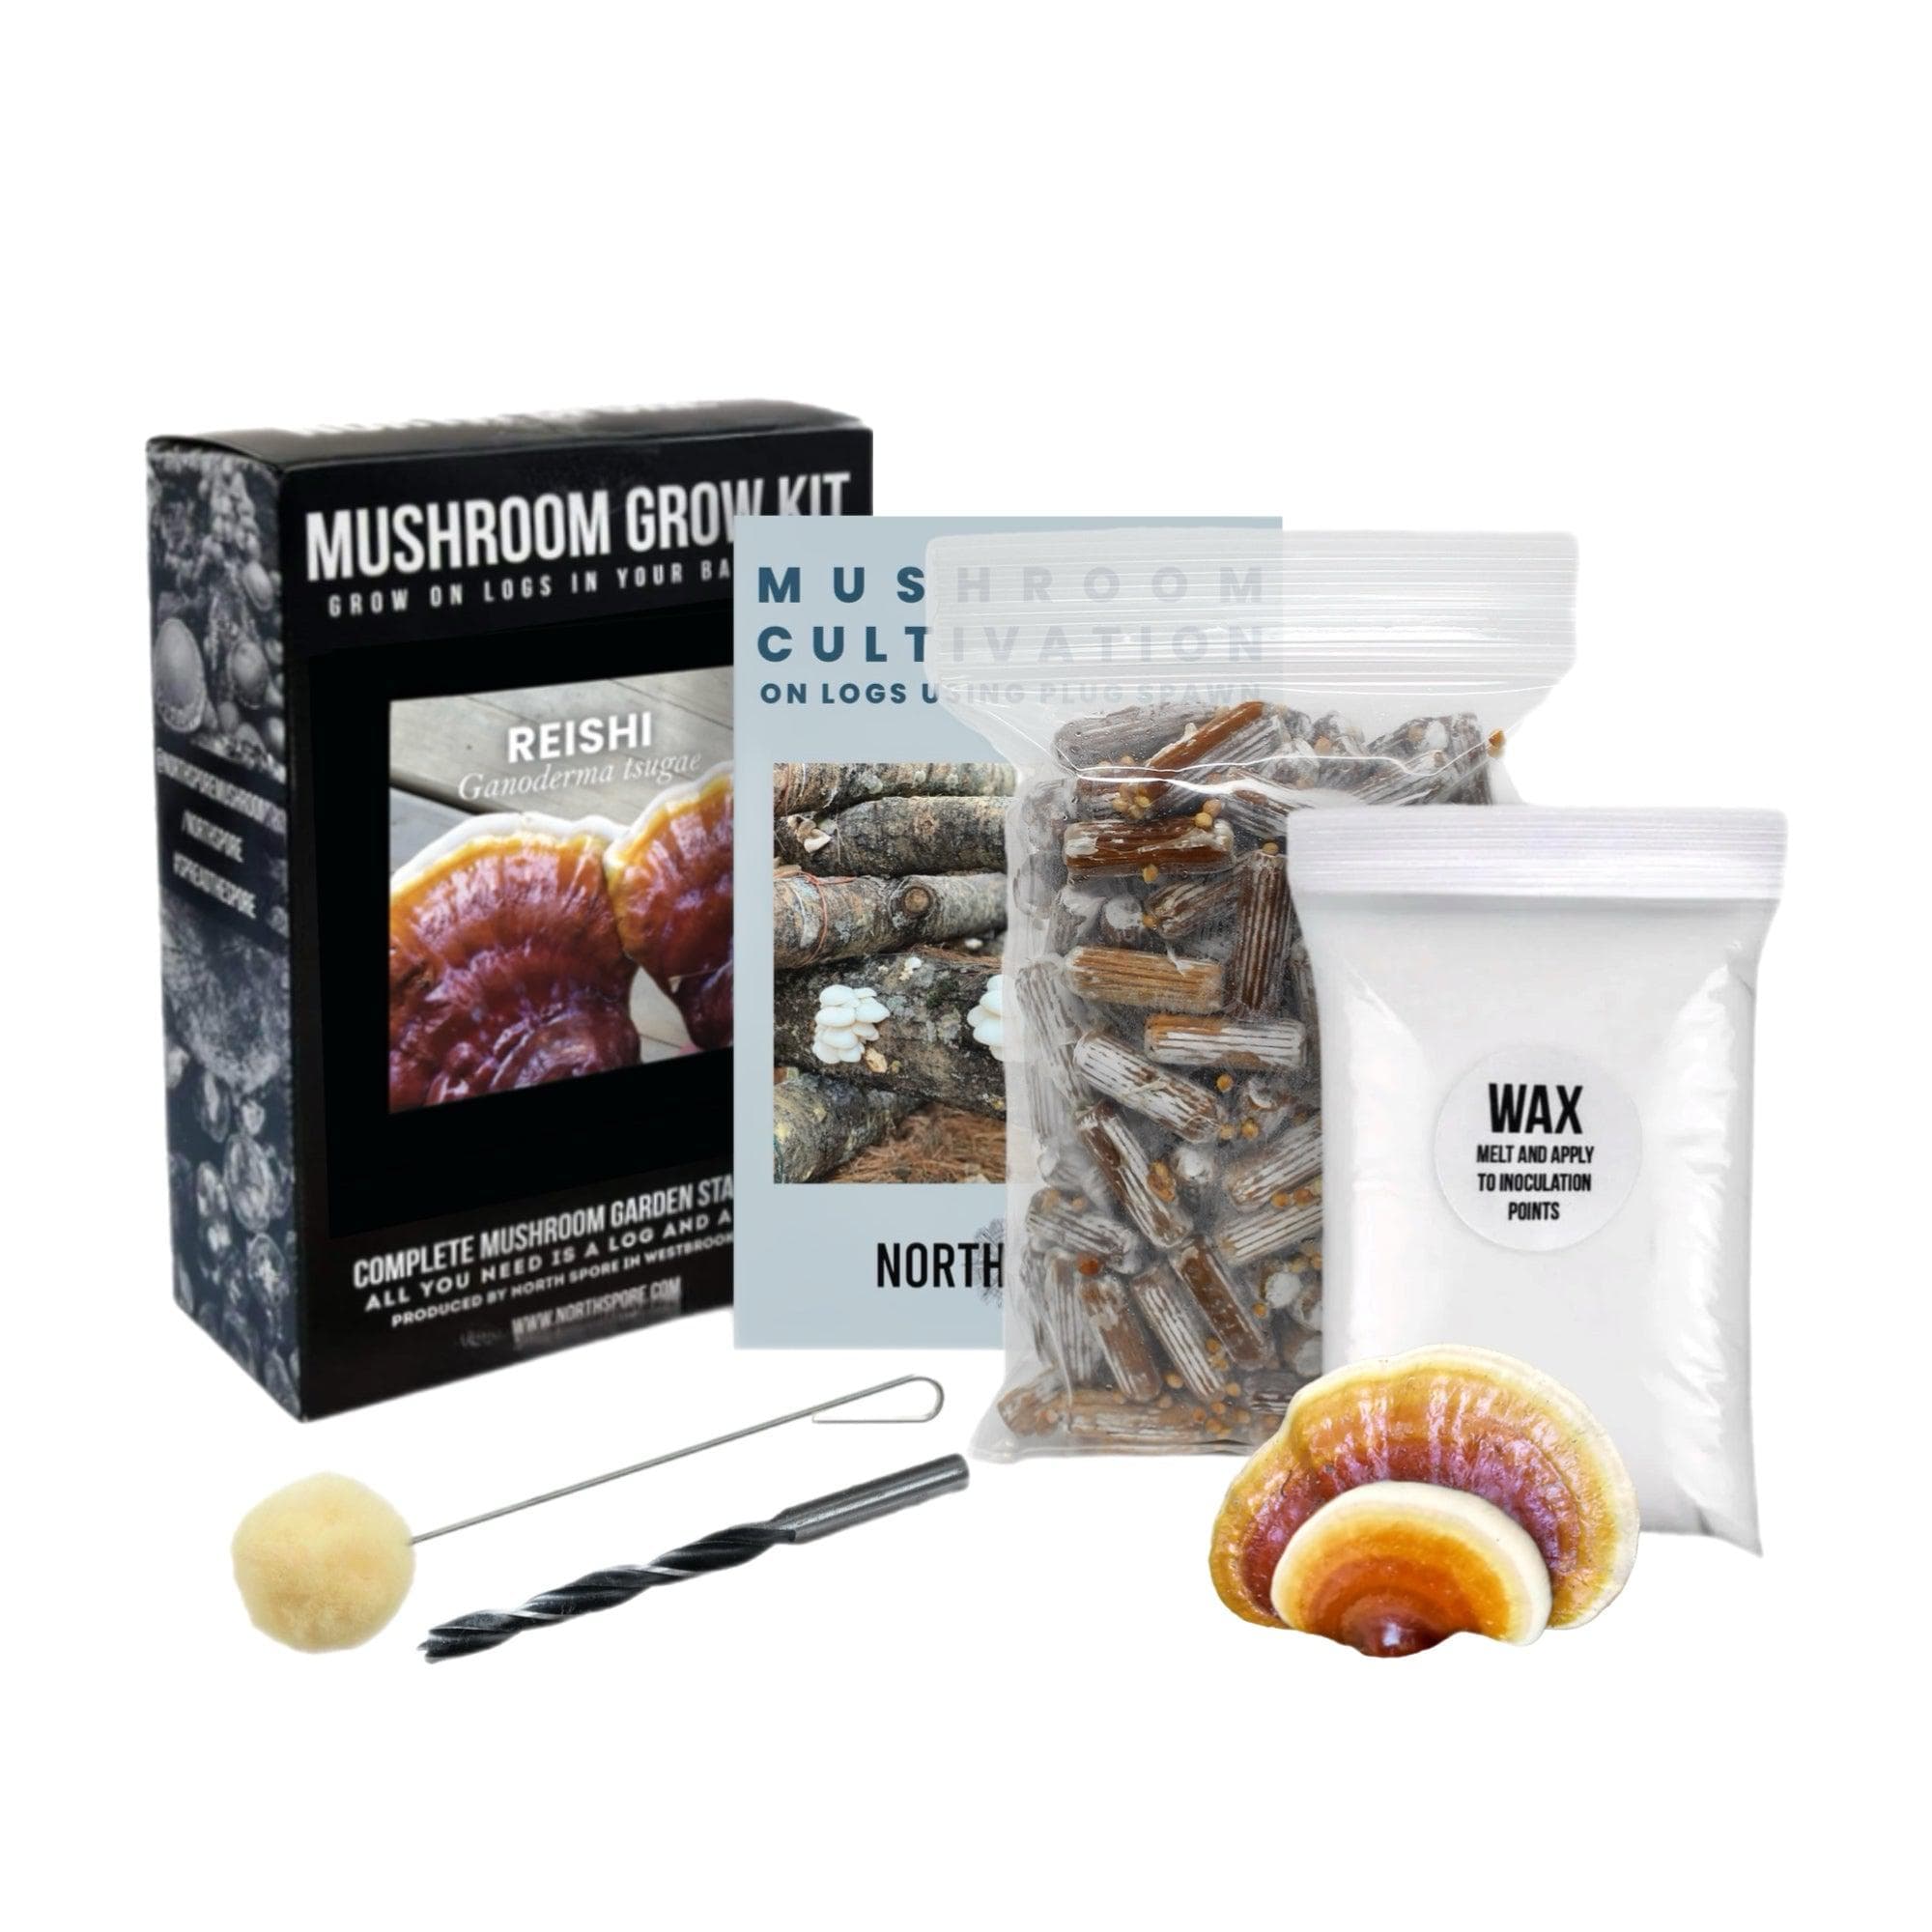
- Reishi (Ganoderma lucidum): Grown for its medicinal properties, usually on logs.
Before you start, check which species are suitable for your climate. Some, like oyster mushrooms, tolerate a wide range of temperatures. Others, such as shiitake, need cooler, moist conditions. Always buy spawn (mushroom seed material) from reputable suppliers.
Also consider your schedule and goals. For example, oyster mushrooms are a great choice if you want fast results and don’t mind a shorter harvest window. Shiitake and lion’s mane take longer to establish but will reward you with several years of harvests.
If you want a mushroom that helps build your soil and looks impressive in the garden, wine cap is a good option.
Beginners often overlook local climate factors when choosing a species. For instance, if you live in a region with hot summers and mild winters, wine cap and oyster mushrooms can handle the fluctuations better than shiitake. On the other hand, if your climate is cool and damp, shiitake or nameko might be more reliable.
A practical tip: start with one or two species, learn their needs, and then expand your variety as you gain experience.
Outdoor Beds: Creating Mushroom Gardens
Outdoor beds are a great method for growing mushrooms if you have some shaded ground and access to wood chips or straw. This approach is especially easy for beginners and works well for oyster mushrooms and wine cap.
Planning Your Mushroom Bed
- Choose a location: Pick a shaded area that doesn’t dry out quickly—under trees, beside a north-facing wall, or in the shadow of a building.
- Size: A common bed is 1 meter wide, 2–3 meters long, and 15–20 cm deep.
- Materials: You’ll need hardwood chips, straw, or a mix. Softwood chips (like pine) don’t work well for most mushrooms.
Try to avoid spots with poor drainage, as standing water can rot the mushroom mycelium. If you have heavy clay soil, consider raising the bed slightly or adding a layer of gravel beneath the cardboard.
Step-by-step Bed Preparation
- Clear the area: Remove grass, weeds, and debris.
- Loosen the soil: Dig the top 10–15 cm to help drainage and root penetration.
- Layer the materials: Start with a layer of cardboard or newspaper to block weeds.
- Add wood chips or straw: Make a 5–10 cm layer.
- Add mushroom spawn: Sprinkle spawn evenly over the chips or straw.
- Repeat layering: Alternate chips/straw and spawn until the bed is full.
- Top with chips/straw: Add a final 5 cm layer to cover the spawn.
- Water well: Keep the bed moist, but not soggy.
For a more productive bed, try mixing straw and chips in each layer. Straw provides quick nutrition, while wood chips last longer and feed the mushrooms over time.
Best Practices And Tips
- Use fresh, untreated wood chips. Old or composted chips may contain other fungi that compete with your mushrooms.
- Water the bed regularly, especially during dry periods. Beds should stay damp but not waterlogged.
- Mulch with straw or leaves to conserve moisture.
Another tip: avoid using leaves from black walnut or eucalyptus, as these can inhibit mushroom growth due to natural chemicals in the wood.
If you’re growing close to other garden plants, keep a border (10–20 cm) between your mushroom bed and vegetable beds to prevent accidental spread of unwanted fungi.
What To Expect
Mushroom beds often take a few months to colonize. Once established, you might see your first mushrooms in the same season, but sometimes it takes until the next spring or fall. Beds can produce for 2–3 years before needing to be renewed.
During colonization, you might see white threads or mats (mycelium) spreading through the chips. This is a good sign and means your mushrooms are establishing themselves. If you see green mold or black spots, remove those patches and add more clean chips.
Example: Wine Cap In Wood Chip Beds
Wine cap mushrooms are known for their large, burgundy caps and rapid growth. A well-maintained wine cap bed can yield several kilograms per year. They also help break down wood chips into rich garden soil.
A gardener in the Midwest, for example, started with a single bed under fruit trees. After the first year, the wine cap mycelium spread into the orchard mulch, producing unexpected harvests and improving soil fertility for the trees.
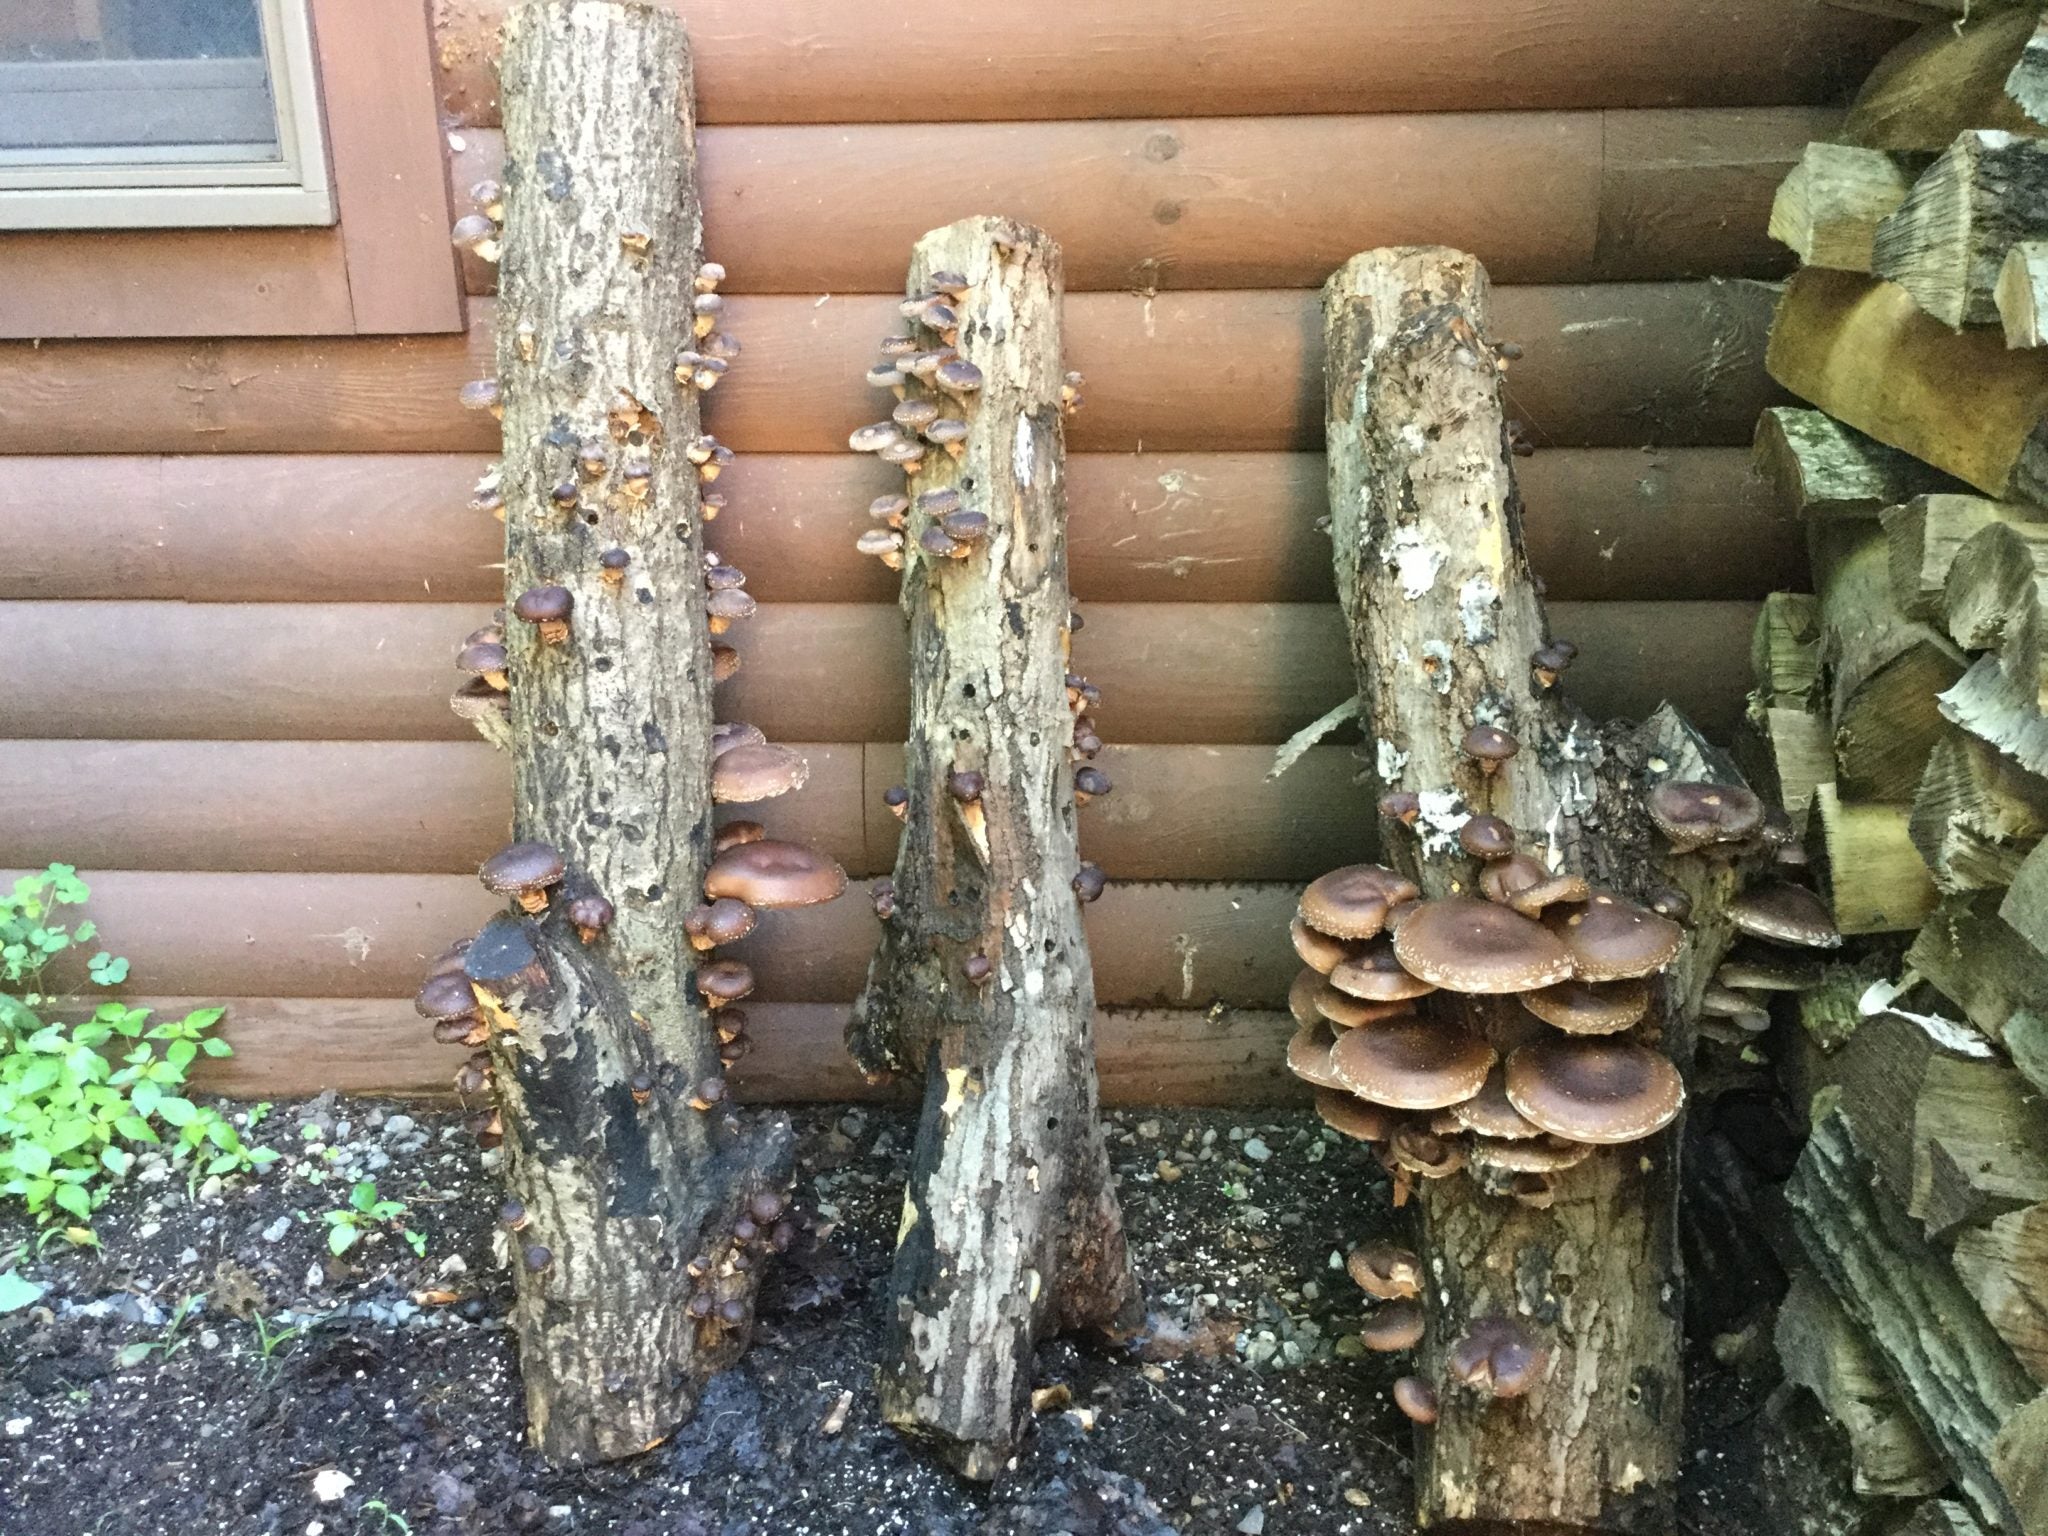
Log Cultivation: The Classic Outdoor Technique
Growing mushrooms on logs is a traditional method that can provide harvests for many years. This technique is popular for shiitake, oyster, and lion’s mane mushrooms.
Selecting The Right Logs
- Tree species: Hardwoods like oak, beech, maple, and alder are best. Avoid conifers (pine, fir) as most mushrooms don’t like the resins.
- Log size: 10–20 cm in diameter, 1–1.2 meters long is common. Logs should be cut from healthy trees during dormancy (late fall to early spring).
- Freshness: Use logs within 1–2 months of cutting. Older logs may be colonized by wild fungi.
For best results, cut logs after the leaves have fallen but before new buds appear in spring. This is when the wood contains the most sugars to feed mushroom mycelium.
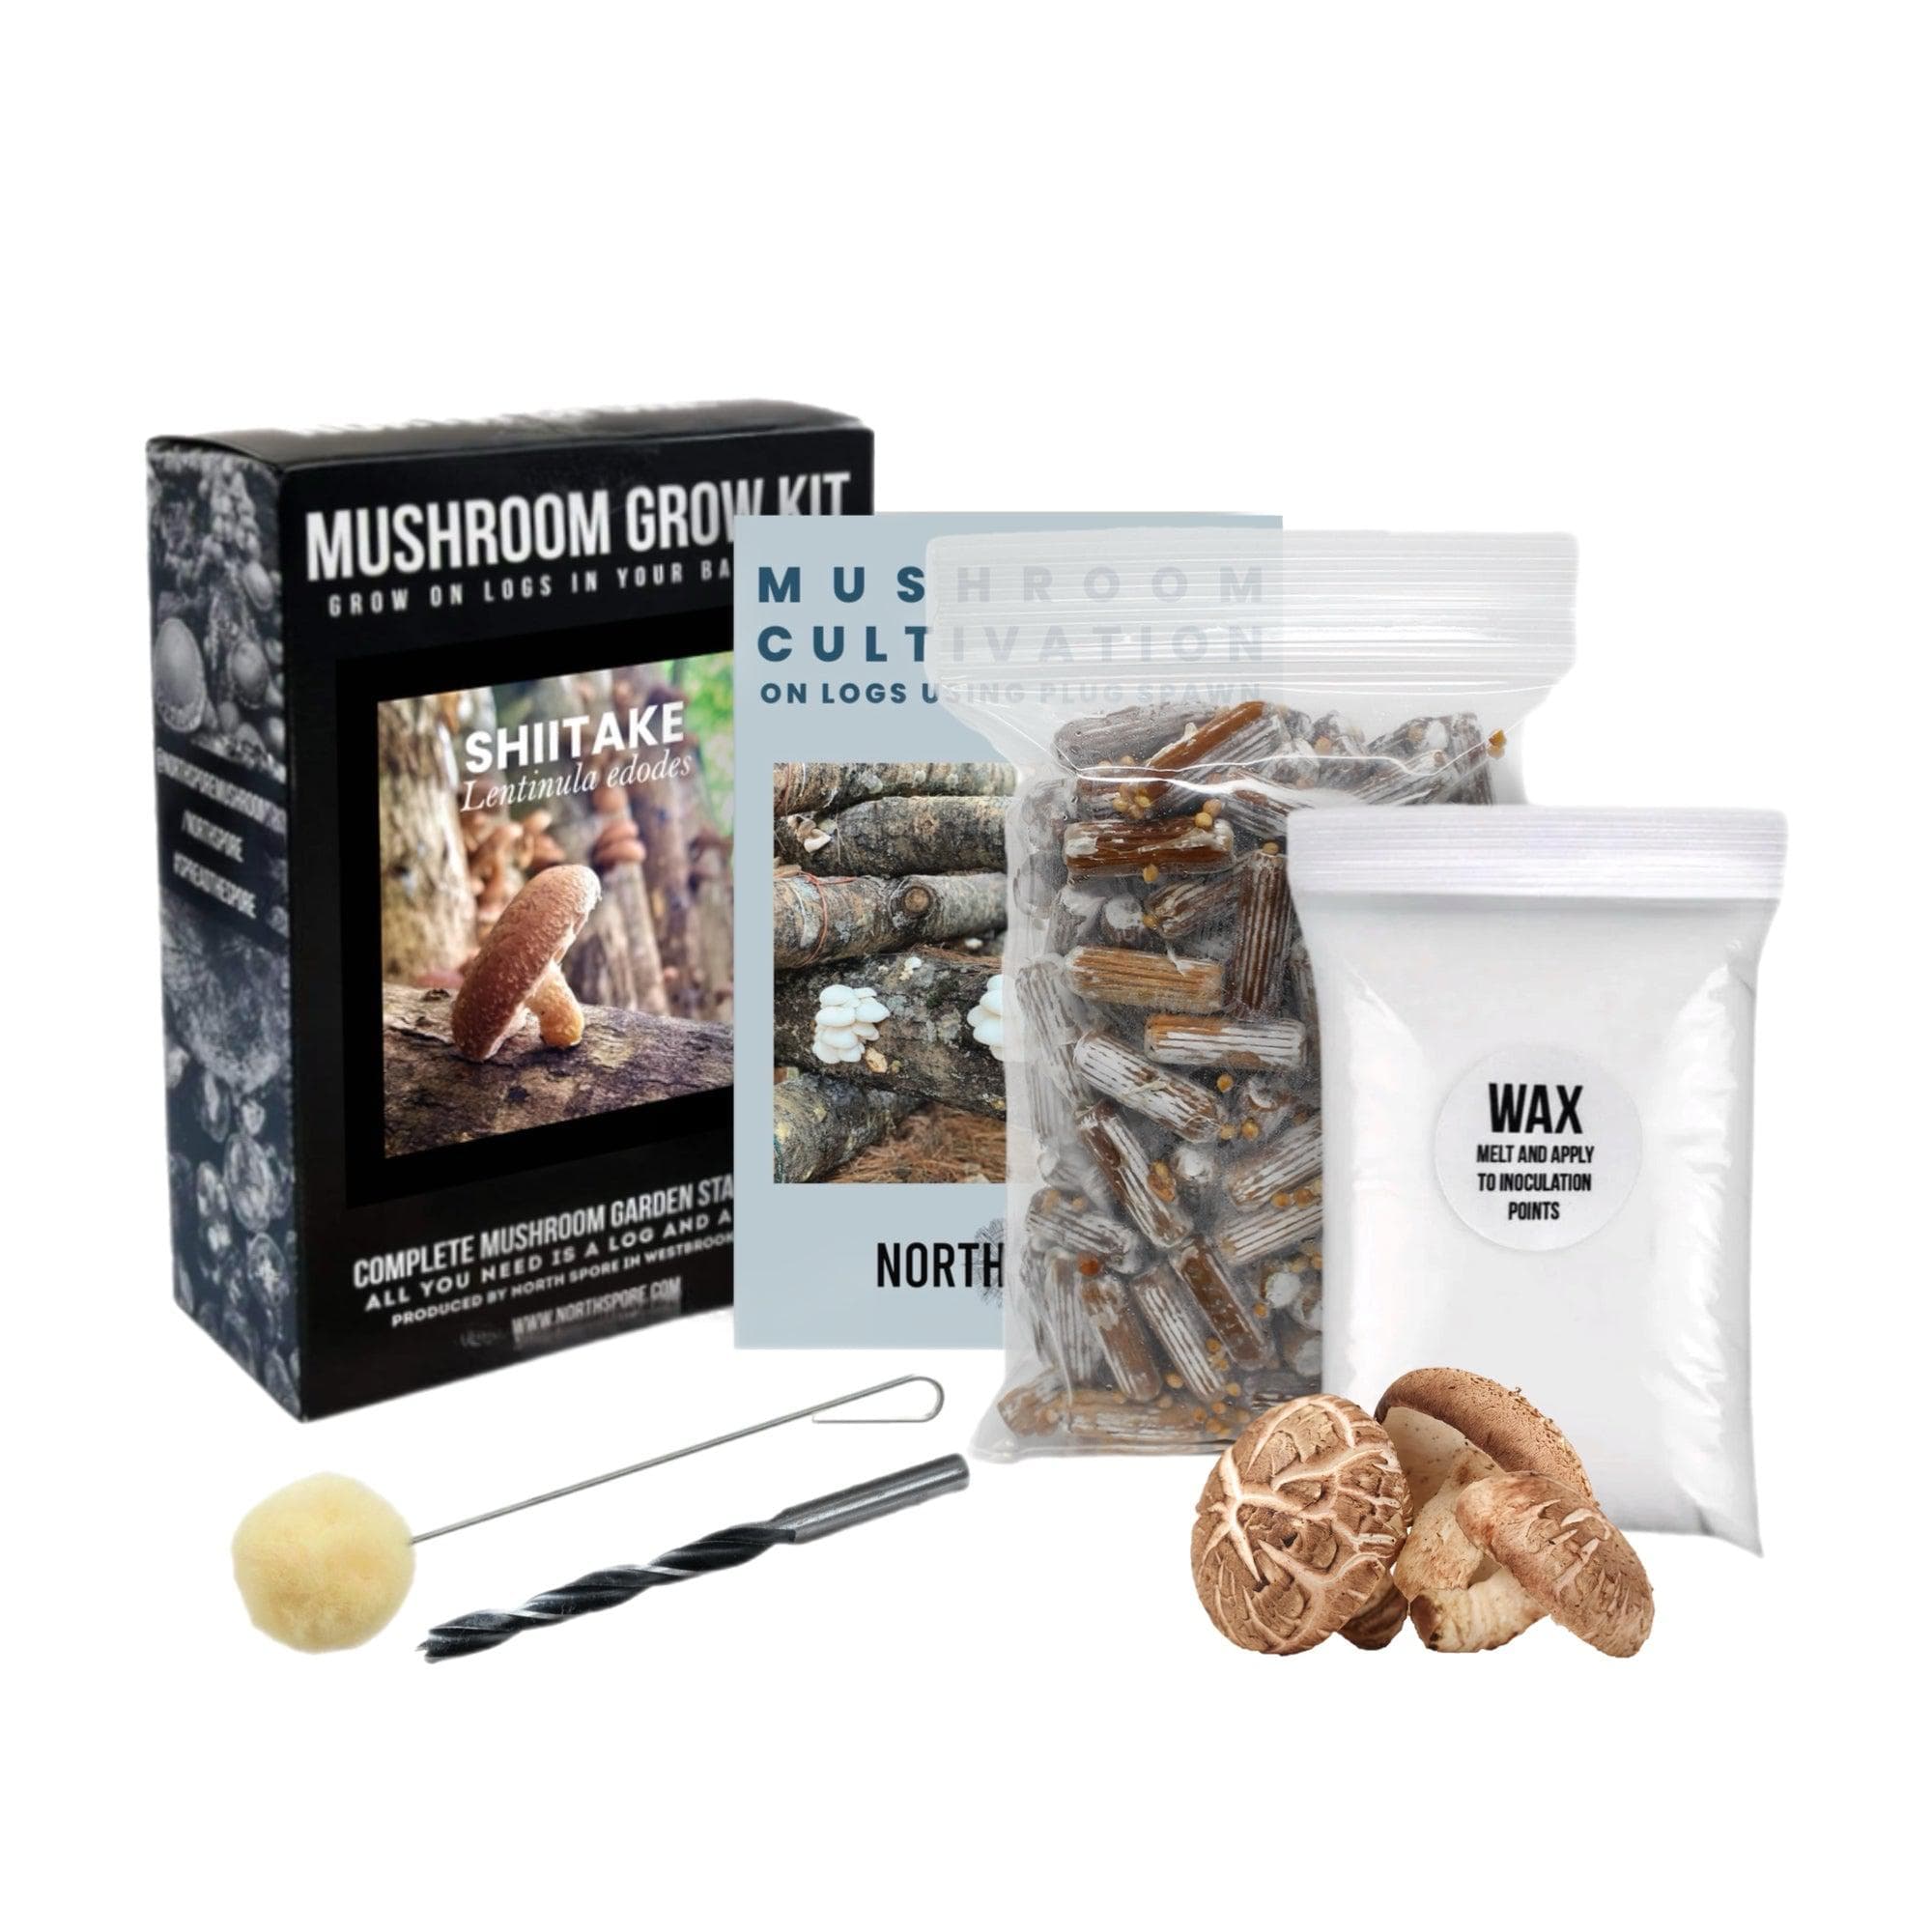
Inoculation Methods
There are two main ways to introduce mushroom spawn into logs:
- Drill-and-plug: Drill holes 15–20 cm apart in a diamond pattern, insert spawn plugs (wooden dowels inoculated with mushroom mycelium), then seal with food-grade wax.
- Totem method: For larger logs, stand them upright, cut into sections, layer spawn between slices, and reassemble.
The drill-and-plug method is best for most home growers, as it gives good control over spawn placement and works for logs of different sizes.
Step-by-step: Drill-and-plug Inoculation
- Drill holes: Use a 7–9 mm bit, 4–5 cm deep.
- Insert spawn: Tap plug spawn or sawdust spawn into each hole.
- Seal holes: Cover with melted cheese wax or beeswax to prevent contamination and moisture loss.
- Stack logs: Place logs in a shaded, moist spot. Lean against a fence or stack “crib-style” with space for air.
- Water regularly: Especially during dry spells.
A tip many beginners miss: after stacking, cover the logs with a breathable tarp or shade cloth for the first few weeks to prevent rapid drying.
Log Maintenance And Fruiting
Logs take 6–18 months to fully colonize. Once ready, mushrooms will fruit after rains or when soaked. One log can produce mushrooms for 3–7 years.
You’ll notice white or tan patches at the ends of logs as mycelium spreads. If a log seems slow, don’t give up—sometimes the process is invisible underground. Patience is part of the reward.
Practical Insight: Why Wax Matters
Sealing holes with wax is not just about moisture. It also keeps out insects and wild fungi. Skipping this step often leads to poor yields, a common beginner mistake.
Another overlooked detail: the type of wax matters. Cheese wax or beeswax works better than paraffin, which cracks easily in outdoor conditions.
Example: Shiitake Logs In Small Gardens
With just 5–10 logs, you can harvest 1–2 kg of fresh shiitake per log each year. Shiitake logs can be “shocked” (soaked in cold water for 24 hours) to encourage fruiting.
One urban gardener tucked six shiitake logs behind a garden shed. By soaking one log each week during spring and fall, she enjoyed fresh mushrooms for salads and stir-fries for years, with very little maintenance.
Stump Cultivation: Turning Tree Remnants Into Food
If you have recently cut down a tree or have old stumps, you can turn them into mushroom factories. Stump cultivation is a low-effort way to grow shiitake, oyster, maitake, and nameko mushrooms.
Choosing And Preparing Stumps
- Best candidates: Fresh hardwood stumps (oak, beech, maple, elm).
- Ideal size: At least 30 cm diameter and 40–60 cm tall.
- Timing: Inoculate within 1–2 months after the tree is cut.
Stumps with bark intact and no rot work best. If your stump has some old, dead wood, cut back to healthy tissue before inoculating.
How To Inoculate Stumps
- Drill holes: Around the cut surface and sides, similar to log inoculation.
- Insert spawn: Use plug or sawdust spawn.
- Seal with wax: Protect from drying out and contamination.
- Mulch around stump: Add leaves or wood chips to keep moisture.
Adding a thick mulch ring (30–40 cm wide) around the stump also helps regulate temperature and moisture, supporting both mushroom growth and beneficial soil life.
Tips For Success
- Shade is important—stumps in direct sun dry out too fast.
- Water during dry periods, especially the first year.
- Be patient: Stumps often take a year or more to fruit but can produce for 3–5 years.
If you notice cracks in the stump, water more often or add extra mulch. Large stumps can be inoculated with multiple mushroom species to maximize harvests.
Non-obvious Insight: Stump Location
Place stumps where you can observe them easily. Slugs, squirrels, and other animals love mushrooms, so regular checks help you harvest before pests do.
Some growers create a “mushroom corner” by arranging several stumps and logs in a shady spot, creating a mini-ecosystem that supports birds and insects as well.
Comparing Beds, Logs, And Stumps
Each method has its own strengths and ideal uses. Here’s a side-by-side look at the main factors:
| Method | Best for Species | Setup Effort | Time to First Harvest | Harvest Duration | Space Needed |
|---|---|---|---|---|---|
| Beds | Wine Cap, Oyster | Low | 3-8 months | 2-3 years | Garden patch |
| Logs | Shiitake, Lion’s Mane, Oyster | Medium | 6-18 months | 3-7 years | Shady corner |
| Stumps | Maitake, Nameko, Shiitake | Low | 8-18 months | 3-5 years | Where tree fell |
When choosing a method, think about your available time and resources. If you want a quick start and don’t mind refreshing the bed every few years, beds are easiest. Logs take more effort up front but reward you with years of harvest.
Stumps are the least work if you already have them in your landscape.
Credit: northspore.com
Spawn: The Key To Success
Spawn is the “seed” for mushrooms—it’s material colonized by mushroom mycelium. You can buy it as sawdust, grain, or plugs. Using high-quality spawn is critical. Cheap or old spawn often leads to failure.
- Sawdust spawn: Best for beds and logs. Spreads quickly, but must be used soon after arrival.
- Plug spawn: Wooden dowels. Easy to handle, great for logs and stumps.
- Grain spawn: Fast colonization but more easily contaminated, usually for indoor use.
Order spawn from trusted suppliers and store it cool until use.
For outdoor growing, sawdust spawn is usually the most economical and versatile. It can fill irregular spaces in beds and logs and is easy to spread evenly. However, plug spawn is less messy and can be stored longer if you’re not ready to inoculate all at once.
A useful tip: when your spawn arrives, check for signs of healthy mycelium—white, fluffy, and evenly spread. If you see patches of green, black, or strange smells, don’t use that spawn.
Site Selection And Microclimate: Getting Conditions Right
Mushrooms are picky about their environment. They need moisture, shade, and the right temperature.
What Mushrooms Need
- Shade: Direct sun dries out beds and logs. Under trees, north-facing walls, or shaded garden areas work best.
- Moisture: Mushrooms need humidity. Regular watering is essential, especially during dry spells.
- Protection: Strong winds or heavy rain can damage developing mushrooms. A sheltered spot is ideal.
Creating A Microclimate
If your yard is very sunny or dry, you can help by:
- Mulching heavily with straw or leaves.
- Building a simple shade cover with cloth or old fencing.
- Grouping logs or beds near water features (ponds, rain barrels) to boost humidity.
You can also create a windbreak using shrubs or a garden fence. This helps keep moisture in the air around your beds and logs.
Non-obvious Tip: Avoid Slopes
Mushroom beds and logs placed on slopes often dry out too quickly. Flat, low spots hold moisture better and produce more mushrooms.
If your only option is a slope, dig shallow terraces and mulch heavily to help retain water.
Credit: www.fungially.com
Watering And Maintenance: Keeping Your Mushrooms Happy
Outdoor mushrooms need less daily care than vegetables, but they do require some attention.
Watering
- For beds: Water deeply 1–2 times per week if no rain. Soil and chips should stay damp.
- For logs: Soak logs with a hose during dry periods. Soaking logs in a tub or kiddie pool for 12–24 hours can trigger fruiting.
- For stumps: Water the stump and surrounding soil/mulch.
In very hot or dry climates, misting in the morning and evening helps prevent rapid evaporation.
Checking Progress
- Look for white threads (mycelium) spreading through chips, logs, or stumps. This means your mushrooms are growing.
- Watch for mushrooms after rain, especially in spring and fall.
If you notice the mycelium disappearing or turning brown, check your watering schedule and look for pests.
Common Problems And Solutions
- Dry beds/logs: Water more often or increase mulch.
- Mold or strange fungi: Remove any odd growths and watch for contamination.
- Slugs/insects: Use barriers (copper tape, diatomaceous earth) or harvest mushrooms early.
Some growers use beer traps or hand-pick slugs early in the morning. You can also try placing boards near beds; slugs hide under them during the day and are easy to collect.
Harvesting Outdoor Mushrooms
The moment you see fresh mushrooms popping up is exciting. Proper harvesting helps your patch stay productive.
When To Harvest
- Pick mushrooms when caps are fully formed but before they flatten out and begin to drop spores.
- With shiitake and oyster, twist or cut at the base.
- Wine caps are best harvested when caps are firm and edges are still rolled.
Harvesting at the right time not only gives the best flavor but also prevents pests from finding your mushrooms first.
How Much To Expect
A well-established bed or log can yield several kilograms per season. Harvests often come in flushes—several mushrooms at once, then a break, then more.
If you’re consistent with watering and maintenance, your harvests will increase each year as the mycelium matures. For example, a 2-meter wine cap bed can produce over 5 kg in its best year.
Storing And Using Mushrooms
- Clean gently with a brush or damp cloth.
- Store in paper bags in the fridge (not plastic—mushrooms need to breathe).
- Many mushrooms can be dried or frozen for later use.
If you have a big harvest, slice and dry mushrooms in a food dehydrator or low oven. Dried mushrooms store for months and add rich flavor to soups and sauces.
Table: Average Yields By Method And Species
| Species | Method | Average Yield (kg/year) |
|---|---|---|
| Wine Cap | Bed | 2–5 |
| Oyster | Log | 1–3 |
| Shiitake | Log | 1–2 |
| Maitake | Stump | 0.5–1.5 |
Credit: northspore.com
Expanding Your Mushroom Patch
Once you succeed with one bed or a few logs, it’s easy to expand. Each year, add new logs or refresh your bed with more chips and spawn. Over time, your backyard can become a rich ecosystem for mushrooms—and for beneficial insects, birds, and other wildlife.
Some growers even use spent mushroom beds as garden compost, improving soil health and reducing waste.
As your confidence grows, experiment with new species or mix several mushroom types in one area for continuous harvests through the seasons. With time, you’ll develop a sense for what works in your specific microclimate.
Safety And Troubleshooting
Mushroom growing is generally safe, but a few points are critical:
- Only eat mushrooms you grew from reliable spawn. Wild mushrooms can be toxic.
- If you see unfamiliar fungi, don’t eat them.
- Wear gloves when handling logs or stumps, especially if you have allergies.
- If a bed or log stops producing, check for moisture problems, contamination, or exhausted substrate.
Never let children or pets harvest mushrooms unsupervised. When in doubt, consult local experts or mycological societies.
Advanced Tips For Higher Yields
- Inoculate logs of different tree species to spread out harvest times.
- Use shade cloth or natural windbreaks to protect from extreme weather.
- For large beds, mix hardwood and straw to balance nutrition and water retention.
- Add a light misting system for hot climates.
Another secret to success is rotating your growing areas. After a few years, move your beds or logs to a new spot to avoid buildup of pests or diseases.
Sustainability And Ecological Benefits
Outdoor mushroom cultivation isn’t just for food. It’s also a way to recycle woody debris and improve soil. Mushrooms break down tough cellulose and lignin, returning nutrients to your garden. Some species, like wine cap, even suppress plant diseases and boost beneficial soil microbes.
If you’re interested in permaculture or regenerative agriculture, growing mushrooms is a perfect fit. They turn yard waste into delicious food and better soil.
For more in-depth information about sustainable mushroom growing, visit the Wikipedia page on mushroom cultivation.
Frequently Asked Questions
How Long Does It Take To Grow Mushrooms Outdoors?
Most outdoor mushrooms take several months to a year to fruit after inoculation. Oyster and wine cap in beds can fruit in 3–8 months. Shiitake on logs often needs 6–18 months. Stumps may take up to a year or more.
Patience is key, but the wait is worth it.
Can I Use Any Type Of Wood For Logs And Stumps?
No. Most edible mushrooms prefer hardwoods like oak, beech, maple, or alder. Avoid softwoods such as pine or cedar—these contain resins and chemicals that slow or stop mushroom growth. Always use wood from healthy, recently cut trees.
How Do I Know When Mushrooms Are Ready To Harvest?
Harvest when the caps are fully opened but before they start to flatten and release spores. For shiitake, the cap edge should still be slightly rolled. Wine cap and oyster mushrooms are best when young and firm. Overripe mushrooms lose flavor and can attract pests.
What If Wild Mushrooms Appear In My Bed Or On My Logs?
Never eat wild mushrooms unless you are 100% certain of their identity. Remove any unknown fungi to reduce competition. Only harvest mushrooms you inoculated with certified spawn. When in doubt, consult a local mycologist or extension service.
Can I Grow Mushrooms Outdoors In Hot Or Cold Climates?
Yes, but you need to pick the right species and time your inoculation. Oyster mushrooms tolerate both cool and warm weather. Wine cap does well in temperate climates. Shiitake needs cool, moist conditions. Use extra mulch or shade in hot areas, and insulate beds in cold climates.
Growing mushrooms outdoors is both art and science. With a little patience and the right techniques, you’ll discover a new world of flavors and experiences waiting in your own backyard. Whether you choose beds, logs, or stumps, the rewards go far beyond the harvest—they’re about learning, sharing, and becoming part of nature’s hidden cycles.